Wednesday, December 30, 2020

2020 In Review

Looking back on 2020, it seemed to me I did more planning, fretting, and "getting ready to get ready" than I did any doing. But that isn't necessarily true. Despite, or perhaps because of,  the extraordinary circumstances of 2020, we accomplished a good bit on Gardens of Fenwick. In roughly chronologic order here's what we got done:

Name Boards 


New Hinged Tiller


Hand-painted Registration Numbers


New Running Rigging


New Splicing Skills: Soft Shackles and Continuous Loops


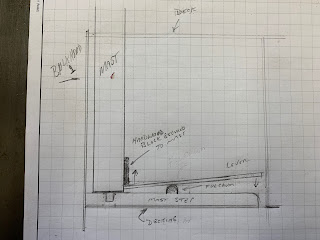
Main Mast Lever Lift (Concept drawing. Seems I don't have an as-built-and-installed photos)


Boat Stands


Lazy Jacks


Mizzen Mast Slot & Plug


SUP Paddles


Two-Piece Kayak Paddle


Outboard Seats


"Front Row" Viewing Platform (at the west side of our place) and Two (newly built) Adirondack Chairs


Les Cheneaux Islands Get Away


Stove Box


Cooking & Baking Experimenting: Taking inspiration from the Great British Baking Show, we tried new recipes for Breads and Clangers. From exploring the Internet, we've begun playing with Curries. And in a moment of weakness, I decided to bake Fruitcake, which turned out nicely.

We are looking forward to 2021! 


Monday, December 7, 2020

Book Stack

Small Craft Advisor has been sharing photos of readers' collections of boat related books. Thought I'd share my Stack with SCA but due to 'technical difficulties' I wasn't able to attach a photo to an email to SCA. 

So, here it is: my Book Stack:


Not as large a collection as some - but I forgot to include my Swallows & Amazons series and Good Little Ship (the story of Arthur Ransome's own boat). 

That thicker black book near the bottom of the stack is Dutton's Navigation and Piloting, acquired when I attended the USCG Academy in the late 60s. When I left the Academy, for some inexplicable reason, I kept Dutton's and left Bowditch's The American Practical Navigator. Over the years I've thought about that choice - and wish I had both books.


Tuesday, December 1, 2020

Stove Box?

 Whatever happened to the stove box I described in over a month ago? 

It has been finished. Nothing great about it, just a simple, functional, plywood box to hold a camp stove, a base for the stove and a couple propane cylinders. 


Some refinements to think about over the winter months: wind screens and a tie-down to hold it in place while underway. 

Shouldn't have taken 4-and-a-half weeks to complete.

Monday, November 9, 2020

Mistakes

Mistakes... I've made a few...

Mistakes are often bad, and sometimes they are life-threatening or career-ending. I'm not talking about catastrophic types of mistakes. 

Sometimes mistakes are just annoying and pretty much harmless. Sometimes simple mistakes can cascade into a series of mistakes, increasing the annoyance and interfering with progress. For example, yesterday, while changing the blade in my table saw...

  • Mistake #1: Not keeping the base of the table saw clean of sawdust. 
  • Mistake #2: Dropping the retaining washer into the sawdust.
  • Mistake #3: Trying to use a magnet to retrieve the washer.
  • Mistake #4: Setting the magnet on top of the cast iron saw.

So, to set things right, I had to figure out how to get the magnet off the table (success involved a 4x4 and a 5-lb sledge hammer), find the washer, install the blade (without repeating Mistake #2!), and clean out the base of the table saw.

I got it all done but the series of mistakes took up an inordinate amount of time. Catastrophic? No. Annoying? Yes. Interfering with the project at hand? Yes. 

Sometimes, though, you get to laugh at yourself - and that's a good thing.

Thursday, October 29, 2020

Galley Gear and Stove Boxes

Thought about a new camp stove, new cookware & dishes and an elaborate Galley Box to hold it all and a bunch of provisions.  But, we are new to boat camping and, as fun as shopping can be, we want to figure things out before such a spending spree. What we think we need/want for starters is a way to boil water and prepare simple one-pot meals.

We have a two-burner propane camp stove that works well but takes a lot of space. We have a one-burner propane camp stove that works well but seems too larger to stow nicely... except that it breaks down into three components and doesn't need a huge amount of storage space. 

We have a 9" x 12" x 13" plywood box I built and used years ago for camp dishes, utensils, a small cook pan, and a kettle.

This box is a good start, but I soon realized the single burner stove, even broken down, takes up enough of the box that we need something more for the other gear.


But, when I set about making a mock-up it occurred to me that I have a box that fits the cooking/eating gear pretty well. So, I shifted the focus a bit and mocked up a box just for the stove.


The photo shows the stove box mock-up sitting on top of the gear box but that is just one possibility. 

The interior dimensions for the stove box are pretty well settled. Construction details need to be worked out. I've got some 1/4" Baltic Birch ply on hand so the new stove box should be completed soon. Using this ply, I'll paint it to match the interior color of Gardens. Maybe I'll paint the gear box, too.


Sunday, October 18, 2020

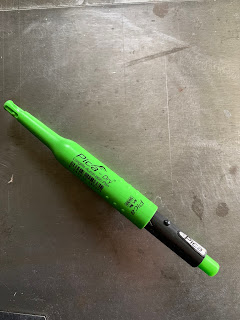
Tool: Pica-Dry Longlife Automatic Pen

About this time last year, I read a post (somewhere) about the "Pica-Dry Longlife Automatic Pen." I thought it was interesting enough to order one. 


First impression was that it is a pencil not a 'pen' (which seemed odd but that could be my shortcoming.) Whatever it is called doesn't affect how it works. 


Second impression was that it is a bit bulky and not particularly suited for keeping in an apron, shirt or pants pocket, The bright green holder has a nice looking clip that looks like it would hold the pencil securely in a pocket. That doesn't work for me at all so the pencil lives on the tablesaw fence or on the work bench. The end of the holder is a sharpener which is convenient and works well. 


The pencil comes with one (1) black lead which, surprising to me, lasted quite a long time. However, additional leads are available in packs of eight (8) leads (either all black or a combination of four (4) black, two (2) red, and two (2) yellow). Out of curiosity, I bought the combo pack without really having a purpose for the colored leads at the time. Last week, to my pleasant surprise, I discovered the usefulness of the yellow lead.


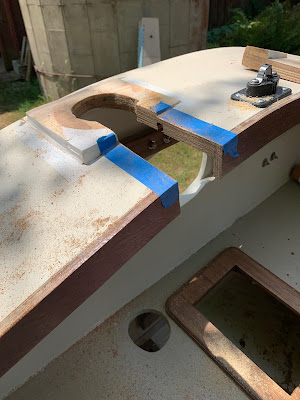
Working on Gardens' coamings (varnished meranti ply), I needed a line visible enough to work with in the rather dimly lit boat bay (in the barn). The black lead certainly worked to put a line on the coaming, but it was difficult to see well enough to work with it. I changed out the black lead for yellow and was pleased with the result. I can't quite imagine what I'll need the red lead for, but when I'm sure the red will work just fine, too.

The black lead works well for layout lines on timber and ply but not so well for jotting down notes (the lead is pretty thick and doesn't lend itself well to my handwritten notes). 

I like the pencil enough to get another one for the boat bay.

Monday, October 5, 2020

A New Sail

When I decided to build a Pathfinder, I thought about a balance-lug-yawl sail plan using the balance lug sail from my Goat Island Skiff. My thinking was, I already have the sail and I can't sail two boats at the same time. At the 2011 Sail Oklahoma event, I discussed this idea with John Welsford and he agreed to draw up the sail plan. 

My GIS sail had been assembled from a Sailrite kit - a saga in itself - and I used it on Karen Ann (my GIS) and, eventually, on Gardens of Fenwick. Over its life that sail was used, abused and not cared for properly: stains (unknown origin) did not wash out; careless winter storage allowed mice to dine on the the leech; and the leech repair was functional but not pretty... As we sailed Gardens this summer, I harbored thoughts about buying a new main, but didn't act on those thoughst. 

Early last week I said something to Jan about maybe thinking about a new sail. She agreed that the sail was looking tired and  thought a new sail was a great idea! So, last Thursday I placed the order with Duckworks and this morning the new sail arrived!


The sail is gorgeous and, without taking it out of the plastic wrapper, we can see that the sail is heavier duty (5.0oz) than the old sail (4.10z) and that the quality of the sewing if far superior to what I cobbled together seven years ago! We're done sailing for the year so the new sail will winter in its shipping box. 

We are looking forward to dressing up Gardens with the new sail and sailing her next spring!


Tuesday, September 22, 2020

Les Cheneaux Islands Get-Away


We needed a break and a short get-away to Lex Cheneaux Islands in Michigan's UP was just the thing. We reserved a cabin, got the boat ready, prepped some meals and packed our bags. Wednesday’s four-plus-hour drive from home to Cedarville in the UP went well. We’ve got a few trees around home that are tinged with red and the farther north we went, the more and better the colors got: reds, yellows, oranges. The last weekend of summer and autumn has fully arrived in northern Michigan. 

We arrived at the Les Cheneaux Landing resort around 4:00pm. We checked in, parked the boat near the ramp, and unloaded the car. We planned to launch the boat that afternoon, but given the conditions - wind was blowing 9-10, gusting to 12 from the N; and I was tired - we decided to wait for morning to launch.


The cabin we rented is a very small, knotty-pine interior, two bedroom affair with a small kitchen and sitting area - which worked for us: The second bedroom became (or maybe has always been) a closet… Two couples sharing this cabin (advertised as “sleeps four”) would be very cramped…


We enjoyed a relaxed evening: a spaghetti dinner, a walk down to the dock, cooling temperatures, a couple of beers… peace and quiet…  


The next morning, after a good breakfast of coffee, eggs, toast and fruit, it was time to launch Gardens. Things (backing down ramp) went well (no audience of advisers). The wind was, thankfully, very light as I backed the boat out of ramp; did a couple of unintended loop-de-loops (narrowly missing a pontoon boat) before getting into the slip.


Rigging the boat on the water went smoothly with no major complications. My biggest surprise was that the halyard and lazy-jacks did NOT wrap each other up into a tangle. And the lazy-jacks worked well to ease the rigging process. One mistake: I didn’t run the halyard around the mast (to hold the yard close to the mast) but I never noticed it until we lowered the sail at the end of the outing.


Light NNW winds (3-4mph) helped us back out of the slip and we were off… Winds promptly went to 7-8mph (gusting 10) so we enjoyed some nice sailing. We took what the wind gave us and headed SE down Snow’s Channel. Pretty much a downwind ride to Conner’s Point and Muscallunge Bay. The wind backed to W and piped up to 10mph (gusting 12). The geography of the islands bends the wind quite a bit depending where you are in the bay, and I found it difficult to maintain a steady course. It was fun but taxing. 


A steady W wind would have been nice heading back up Snow’s Channel, but again Marquette Island and shifting winds worked against a nice easy beat. In the lee of Marquette Island, the winds became light and variable: from lulls of 0 to 5-6 (gusting 8); and shifting from SW through to N - and sometimes back.  Oh, we sailed back but tacking became tiresome in the lulls, shifts and gusts. Gardens seemed to work against the return as well as we weren’t able to complete every tack. However, the winds co-operated, the trolling motor worked well as we neared the dock,  and I didn’t hit anything getting into the slip.


It wasn’t a long sail, but it was wonderful.


The GPS recorded a max speed of 6.1mph during a deep reach across Muscallunge Bay. Unfortunately, I forget to turn off the GPS and the Navionics app until long after we were done sailing (yes, I recorded securing the boat and walking from the dock to the cabin…) so the ‘moving’ average speed was lower than it really was… I’ll learn sometime…


Friday morning was similar to Thursday but with lighter N-NW winds. We went SE down the channel to Muscallinge Bay. And so, our sail was similar to the previous day. All went well until we headed back up Snow’s Channel. Light and shifty winds seemed to work against successful tacking, but not on every tack. 


We (meaning I) experienced some difficulties completing tacks. Gardens goes into irons pretty handily. I tried several tactics to overcome these difficulties (un-sheeting the mizzen, more boat speed before starting the tack; minimal rudder; and manually backing the main), but the inconsistency of the conditions (wind speed and direction) and the intermittent successes/failures of tacking created uncertainty about what was happening. At one point during a failed tack into a lull, I released the rudder and eased the sheets and Gardens did a slow figure-8 - a  Yes, a slow, gentle falling off to starboard, through a gybe, and through another gybe before I took the tiller and managed to react to a wind-shift puff. I have no explanation for that. 


Ignore the stats: For some reason, Navionics did not accurately record time, speeds and distances. The trip time is close but certainly not speed or distance.  Perhaps poor cell coverage accounts for that?


We returned to the slip to secure Gardens for the night, and the lazy-jacks proved their worth once again. I’m not sure where I developed a reluctance to lazy-jacks but I am glad I’ve gotten over it!


Saturday was cloudy, cold (mid-40s), and windy with rain in the forecast. We decided not to sail and, instead, drove to Salt St Marie for some touristy sight-seeing. After watching an ore boat lock through the Soo from Lake Superior to the St Mary’s River, we drove to Whitefish Point. We walked the beach in a building S wind, marveled at the water-smoothed rocks and got back to the car as the rain began. By the time we got back to the cabin the rain had subsided and it was time to pull Gardens and pack her up for the road trip home.  Sunday’s drive home under sunny skies was uneventful and I began a mental “Winter Projects” list… 


The Navionics app has a play-back feature. Watching the tracks of both sails, it seems that we completed significantly more tacks than we missed - despite the perception/impression/memory that hits and misses were about equal. Thursday’s ratio was 8:4 (hits to misses); Friday’s ratio was 12:4 (hits to misses). So… things were not as “bad” as I let myself believe, but clearly there is room for improvement. I was more mindful of un-sheeting the mizzen on Friday than on Thursday. Also, on Friday I observed slight weather helm more than I did on Thursday. However, on both days there were periods of lee helm, and on at least two of those missed tacks, the lee helm prevented enough increased rudder at the beginning of the tack.


This outing was not intended to be an overnight boat camping experience - we (Gardens and us) are just not prepared for that yet. We enjoyed two really great days of sailing, learned some things; enjoyed some needed peace and quiet (very limited wi-fi contributed to that) and came away pleased with the five day get-away. Baby steps (with a cabin and dock) will lead to more adventures. Some items on the Winter Projects list will be improving Gardens' accommodations for boat camping.

Tuesday, August 25, 2020

Anchor System - More Questions Than Answers At the Moment

 Gardens is a fun boat to day-sail. We have an anchor, chain, and rode on board but have not figured out how to rig an anchoring system.  I have an idea of what I'd do in some sort of emergency if I had to, but I'm trying to sort out a system for more deliberate, non-emergency, planned situations - like lunch stops and overnight outings. 

What we've got:

  • 2kg (4.4lbs) Lewmar Claw anchor
  • 15' 1/4" Chain (with shackles)
  • 100' 3/8" Nylon 3-Strand Rode (with thimble)
  • Two 6" Forward Cleats (approximately 30" from the stem)
  • Bow Chocks (at the stem)
  • A Bucket (stowed in starboard side of foreward cockpit)
  • An Impractically Small Foredeck
  • Large (3/4" ID) Padeyes along side decks 


The impractically small foredeck means I need to handle (lowering/raising) the anchor from the foreward end of the cockpit. Since the sail bundle sets on the port side, it makes sense to me to work the anchor from the starboard side of the boat. The anchor bucket rides in that foreward starboard corner of the cockpit. So... so far, so good. 

But...

  • To what do I secure the bitter end of the anchor rode? Years ago ('67, '68, '69) I learned that anchor chains were "secured" to the keel of a ship with snake stuff -  so that if the anchor ran loose the chain wouldn't tear the ship apart. Of course, I'm talking about a much smaller scale...
  • How do I store the rode/chain in the bucket so that it doesn't fall in on itself (tangle itself in knots)?
  • Does an anchor bridle make sense to use on a mono-hull?  If yes, how should it be rigged?
  • What is the "correct" orientation for the bow chocks?
  • Is there a simple/easy way to mark the anchor rode to know how much has been let out?
  • Is 3-strand nylon or double braided nylon 'better' for an anchor line?
  • Is 115' of rode (chain + line) enough? I know it depends on where one expects to anchor...
  • And so much more that I don't know what I don't know enough to ask about...
Good thing Gardens is patient. We'll get out a couple of times locally before heading to the Upper Peninsula for a four-day get-away where we'll do some exploring in Les Cheneaux Islands. By the time we get back from that trip we'll have, hopefully, answers to some or all of our anchoring questions.


Sunday, August 16, 2020

Side Deck Seats, Auxiliary Power, and a Kayak Paddle

Side Deck Seats: My variation of the Side Deck Seat has survived the mock-up stage. I'm using a wooden cleat/foot/support rather than the stack of garden-pad foam Mike used. 


There are two smaller cleats that straddle the coaming and hold the seat in place.  The 'real' seat will be  1/2" plywood. The entire assembly will be epoxied and painted.


We'll see how it works. If it scratches the deck, I'll modify it - but the deck will be repainted this winter anyway.

Auxiliary Power:  Two SUP paddles are ready to be put into action should the need arise. Fortunately, the wiring issues (my bad) with the trolling motor have been repaired - so we are hopeful that we'll never need the new paddles. But, we have them just in case...


The paddles have been sealed and varnished since this photo was taken early last week.

Kayak Paddle: I decided to build my granddaughter a kayak paddle for her birthday next month - but the kids are taking their kayaks with them on a Labor Day vacation so I need to get the paddle done. The paddle will be two-part take-apart using carbon fiber ferules from Duckworks. The wood is white pine from a tree on our property.


We're working on a sailing trip in Les Cheneaux Islands in Michigan's Upper Peninsula for mid-September which means we need to get out as much as we can over the next few weeks to make sure everything is ship-shape.

Sunday, August 2, 2020

It Doesn't End, Does It?

So, we're (Gardens, Jan and I) sailing again after a long (winter-into-spring-into-summer) offseason of repairs, modifications, improvements, etc. Just about everything added to, or improved upon, Gardens works as well or better than expected: Lazy-jacks, the mast 'lifter,' the mizzen slot, the hinged tiller, and the boarding assist handle all work very well. The only real disappointment is the bronze mast traveler. I believe it is a great idea but it does not seem to suit the Pathfinder's configuration; I believe in a completely open boat the mast traveler would work just fine. 

But already, after just a single sail, the to-do list is growing! 

Paddles: During last week's outing, several short-comings made themselves apparent. When the trolling motor failed (I did a poor job of wiring a plug to the motor's power cable), the absence of paddles became painfully apparent. Yes, I know, I should have had paddles on board... but I didn't. To remedy the situation I am building two SUP paddles (it occurred to me that standing up to paddle Gardens will be more comfortable than sitting). The wiring for the trolling motor has also been corrected. We may never need the paddles, but we'll have them just in case.

Cockpit Comforts: 

Side Deck Seats: Gardens' coamings are only 3/8" thick so they are not at all comfortable to sit on. Jan caught a rare moment on last week's (light air) sail:


Jan commented that she, too, would sometimes like to sit up on the coamings - but they are too uncomfortable (not a direct quote but good enough). So, remembering a FaceBook post from May,  I'll adapt Michael Olson's side deck seat to fit Gardens' coamings. NOTE: For some reason I cannot create a link to the FB post re coaming seats. Please search the John Welsford Small Craft Designs FB page for "coaming seats," scroll to Michael Olson's May19, 2020 post. Sorry for the inconvenience.

Cup Holders: Jan also wants cup-holders. I haven't figured that one out yet, but I am working on it.

Anchor Set Up: Gardens has an anchor, chain and rode suitable for the waters we sail. However, I don't have a decent way to secure the anchor to the boat... I opted against utilizing the anchor well (part of the design and built as per plans) by not opening up the foredeck.  I am rethinking that decision. If I decide to use the anchor well, the modification probably won't happen until later this year. But, I am pondering the possibilities.

Camping Set-Up: While we aren't there yet, I am thinking about, and planning for, boat camping. Sleeping pads and bags, shelter (cockpit tent [boom or otherwise], dodger, or?), galley box and gear, porta-potty, and more will be needed. 

When you build and sail a wooden boat, the ideas keep coming and the work list doesn't end, does it? 


Monday, July 20, 2020

Variation on a Theme

Late last week, during what should have been the last yard sail before the real thing, I was disappointed that the newly installed lazy-jacks did not hold the sail bundle (boom, sail & yard) in a horizontal orientation. The foreward end of the bundle rested on the foredeck, while the aft end of the bundle rose higher. Neither lazy-jack tension or main sheet tension helped.  

So, having been rained out of sailing over the weekend, I decided to try again today to figure everything out. Following an epiphany of sorts, I swapped out the square lashing on the boom (holding the boom close to the mast) for a "Bleater" (GIS nomenclature for a line to keep the sail bundle from moving foreward as the sail is raised). Using the square lashing this spring resulted from "faulty" muscle (brain) memory from rigging my GIS and short-term memory loss (I've used a Bleater on Gardens the last two summers).


The Bleater loops around the boom, then around the mast, and forward to attach near the end of the boom. A little trial and error to get the Bleater length correct (to position the tack of the sail 400mm ahead of the mast), and the Bleater keeps the sail bundle from moving forward as the sail is raised.

How does this help the lazy-jacks hold the sail bundle horizontal? As best as I can figure, when using the square lashing allows the bundle to move foreward when the sail is raised or lowered. That movement changes the geometry (and pivot point) of the lazy-jacks, and the foreward end of the boom drops while the aft end raises. 

Whether that is really what is happening or not, the result is that with the Bleater the bundle does not more foreward and I can set the lazy-jacks to hold the sail bundle horizontal at whatever height I choose (well, with reason). 

One solution I considered was parrel beads. I didn't have any beads to try, but it seems to me, the Bleater is a variation on the theme of parrel beads. 

Now, to sort out reefing...

Sunday, July 19, 2020

"If It Works, Don't Fret"


Final yard sail and rigging set-up of the pre-season (much like everything else, the summer sailing season has been shortened - not so much by the pandemic, but by procrastination). 


Rigging the mizzen raised a couple of questions. Answers were forthcoming but the best one was John Welsford's words of wisdom and needed reminder:

If it works, don't fret.


Thursday, July 9, 2020

Almost There...

Gardens has spent more than a week yard sailing, getting outfitted for the summer (which is too far gone already), and teaching me a few things.

Things done: 
  • New rigging for the main (mast traveler, halyard, sheet, out-haul)
  • mizzen (halyard, sheet, snotter).
  • New lazy-jacks.  
  • New rigging for the centerboard
  • New "Mast Lifter" - a lever/fulcrum system to lift the main mast out of the step (see other posts for the why's and wherefores).
  • New paint (transom: inside and outside;center-line; coamings; and touch-ups on the deck)
  • New varnish on coamings, battery-box surround, and tiller.
What have I learned? Installing the lazy-jacks was a lesson in futility until it dawned on me that everything is interconnected. You can't make an adjustment without taking everything into consideration. It took me far too long to make that obvious observation but once I did, the process went well.

Changing the main halyard system involves more than just adding a bit of hardware. The mast traveller changes the geometry of where the yard sits in the boat before hoisting, and how it fits the lazy-jacks . Other systems allow a bit more flexibility - but if the down-haul is not loosened the sail bundle isn't going anywhere. And, see the next paragraph and photo for another issue I had with the mast traveler. 

From the category of Unintended Consequences: Two years ago, I installed the halyard block on the mast with a "spin strap" (from Duckworks). I installed the strap upside down (my bad). The recent experiments with the mast traveler resulted in the strap (and the top screw) bending. The strap has been replaced with a heavy-duty padeye. Gardens may sail this summer without the mast traveler.


The last two items on the list should be done this week:

Mizzen Mast Slot to facilitate stepping the mizzen (the slot concept works for the main, ought to work for the mizzen for similar reasons). Start of the project...


Registration Numbers. The resident artist is finishing up a painting and will add the registration numbers to Gardens' sheer planks this weekend.

This Sunday we'll do a snoop trip to check out boat ramps on Muskegon Lake (which feeds into Lake Michigan) so there will be options for an outing the following weekend. A shake-down sail is in the works for next week.


Thursday, July 2, 2020

Snoop Trips

Rigging and outfitting Gardens for the season is nearly complete. The mast traveler and lazy-jacks are sorted out; the revised up-haul for the centerboard is in place but can't be tested until Gardens is on the water; the "Mast Lifter" has been installed (and works well!). The coamings have received fresh varnish - although additional work on the coamings is already on the fall/winter work list. About the only thing left to do before hitting the water is painting the registration numbers on the sheer plank. I'd rather not tempt fate by launching at a local lake without those numbers on display...

As for the snoop trips... We've been scouting some of those local lakes:

Wabasis Lake is about 20 minutes from the house, is large enough (400+ acres) for some sailing, isn't completely built up with cottages or McMansions, and isn't terribly busy on weekdays. The 4-lane launch ramp is one of the better ones around:


Gardens was first splashed at Wabasis Lake in 2018 and her 2019 shake-down sail took place there, too. We'll revisit Wabasis Lake soon.

Townline Lake is about 30 minutes from the house, is small (just under 250 acres) and was probably fine for sailing until the entire shoreline was built out with cottages (along with pontoon boats, ski boats, fishing boats, and jet skis; but not a sailboat in sight - not even a sunfish on a lawn).  On a Sunday the lake was busy! The launch ramp is pretty typical of small lake ramps: paved single lane, no dock, and a drop-off at the end of the pavement.


Curiously, there is a warning to "Sailboat Operators" about overhead power lines (presumably to the cottages on the island in the lake):


"Maximum Mast Height 30'" Two thoughts on that warning: No one is going to launch a sailboat with a 30' mast at that launch ramp. And, Why would anyone put that size boat on a lake this small?

Based on the boat traffic we saw last Sunday, we don't plan to take Gardens to Townline Lake.

Friday, June 26, 2020

Gardens' Annual Yard Sail

Day 1, Thursday:
Some new rigging, a tidy-up of small bits of mis-matched line, a piece of new hardware, and an experiment with lazy jacks.
I was pleased with the overall set of the mail (left the mizzen in the barn for another day) but I was not thrilled with how the mast traveler worked. Oh, it hoisted the yard & sail just fine. But on lowering the sail, the yard was a bit unruly and when the yard was almost (but not quite) all the way down the mast traveler kept lowering, losing halyard tension on the yard and the loop on the yard popped off the hook of the mast traveler. (That is one messy sentence!) Lazy-jacks helped somewhat but the yard still popped off the hook. Perhaps a stopper of some sort on the mast to prevent the traveler from dropping lower than the yard?
The lazy-jacks presented a couple issues of their own. They really are quite a rat's nest of line and unless there is a convenient way to keep them rigged on the mast and boom for trailering, I am not convinced they would be worth the trouble of rigging for day-sailing. However, truth be told, this was my first effort at setting up and using lazy-jacks so, maybe, operator error is to blame.

Day 2, Friday:

Definitely a better day wrestling with the lazy jacks. Shortened the aft legs, lengthened the LJ halyard/downhaul, moved the legs toward the ends of the boom. Worked on stowing/securing for trailering (needs more work). The lazy-jacks helped control the sail and, I suspect, that will improve as I tweak the system. All in all pleased to make progress.

Pro-tip: Don't Yard-Sail until after the front passes through... things got dicey...

Next issue: minimizing catching LJ on boom mounted hardware and work on tidier bundling of the yard/sail/boom package for trailering.


Thursday, June 18, 2020

Concept... and Proof of Concept

One issue I've had with unstepping Gardens' mast alone is in lifting the mast two, or so, inches for the stub tenon to clear the mortise in the mast step so the mast can be walked back to horizontal using the Slot in the deck.  Reaching across the three feet between BH-2 and the mast is not too difficult, but having enough leverage to lift the mast straight up is the problem. Someone standing on the foredeck can easily lift the mast vertically, but that same person cannot then lower the mast. So, I needed a solution for unstepping the mast by myself.

Concept: A Mast Lift consisting of a Lever, a Fulcrum, and a block of wood attached to the mast. Lifting the mast is helped by stepping on the lever... That's the Concept.


The lever is White Oak: 1.25"x1.25"x 36" 
The fulcrum is a T-section: White Oak: 1"x3"x6" base with a 1"x3"x6" upright (with a 1.25" notch)
The block is  White Oak: 1"x1.25"x4" screwed to the mast

Proof of Concept:


Not the best photo. The Proof of Concept utilized the mast support (used when trailering), not the full mast. The prototype fulcrum was modified from what is in the photo to the dimensions listed above.  The block on the mast support is pine - not white oak. (Ignore the yellow lifting strap in the foreground and the dust collection on the stringers in the background.)

I'll pull Gardens into the yard for rigging and testing the changes (mast traveller, lazy-jacks, etc.) made over the winter, including the "mast lift."
.