The winter holidays are rapidly approaching.
The Solstice is less than two weeks away - and it can’t get here soon enough! Dark in the morning when I get up (and I sleep in!); dark way too early in the afternoon (and I don’t blame that on ST or DST, it is just the way it is).
Christmas is two weeks away and is taking over much of our waking hours. Decorating (the tree and the house); shopping (too many trips to too crowded stores); making gifts (why do I wait until December every year?) in time to mail them; mailing those gifts; party planning and food preparation (is it worth the worry? [Spoiler Alert: Yes, it is!]); and travel plans - it all takes a toll. But we always survive and, for the most part, enjoy it.
The New Year is three weeks away but at least there is little or no stress associated with the New Year (STRESS will come later in the year).
By the way, the Christmas gifts this year are simple little keepsake boxes for my children and grandchildren making use of bits and pieces from the cut-off bin and wood that has been waiting to be used. If any of the boxes were done, I’d include pictures - but as I said, Christmas is just two weeks away so, naturally, none of the boxes are done. Last minute woodworking is a tradition!
Wednesday, December 11, 2019
Tuesday, December 3, 2019
Project Ideas
With winter weather here (ahead of schedule…) there is little opportunity to spend time in the shop actually working on boat projects.
So, the next best thing is to sit in the living room, with a cup of coffee, watching the snow fall, thinking about project ideas (and how to make those ideas work).
Painting/Repainting the Centerline. It is easy enough to take Gardens off her trailer, thanks to Elmer (the Gantry).

Blocking the boat is simple enough but supporting the boat to keep it from falling is the issue. Commercial boat stands really are not an option (too expensive). I’ve got a few ideas kicking around...
Name Boards. We’d like to add name boards but I have not figured out how to shape the ‘backside’ of a flat board to conform to the contour of the sheer plank. Same thing with the state registration numbers - I don’t like them on the outside of the coaming (seemed like a good idea at the time...)

But, same issue, how to fit a flat board to the contour of the sheer plank? I’ve got an idea to develop...
Add Wheels to Elmer (the Gantry). Elmer needs to be a bit more mobile. Dragging it around (admittedly not very far) is doable but wheels would make it easier. Older photo shows bottom one of Elmer's legs.

Adding wheels probably isn’t rocket science. Probably one wheel per side (sort of like a wheelbarrow). Wheels would only be used to move Elmer empty. I have no intention of moving the boat when it is suspended on the hoist. I just need to figure it out and do it!
Mast Lift Assist. When the main mast is unstepped it needs to be lifted about 2” to clear the mast step before I can tilt and walk it down to horizontal (not a great explanation). With a second person to help, lifting the mast is simple. By myself, reaching across the deck reduces my leverage to lift and support the mast. Strange thing is, last spring and summer I had no difficulty in handling the mast by myself. In August, with the boat on the water, I had a tough time handling the mast (good thing Jan was there). So, I’m looking for a technique or ‘device’ of some sort to make it easier for me to unstep the mast. Practice might be the answer.
No immediate rush on these, and other, ideas. Suggestions and ideas are welcome.
Wednesday, November 20, 2019
Winter Mode
Gardens has been put away for the winter. Elmer the Gantry was useful in getting Gardens back on her trailer.

The mainsail was unbent from the boom & yard. The spars were stored in boat. The sail was folded, placed in a plastic storage bag and placed in a cardboard box, and stored in an upstairs closet (all this intended to avoid driveway sail repairs next spring necessitated by wintering mice). The mizzen sail was left wrapped on the mizzen mast, wrapped in plastic (to guard against mice...) and stored in the boat.
Obviously, the mast, in its travel mode, supports the tarp. And, just as obviously, the tarp can be pulled back for any work (minor tasks) I can attend to over the winter months.
Tuesday, November 12, 2019
An Early Winter
Daytime highs have been below 50* since mid-October - and trending lower: highs in the mid-30s this past week; lows in the high teens; highs this week in the mid-20s. Nothing in the forecast suggests a warming trend any time soon. Last Wednesday's light snow disappeared before yesterday's 5-inch snowfall. Winter is settling in.

Epoxy work and painting are now on hold until next spring. There are a few tasks to work on - at least until I'm snowed out of the barn. Lazy-jacks can be rigged; shop cleaned up; spars/sails can be stowed (mouse-proofed?); and Gardens can be tarped for the winter.
Maybe an early winter will bring us an early spring. One can wish...
Wednesday, November 6, 2019
Full Circle (On One Small Task)
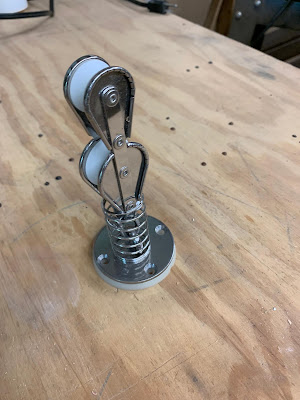
Gardens' original mainsheet fiddle-block wasn't fitted with a cam cleat, which meant I had to hold the mainsheet (which meant my hands would cramp up while sailing), but was fitted with a stand-up spring to keep the block from flopping around:
The replacement fiddle-block with cam cleat seamed to be the solution:

But... I couldn't get the fiddle-block installed with the stand-up spring: The spring was too stiff, the space was too tight, the shackle was too small, the swivel post was even smaller, and the threaded shackle pin was smaller still - it all worked against my fat fingers... My solution was a short section of pool noodle foam wrapped around the block and base:

That worked but not as well as a stand-up spring. Someone saw a photo of that "stand-up-foam-base" in a post on John Welsford's Small Craft Design Face Book page and suggested/recommended using a stand-up spring. I decided to see if I could find a "right-size" spring... The local hardware store - to my surprise - carries a fairly wide variety of small springs. But they didn't have one that would work. An Amazon search turned up a smaller (shorter, slightly smaller diameter) Harken stand-up spring but when it arrived, it didn't fit over the pad eye in the base. I decided to try the original spring again.
After several failed attempts I figured out that if I completely disassembled the base, started with the block upside down, and worked from the "inside out," I could (possibly) get the block, spring, and base connected and put back together. I only needed two more hands... My wife came to the rescue and together we got the whole thing re-assembled!

The path to this improvement to handling the mainsheet took me full circle back to the parts I had on hand when the fiddle-block w/cam cleat arrived. Buying the new fiddle-block with a cam cleat was part of the solution I was seeking. But finding a solution doesn't always mean buying a solution - I had that stand-up spring all along.
The mizzen mast project is on hold: Winter is settling in here in central Michigan: high temperatures in the mid-30s; lows in the 20s; and warmer temperatures are not in the forecast. It will be spring before I'll get back to work on the mast.
Monday, October 28, 2019
Mizzen Mast Project -
The short version: Not a good result. I should have practiced more...
I've got eight birds-mouth staves that don't fit together properly in two ways: All eight staves do not fit snugly and there are two significant gaps between staves along the taper.


My guess is the saw blade was not set precisely at 45*. Practice pieces(one set of eight at 24" and one set of eight at 36") appeared to be cut correctly as they fit tightly with no gaps along their lengths. As for the gaps, my guess is that the staves were not tapered uniformly - a result of the tapering technique I used (power-planing two staves at a time followed up with a hand plane).
Other factors contributed to what happened here: Using different table saws for different cuts, using new-to-me techniques (tapering and cutting the V-notch on the table saw). Frankly, I found setting up the table saw to cut the V-notch to be more fiddly and more difficult than setting up the router table & jig to cut the notches on previous spars.
I have enough material to make two more staves. So, one option is to make the two staves and see if that helps at all. If that doesn't work, then a second option is to purchase additional material for a new mast. If creating a new mast, I will probably revert to using the router table to cut the notches and I will use the shooting-board-on-the-table-saw technique (described last week for me by Chris Ring) to cut the taper. Do I have any other options?
Tuesday, October 22, 2019
It's A Process
Everything is a learning process.
I am convinced no one can accomplish anything without someone (or multiple people) contributing to the process.
The prospect of building a tapered birds mouth mast had me stymied. Not the birds mouth process, but cutting the taper into the staves. I understood the taper is cut opposite the v-notch, but I did not understand how to make that cut.
So I asked on the John Welsford Small Craft Design FaceBook page. I received many suggestions and learned about some techniques I had never heard about before. Every response gave me something to think about. The best part of the responses? Ideas. Ideas gave me inspiration to figure out what would work with my tools and skill set.
The technique I used involved an electric planer and a No. 5-1/2 Stanley plane. Using a stop block on the 'spar bench' and a convoluted sequence (one stave, then three, two and finally the last two), I cut the tapers without bloodshed or having to mill more staves.


Next, I'll set up the portable table saw to cut the V-notches. It'll probably take me longer to get the saw set up accurately than to actually cut the notches.
Everything is a learning process. I appreciate the contributions others have made to help me learn what I need in order to accomplish what I want to do.
Tuesday, October 15, 2019
Prepping for a New Mizzen Mast
Last week I bought about 23 bf of poplar for a new mizzen mast project. This is more than I need for the mizzen, but I'd rather be safe than sorry...
When I built Gardens' spars, I set up shop in the yard outside to accommodate the necessary lengths. But this being October in Michigan, I'm setting up in an empty bay (which is also long enough for the spars) in the barn so I can work out of the weather. Of course, the space wasn't really empty - so some tidying up was necessary. (First photo is about half way through the clean-up.)

One clean-up task was to get rid of a pile of old rough-cut lath strips taking up space. Easiest way to dispose of them is to burn them but, at 5' long, they were too long for our burn pit (and we don't have a burn barrel). So, I cut them down to size and burned them down to a nice pile of ashes. I left most of the cut nails in the lath and used a magnet to pull them out of the ashes.

The poplar found a home on the 'spar bench' (2 long sawhorses and 2 2x10x10' planks). The thickness planer moved from the shop to the work space. Infeed and outfeed supports were set up. The space was ready to get to work.


Milling the poplar began today. First step is to smooth the faces of the planks. Using a No. 5 Stanley plane, I began flattening the slight crown of the first plank before using the thickness planer. Interesting to note the 5/4 planks turned out to be 11/8 (1-3/8)- which is nice enough but it means more milling before ripping the staves for the mast.
Tuesday, October 8, 2019
Fixing Warts; Trailer Mods
When I installed the cockpit coamings, I was more than a bit careless with my epoxy work. The warts didn't seem to bother others, but they bothered me.

I expected the clean-up job to be difficult and tiresome. Much to my surprise, the warts disappeared after only a few minutes with a sander! A bit more sanding and the coamings will be ready to repaint.

Gardens' mizzen mast is solid wood and, despite being 5' shorter, weighs nearly as much as the hollow bird's mouth main mast. The mizzen is awkward and cumbersome to step/unstep. While we haven't ever lost control or dropped the mizzen, I decided, quite a while ago, to build a new lighter, hollow mizzen mast. This is one of my fall/early winter projects.
L.L. Johnson Lumber, in Charlotte, Michigan (less than an hour's drive away), has the material in the length (14') I need. I fussed a bit about how to get 14' lumber home - without paying the $65 delivery fee. A friend offered the use of his utility trailer or I could borrow my sister's utility trailer, but at 8' long, those do not readily transport long bits of lumber. My friend commented that it was too bad Gardens was on her trailer... Well, that got me thinking! I hoisted Gardens off the trailer, pulled the trailer out, set Gardens on the floor of the barn, and set about modifying the trailer to carry lumber. I removed the bunks (which I will be replacing), moved the bunk supports outboard on the trailer, and added a cross member to support one end of the lumber.

I'm driving to Charlotte tomorrow for the mast material and while I'm there I'll pick up enough cherry lumber to build us a new bed frame over the winter.
Tuesday, October 1, 2019
Catching Up
It's been awhile since I've added anything to the blog. So, here are a few updates...
Sailing
Gardens of Fenwick sailing in Les Cheneaux Islands, Lake Huron, August, 2019:

September travels to Coupeville, Washignton, on Whidbey Island for a family reunion:


A short ferry ride from Coupeville took us to Port Townsend for the Wooden Boat Festival. Port Townsend from the ferry:

The Wooden Boat Festival was a lot of fun but since we didn't see everything we wanted to see, we decided we'll have to return next year.
Boarding Assist
Jan and I have recovered from multiple surgeries (me: two knees; Jan: two hips), but we both found it a bit awkward stepping on and off Gardens at the dock. Jan, teasingly, suggested a shower grip type handle to make it easier to get on and off the boat... Right... But then I got to thinking about a solution - and came up with this: A 1.25 diameter dowel; a through-deck hole, and a seat-top socket: aka, The Boarding Assist:


With a socket on each side of the boat, only one dowel is needed, and the dowel will stow in the cockpit while underway. Varnish on the dowel and the cap/plugs (for the through-deck holes when sailing) will close out this project.
Milestone...
A pleasant surprise for me was recently discovering this blog has viewed over 100,000 times! Thanks to everyone who has ever visited my ramblings.
Sunday, July 7, 2019
Main Sheet Block Upgrade
Last year Gardens' mainsheet was rigged through a single block with a becket on the boom and a fiddle block on top of the centerboard case. A spring prevented that fiddle block from flopping around when there was little or no tension on the sheet.

That feature worked well. However, I had no way to sail without keeping a firm grip on the mainsheet. Sailing all day with a firm grip on the mainsheet resulted in serious cramping of my hands. The fiddle block, clearly, does not have a built-in cam cleat, and I did not include a cam-cleat in last year's temporary set-up.
High on the list of upgrades was a fiddle block with a cam cleat. Naively, I figured I could just swap out the new fiddle block for the old one. The two blocks are significantly different in size and, as I soon learned, the new block would not fit the spring. I searched for a suitable spring (local hardware stores, Amazon, McMaster-Carr, Grainger, etc.) without success. Without a spring - or something - to hold the block upright, the block will flop around noisily, bang up the top of the CB Case and generally be annoying.
A possible solution presented itself while I was cleaning out the garage a couple of weeks ago. Moving a collection of long unused pool noodles (we don't have a pool...), I wondered if a piece of pool noodle might work to hold the fiddle block upright. Well, in the shop, it does! A 1" slice of noodle (with a slit cut to facilitate installation) does just what I need it to do: hold the block upright and allow the block to move as needed. A couple wraps of tape secures the slit (electrical tape may replace the current masking tape...).
The block will soon be installed on the CB Case top. Almost ready for sea trials.

That feature worked well. However, I had no way to sail without keeping a firm grip on the mainsheet. Sailing all day with a firm grip on the mainsheet resulted in serious cramping of my hands. The fiddle block, clearly, does not have a built-in cam cleat, and I did not include a cam-cleat in last year's temporary set-up.
High on the list of upgrades was a fiddle block with a cam cleat. Naively, I figured I could just swap out the new fiddle block for the old one. The two blocks are significantly different in size and, as I soon learned, the new block would not fit the spring. I searched for a suitable spring (local hardware stores, Amazon, McMaster-Carr, Grainger, etc.) without success. Without a spring - or something - to hold the block upright, the block will flop around noisily, bang up the top of the CB Case and generally be annoying.

A possible solution presented itself while I was cleaning out the garage a couple of weeks ago. Moving a collection of long unused pool noodles (we don't have a pool...), I wondered if a piece of pool noodle might work to hold the fiddle block upright. Well, in the shop, it does! A 1" slice of noodle (with a slit cut to facilitate installation) does just what I need it to do: hold the block upright and allow the block to move as needed. A couple wraps of tape secures the slit (electrical tape may replace the current masking tape...).

The block will soon be installed on the CB Case top. Almost ready for sea trials.
Wednesday, July 3, 2019
Back to Work on Gardens
After ten weeks of back spasms, treated by chiropractic care, modern medicine and, at last, physical therapy, I am finally getting back to work on Gardens. I had hoped to have been sailing her by now, but we do what we can... My "winter" projects are just now getting underway...
Last year, Gardens sailed with a 12V 34Ah battery (for the trolling motor) just sitting unsecured on the aft seat. I didn't care much for that arrangement, so I built a battery box (shown as a work-in-progress).
But, there's not a significant difference between a battery sitting on the seat and a battery in a box sitting on a seat. I decided to use the space below the aft seat, replaced the access hatch with a larger hole, and installed a lip/rim/whatever to hold the box and pretty up the cut-out. Shown here in the early stages of the project.
The battery fits in the box.
The box fits into the cut-out. The lid is a nice, snug friction fit.
The trolling motor cables fit in the slot in the lid. And the whole thing is removable for access to rudder hardware.
Other projects in the works...
Last year, Gardens sailed with a 12V 34Ah battery (for the trolling motor) just sitting unsecured on the aft seat. I didn't care much for that arrangement, so I built a battery box (shown as a work-in-progress).

But, there's not a significant difference between a battery sitting on the seat and a battery in a box sitting on a seat. I decided to use the space below the aft seat, replaced the access hatch with a larger hole, and installed a lip/rim/whatever to hold the box and pretty up the cut-out. Shown here in the early stages of the project.

The battery fits in the box.

The box fits into the cut-out. The lid is a nice, snug friction fit.

The trolling motor cables fit in the slot in the lid. And the whole thing is removable for access to rudder hardware.

Other projects in the works...
Tuesday, March 12, 2019
Winter’s Retreat and New Kit for Gardens
Second week of March and winter has begun its retreat… mid-30s for two days, 40s today and tomorrow, with the promise of 60s on Thursday… Hope springs eternal…
My knees are recovered enough to let be get out to the shop… unfortunately, the frozen snow drifts across the barn entrances won’t let me in! So, rather than actually build a few items, I’m left to thinking and drawing sketches for a No. 2 Camp Box; a Day Box for misc gear (GPS, VHF, Binocs, etc); a Battery Box; attachment points for those low-profile fenders; and a Compass Box.
The barn needs attention, too. One roller on a large (unused) slider door came off its track in last week’s wind storm. The door is hanging by one roller and has opened a decent sized hole in the south side of the barn - directly behind Gardens!

Gardens is well covered with tarps and the tools were stowed in tubbies but I need to get out there soon for a temporary fix to the door.
In other news… UPS and USPS have been busy delivering more bits for Gardens’ kit:
- 12 lbs Danforth Anchor
- Air Horn
- First Aid Kit
- Low Profile Fenders
- Hardware and Line for Lazy Jacks
- Hardware for Grab Lines along side decks …and more
Thursday, February 7, 2019
Creating A Bucket List
I haven’t really ever had a Bucket List. I think that is so because when I hear the term ‘Bucket List,’ my mind interprets it as ‘Epic Adventures Mere Mortals Cannot Accomplish.’ And I, being a Mere Mortal, cannot accomplish epic adventures… Recently, however, I began to realize that the idea of a List isn’t limited to Epic Adventures.
Perhaps now is the time to create my Bucket List! Nothing too epic - well, maybe one. No particular order. No particular timeframe.
My Bucket List:
Dinghy Delta Ditch Sailing Event. Sacramento Delta, California. This is a 30-mile downwind small boat race from Rio Vista, California up the Deep Water Channel to Sacramento, California. It is hosted by the Lake Washington Sailing Club in Sacramento and takes place each year in mid-August. I became aware of this event nine or ten years ago when I was building my Goat Island Skiff in Sacramento. Life lead me away from the West Coast before my GIS was completed but now I look forward to sailing the event in Gardens.
Sailing Gardens on each of the Great Lakes. The state of Michigan touches four of the five Great Lakes and it seems like an obvious endeavor to sail on all five. What I have in mind is not just poking out into each lake for a few minutes and then scampering back to shore. Michigan, Huron, Erie and Superior each have islands that are easily reachable for a daysail or a camping weekend. I’ll have to explore the charts for Lake Ontario to see if there are similar opportunities there.
Sailing across Lake Michigan. It is roughly 70 straight-line miles across - and, of course, more than that when sailing. This is the Most Epic item on my List. Originally can to mind earlier this winter so planning for this has begun. Outfitting Gardens this spring will be done with this adventure in mind, which will of course benefit the other sailing adventures on the List.
MS Buckeye Breakaway Bicycle Ride. Following two knee replacement surgeries last year, this two-day 150-mile bicycle fundraiser ride, from Brunswick, Ohio to Ashland, Ohio and back, is on the list (yes, I’ve completed this ride before but with the new knees, I need a fitness goal).
Community Boat Building and Sailing. Using Mik Storer’s OZ Goose box-boat as a platform and based on the Philippine model of community boat building, sail training and racing, I’d like to introduce people to boatbuilding and sailing. I have an OZ Goose kit waiting to be assembled and a set of templates to facilitate subsequent builds.
So, that’s it. I’ll add more as I think of them but I suspect my list will involve sailing, biking, and travel more than anything else. I’ll provide details as each of these comes to fruition.
Sunday, January 13, 2019
Rigging a Balanced Lug Sail and Other Tips
A You Tube video by Gig Harbor Boat Works, detailing the rigging of a SCAMP, showed up on the John Welsford Small Craft Design FB page this week.
The FB discussion focused on the rigging of a balanced lug sail but there were other useful (to me) tips.
I’ve long understood the utility of lazy-jacks but never quite understood how they are rigged. The Gif Harbor video cleared up most of the mystery for me. Lazy-jacks have been added to Gardens’ to-do list.
Another tip concerned the rigging of the kick-up rudder up-haul and down-haul. Gardens’ rudder is currently rigged with two separate lines that tie off on cleats at the top of the rudder head. This involves leaning over the transom to raise and lower the rudder. In the video, the up/down haul is a single line - one end serves as the up-haul, the other end serves as the down-haul. The bight of the line passes through the transom and leads to cleats on the side of the tiller. This arrangement keeps the adjustment inside the cockpit. I’ll see if this modification can be incorporated on Gardens.
As to the rigging of the sail itself, a loop in the halyard fits over the end of the yard - rather than being fed through the yard and tied off - and is captured by a fitting on the yard. Tension on the halyard keeps it in place. I’ll check the yard to see if a small cleat would work to capture the looped halyard and, if so, will make that change as well.
The knees are healing well. If the weather were a bit more hospitable, work on Gardens might be possible. As it is, I’ll have to wait a couple of months for the weather to cooperate.
Subscribe to:
Posts (Atom)