The Boat Cave, inspired by the guys at the Eaton Rapids, MI, Scamp Camp, is a simple framed-in space around the boat with foil-faced insulation panels and a small propane heater (which has only been used once).
So, how is the Boat Cave working?
It is working quite nicely, thank you very much!
In previous years, cold weather brought an end to boat work by mid-November. This year it is the end of December and the boat work is going strong. When cold weather finally forces an end to boat work, my expectation is the Boat Cave will enable work to resume in early March (or sooner) instead of mid-April (as in previous years).
The Boat Cave works!
Wednesday, December 30, 2015
Sunday, December 27, 2015
A Ghost of Errors Past
Although I didn't know it at the time, I made an error in laying out BH-2 back in December, 2011.
Good Progress
That error wasn't discovered and "repaired" until September, 2012. (Jan helped me spot my error then, too.) Measure Twice Cut Once
However, the real consequence of that error and repair - bad geometry for the King Plank - was not realized until now.
Various views of the King Plank mock-up today:
I'll cut the notch in BH-2 deeper until the King Plank is supported at the stem, BH-1 and BH-2. Then, doublers on both faces of the frame and a filler in between should correct the previous errors and strengthen BH-2.
Of course, now I can only wonder what other ghosts of earlier errors/repairs will appear as work proceeds on Gardens.
That error wasn't discovered and "repaired" until September, 2012. (Jan helped me spot my error then, too.) Measure Twice Cut Once
However, the real consequence of that error and repair - bad geometry for the King Plank - was not realized until now.
Various views of the King Plank mock-up today:
- Overall view:

- At the bow - a pretty close fit to the stem and the top of the stringer/plank structure:

- In the existing notch in BH-2 (the real King Plank will terminate at BH-2):

- At BH-1:


I'll cut the notch in BH-2 deeper until the King Plank is supported at the stem, BH-1 and BH-2. Then, doublers on both faces of the frame and a filler in between should correct the previous errors and strengthen BH-2.
Of course, now I can only wonder what other ghosts of earlier errors/repairs will appear as work proceeds on Gardens.
Wednesday, December 23, 2015
A Bit of Remediation
Jan was in the Boat Cave a few days ago and commented that the starboard side of BH-2 looked higher than the port side. I've looked at that frame many times without making that observation - but today I compared the two sides.
I set a batten across on the backside of the frame, marked the batten every three inches and then measured the vertical distance to the top of the frame on each side.

The result? The starboard side was higher at each of the seven measuring points than the port side! Jan has good eyes!
I made a pattern of the port side, transferred the shape to the starboard side and will (carefully) use the angle grinder and ROS to correct the starboard side. (The black line on the port side of the frame is old and not germane to today's effort. The line on the starboard side is my target.)
Jan needs to visit the Boat Cave more often!
Sunday, December 20, 2015
Warmth (Relative but Workable)
The Boat Cave got its first real test yesterday. The outside temperature was 24F and the winds were 15-20 mph. It was cold walking out to the barn.
The temperature inside the Cave was 30F - which really was good to see: the insulation is keeping the winds/drafts out. I turned on the Halogen work light, fired up the Big Buddy propane heater and slid an insulation panel into the doorway (still haven't hung the door). Within 20 minutes the inside temperature was up to 40F, and after another 10 minutes the temperature was 50F where it stayed.
Now that's not exactly balmy but I did shed a layer and was able to work comfortably. I only ran the heater on the medium setting so there is more heating capacity. Once the door is properly hung and the gaps around the door are better sealed, I expect to have mid-50s to mid-60s to work in.
As for localized task heat, I can set up shop lights (1, 2 or 3) focused on a work area, shroud the area with black plastic to get 65-70F - plenty for curing epoxy. Here is the bow section with a single light generating 65F.


One issue with the propane heater is that on the medium setting, two 1-lb canisters are good for about 4 hours or so. I may decide to get a larger tank and connector hose. Other than that I am satisfied that the Boat Cave will let me work later into the winter and earlier next spring.
Friday, December 18, 2015
Not As Planned
So, things don't always work out the way they are planned…
The platform decking didn't get cut and fit this week. But all our Christmas shopping is done and packages are in the mail (to Cleveland, Chicago, Sacramento, Denver and Tanzania).
The bow section is still waiting for one last coat of epoxy and paint. But the Christmas tree is up and decorated and the outside lights have been installed (and work!).
The tiller mock-up hasn't been finished. But Christmas baking and cooking is well under way.
So, yeah, things don't always work out the way they are planned. But that is not always a bad thing.
Wednesday, December 16, 2015
X Marks A Spot
The sore throat is healing.
After supervising the electricians installing a dedicated circuit to the Boat Cave (I know next to nothing about electricity) and after getting almost the last Christmas package to the Post Office, I decided to figure out where the boomkin mount goes.
First, I had to make some adjustments to the 75mm x 45mm hole previously cut in the transom for the boomkin.

The opening needs some cleaning up and some epoxy/fiberglass treatment but I think the size is correct - at least it fits the boomkin I built.
The location on the starboard seat is marked with a blue-tape X.

If this exact location needs refinement, at least I know where to install the doubler.
So, here's the boomkin/mount held in place.

I need a shorter bolt. I also need to sand the boomkin just a bit to accommodate the two inside washers. But, those are pretty minor adjustments. Also, obviously, the cockpit seats have not been permanently installed.
Tomorrow: fitting the forward platform decking.
Sunday, December 13, 2015
Slow Days
Nice (enough) weather lately but I've been down with a sore throat (no other symptoms) since Thursday which means there has been no physical progress on Gardens.
I've been making lists of what needs doing, how to do those things and prioritizing the work. Seeing the progress on two other Pathfinders (in the Florida Keys and in Houston) is inspiring. Tomorrow should find me back in the Boat Cave and in the shop making sawdust and progress.
I've been making lists of what needs doing, how to do those things and prioritizing the work. Seeing the progress on two other Pathfinders (in the Florida Keys and in Houston) is inspiring. Tomorrow should find me back in the Boat Cave and in the shop making sawdust and progress.
Thursday, December 10, 2015
Tiller/Transom/Rudderhead
Working the mock-up for the heel of the tiller, I discovered the opening in the transom for the tiller isn't tall enough or wide enough.


Enlarging the opening in the transom is added to the "To Do" list.


Enlarging the opening in the transom is added to the "To Do" list.
Tuesday, December 8, 2015
Cool and Damp
Last week's mild and unseasonably warm weather has given way to cool and damp. Cool and damp enough to need a better heat source than just the halogen work lights.
My new Mr. Heater Big Buddy heater works well enough for me to work comfortably in the Boat Cave. Unfortunately, I don't have room in the Cave to lay out 4x8 sheets of plywood to cut out the platform decking. I set up 2x4s across sawhorses outside the barn last week.

Too damp yesterday and today for that, so I turned to other tasks needing work.
Necessary stuff but not as immediately gratifying as the cockpit seat.
My new Mr. Heater Big Buddy heater works well enough for me to work comfortably in the Boat Cave. Unfortunately, I don't have room in the Cave to lay out 4x8 sheets of plywood to cut out the platform decking. I set up 2x4s across sawhorses outside the barn last week.

Too damp yesterday and today for that, so I turned to other tasks needing work.
- Mocking up a tiller
- Adding a doubler for the access hatch in BH-1
- Getting a better fit for the king plank pattern
- Fitting and installing cleats to support the cockpit seats
- Cleaning up the debris from building the Cave
- Installing peg board and a shelf
Necessary stuff but not as immediately gratifying as the cockpit seat.
Sunday, December 6, 2015
Cockpit Seats - Part II
All three cockpit seat panels have been cut and fitted! The tick stick method works for me and I am now over my trepidation about cutting irregular shaped panels.

One lesson learned: Follow the build sequence (and tips) offered by the designer in the build instructions. John W describes fitting the seats and foreward platform decking before the planks are installed. At the time I was planking, this did not make sense to me. Now, it does. Before the planks are installed, one can cut the seats/decking oversize, run a batten along the frames, draw a line and cut out the shape. I'll do that for my next build.
Next up, the foreward platform panels.
Friday, December 4, 2015
Cockpit Seats
With much trepidation about fitting the cockpit seats and sleep platform decking, I've been looking for that 'perfect' method of transferring the curves of the hull to the plywood for the seats and deck. I decided on the tick stick method. I also decided to test it with a sheet of luan before risking a sheet of meranti plywood.
Using foam core for the spiling batten and a simple tick stick, I marked off the shape of the port-side cockpit seat.

Transferring the marks to the luan, the curve (matching the hull) looked WAY off…
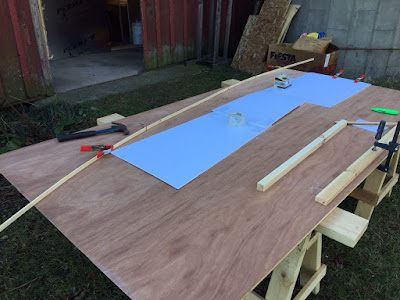
I measured, checked those measurements and remeasured. (Interestingly, to me, the while foam-core, reflecting the sky, looks blue in the photo.) Everything checked out so I cut the luan to shape. And… needing only minor tweaking, it fit! Cutting the meranti was, once I made the first cut, anti-climatic.

It fit, too.
This is a major hurdle for me. Yes, I only cut and fit one piece today - but now I know the method works. More importantly, I know I can do it! Tomorrow, the rest of the seats and decking!
Wednesday, December 2, 2015
King Plank Lamination
While I am using a piece of pine from a Big Box store as a template for the king plank, I have created a more suitable rather plank of CVG DF using board-widening technology - otherwise known as edge glued laminating. I didn't have a wide enough piece for what I needed but plenty of narrower stock.
Edge-glued lamination of three pieces of CVG DF to get the needed width:

Trimmed to width:

Sanded smooth:

Finished board:

The plank is now ready for fitting - but I am still working on the template. Installation of the king plank also has to wait for work on the bow section to be completed: That space is tight enough for painting, to say nothing of the impossibility of installing the anchor well floor if the king plank is installed first.
So now I'm working on the bow section: sanding first, gaps between BH-1 and the first plank filled, epoxy coating, paint, installation of the anchor well floor and whatever else needs doing.
Sunday, November 29, 2015
Boat Work Resumes
The Boat Cave is 99% complete - figuring out how to install the door panel so I can close off the space and still access it easily is about all there is to do to finish the Cave.
As for the boat work…
Gardens has fresh recruits all ready to set sail:

And one of those recruits tried out the forward end of the sleeping platform - he doesn't seem to think decking the space is necessary. That would certainly speed up completion of the interior!

As for the boat work…
- Two small gaps between the second plank and BH-1 have been filled (the heater box, a shop light and black plastic provided enough heat for the epoxy). Sanding and painting of the bow space to follow.
- The cockpit seats are being fitted. This process has always been tricky for me but slowly and carefully it is getting there. I am beginning at the aft end as the shapes seem to be more regular and there seems to be fewer detailed-cut-around shapes,
- The cleats supporting the edges of the cockpit seats need to be fitted and glued. Again, the heater box, black plastic and a shop light will provide enough heat for the epoxy to cure .
- Three pieces of CVG DF have been glued up for the King Plank. The fit of the 1x pine board template for the Kink Plank is being tweaked to get a better fit around the stem. I plan to leave the King Plank long so there is room to "play' with how the deck will fit (how far aft of BH-2 do I want the deck to extend?).

- John Welsford's post re laminating a tiller for SEI pushed me to begin the same process for Gardens' tiller. I plan to use some ash we cut on the property two years ago laminated with walnut.

Gardens has fresh recruits all ready to set sail:

And one of those recruits tried out the forward end of the sleeping platform - he doesn't seem to think decking the space is necessary. That would certainly speed up completion of the interior!

Sunday, November 22, 2015
Boat Bay Becomes Boat Cave
Gardens has been housed in one of the large bays of the barn, referred to around here as the Boat Bay.

The Boat Bay has become the Boat Cave.

The space is a little tight but workable. The foil-faced foam insulation panels do block a good bit of the wind that whistles through the barn - and that should improve as I fill gaps and tape seams. A small space heater and several work lights may (or may not) help warm the space.
Time will tell if this project extends my work time on Gardens. In the meantime, I have boat work to do...
Wednesday, November 18, 2015
Winterizing the Boat Bay
The winterization of the Boat Bay is nearing completion: Creating a smaller space with simple framing of 2x4s tied in with the barn's posts & beams and lined with 4x8 foil faced foam insulation panels.
Two days ago I emptied the Boat Bay - except for Gardens - and moved everything into the yard. Hard to believe all that stuff was sharing the space with Gardens.

Of course, all that stuff had to be brought back inside that evening - considering the rain in the forecast… Fortunately, we found new homes for most of that stuff elsewhere in the barn.
Three of the four walls have been lined with insulation and the seams taped . Framing and paneling the fourth wall are next, to be followed by installation of the overhead panels. Winterization should be completed in time for Friday's expected cold and snow. I can get back to boat work soon...
I am hoping the smaller, insulated space will give me more work time on both ends of winter. Hopefully, warming this new space (the Boat Cave, roughly 2,500cf) will be easier to warm than the old space (Boat Bay, roughly 13,000cf) - which really is an impossible task. One thing is certain: even without the overhead panels installed the Boat Cave, with its foiled walls, is a brighter, lighter space. The Boat Bay seemed to suck the light out of the work lights I use.
Sunday, November 15, 2015
A Little Every Day
Gardens looks great to me right side up.
There is a lot to do but this new, right-right-side-up perspective is motivating - even if the tasks aren't always too exciting: sanding the interior (prepping for paint), adding support material for the mast step, fitting the mock-up King Plank; gluing up some "left over" CVG DF for the King Plank; and other miscellaneous tasks.
I am hoping to extend my working time in the Boat Bay by installing temporary walls lined with foil-faced insulation panels. The overhead will be insulated, too. A couple guys at Scamp Camp in Eaton Rapids, MI suggested this idea in late September and I am getting the job done now. We'll see if it does let me work later into the winter and earlier next spring.
Nothing spectacular, but following the adage: Do something every day, Gardens is progressing.
Wednesday, November 11, 2015
Mast Raising Considerations
Previously, I mentioned a couple of issues re the King Plank, the mast step, supporting the mast step and stepping the mast. I spent a bit of time (away from sanding) trying to sort out just what those issues are for me. So, here they are:
King Plank: Pretty straight forward - follow the plans. Except, I have concerns about the position of the mast step. More on the King Plank later.
Mast Step: John drew up a balance lug yawl sail plan based on the 100sf Scamp sail (I want to use my 105sf GIS sail). The mast step is positioned right aft of BH-1. With the mast in place, access to the bow compartment is not possible. I wonder how often I'll need to access that space when the mast is stepped. Fortunately, John did not include a mast box for this sail plan (otherwise access to the bow space would be impossible).
Supporting the Mast: The plans show the step at BH-1 and a hole through the deck and King Plank (creating the partners). (Think of Wile E. Coyote's black holes. The clamps are holding mock support pieces.)

This arrangement supports the mast at the partners but it means holding the mast vertical, lifting it almost 24" to clear BH-2 and reaching about 34" from BH-2 to the partners to place the mast through the partners. Now, my birdsmouth mast is respectably light at 24 lbs but I don't want to be balancing it vertically while leaning forward to reach the partners. I want a different way to step the mast.
What I want is a way to put the foot of the mast in the step and walk the mast to vertical. This would, I thought, mean creating a slot in the King Plank and cutting BH-2 to accommodate the slot. I thought the King Plank and BH-2 could be adequately supported to accomplish this - but I was - and am - hesitant to cut any of the bulkheads.
What I came up with is to cut a slot in the King Plank between BH-1 and BH-2, beginning at the mast location and ending several inches forward of BH-2.

I still think the King Plank will need additional support/structure, perhaps something as simple as a 1x doubler between the two bulkheads. A plug to fill the slot will support the mast.
Raising the Mast: Standing in the boat and holding the mast horizontally, the mast is already above the top of BH-2, which makes slanting the foot of the mast forward and down into the slot and into the step much easier than balancing the mast vertically. Once the mast foot is in the step, walking the mast to vertical and securing the mast with the plug should be straight forward.
I'm still fiddling with details but I think the concept is feasible and doable
Sunday, November 8, 2015
Taking Inventory
Okay, so I'm not sure "inventory" is the correct terminology for listing what needs to be done on a project but that's what I did today. There is a lot to do…
I took time to admire the lines John created and to enjoy those lines lit by the afternoon sun filtering through the barn.


I began work on the king plank - although I am a long way from installing it. Also played with a couple of notions about placement of the mast step (well, not so much as it needs to go where John designed it to go), how to support it based on John's notes (am I interpreting those notes correctly?) and how to deal with stepping the mast. This last issue is critical.
John drew up a sail plan based on the 100sf Scamp lug sail. The front of the mast is 76mm aft of BH-1. This raises the question: How do i bring the mast to vertical, lean/reach across the deck forward of BH-2 and drop the mast through the deck? Not very easily. A mast gate solves that issue - but raises a number of other questions re the entire structure between BH-1 and BH-2 as well as concerns about the integrity/stiffness of the hull at BH-2. So, I have plenty to think about as I work at prepping Gardens' interior for paint (bilges) and laying out the cockpit decking.
Friday, November 6, 2015
That Went Well
Nine of us - including five neighbors I had not met before today - turned Gardens today. The turning itself took less time than it took to explain the process…


When we finished we enjoyed a good lunch - pulled pork sandwiches, coleslaw, baked beans, chips and pop with bear claws for dessert - and fun conversations about farming, weather, where we all went to school and other get-to-know each other topics. Beer was available but these guys were going back to the fields after lunch so no one had a beer (I did later in the afternoon). When the guys left, they said to let them know when I need to turn the boat again or load it on a trailer.
Gardens now rests on blocks just above floor level. It will be very easy to get in and out of the boat to work on the interior.
It was a good day.
Thursday, November 5, 2015
Two Things
One, Gardens and the Boat Bay are ready for tomorrow's festivities: the of Turning Gardens.
The boat bay was cluttered, messy and dusty. Before:


I tidied up, put things away and swept. After:


I had four of us (me and three others) lined up to turn Gardens but none of us are as hale and hearty as we once were - more help was needed. Our neighbor, Bruce, is retired but his hobby is driving a tractor for a local farmer who Jan knows. Bruce gave us the farmer's number and Jan called the farmer's wife to explain what we planned to do. Another call to the farmer himself and we have a few (3, 4 or 5) more able bodies lined up to help with the turning. We are providing lunch: Pulled pork sandwiches, baked beans, coleslaw and dessert. A community effort - sort of like a barn raising of days past. Should be fun.
Two, yesterday marked this blog's fourth anniversary. Reading back through the years, Gardens progressed rather quickly and I was optimistic about getting her launched in two years. Life intervened - and I wouldn't change a thing - and the build slowed. Now, I am planning to sail Gardens by next June.
My purpose in starting and maintaining this blog was to create a record of the building and sailing of Gardens for my own purposes. That it is read by, what seems to me, as a rather large audience astonishes me. Thank you - every one who has read this blog.
Sunday, November 1, 2015
A Broken Record...
Yes, almost another complaint about the weather. Rather pointless, really, because this is November in Michigan. It is going to be cool/cold, rainy and blustery. Not ideal boat building conditions. So, no, I'm not going to carry on about the recent weather because right now, the weather doesn't matter.
Having decided to turn Gardens this coming week, my recent concerns with the weather and whether I can get done what I wanted to get done "in time" (whatever that meant) have faded away. My immediate concerns now are lining up the help I think I need and preparing (cleaning up) the boat bay.
Deke's Pathfinder build in the Florida Keys provided some inspiration and encouragement yesterday. He turned his hull over - apparently by himself! I suspect five or six guys ought to be able to turn Gardens on Friday.
Thursday, October 29, 2015
Late October
The colors in the woods have dulled and turned drab. Crops are being harvested and fields are being plowed under. Winds… rains… low temperatures and overnight frosts. Yes, it is late October in Michigan and we are heading into a fine, refreshing time of the year.
Temperatures in the boat bay don't drop as low as the outside overnight low, but it doesn't warm up very well either - 46 in there today. The next coat of paint is waiting for the next day promising a bit of warmth. Looks like that will be Sunday; then Tuesday.
All things considered, turning Gardens at the end of next week - even if the paint work isn't completed - is beginning to make sense to me. Turn her for the winter; fit out the interior and decks as I can; turn her again in the spring to finish up the bottom and paint; and turn her again to paint the decks and outfit her.
Why not turn the boat this week and use next week's warmer weather to get started on the interior? My help isn't available this week. It's as simple as that.
Late October heading into one of the finest times of the year - just not great boatbuilding weather.
Sunday, October 25, 2015
End of the Month?
Can I get Gardens painted and turned over by the end of the month? Maybe... but probably not. Painting continues albeit slowly. Weather dictates when I can paint but last week's cold has passed and conditions have been more favorable. Still, the process seems to stretch out interminably and I think back on days lost this past summer... Can't do anything about those lost days now so I'll just keep plugging away.
I think the bigger issue now is getting enough help here at one time to do the deed.
I think the bigger issue now is getting enough help here at one time to do the deed.
Wednesday, October 21, 2015
While Paint Dries
Warmer temperatures allowed for painting yesterday.
While the paint dries I need something to do. Small, and some not so small, parts need work, including the mizzen mast step, the outboard bracket and the centerboard.
Gardens' mizzen mast step was first made up according to the drawing a couple years ago. This summer, with a mizzen mast mock-up (one of my test birdsmouth assemblies), I realized the front edge of the mast was not supported by the mast step. I glued up a new step a month ago and today took advantage of the paint drying to cut the step to size & shape - with one variation. (The first step is maple and mahogany; the new one is cherry and mahogany - it's what I had on hand.)


Yes, the new one needs sanding and finishing but I'm marking it as progress.
As for the outboard bracket, there is drilling, fitting, trimming, sanding, drilling, finishing and assembling to do. These are all small tasks that can be done to fill time and without hurry.
The centerboard was also assembled two years ago but needs to be finished: faired, sanded, drilled (pivot hole) and painted. These tasks, too, will be done over the next few days as paint dries.
Sunday, October 18, 2015
A Beautiful Day in the Neighborhood…
Yes, autumn in Michigan is gorgeous - bright, crystal clear, blue sky, brilliant sunshine, wonderful color in the trees and gusty winds whipping fallen leaves around the yard.
Yes, absolutely gorgeous - and too cold for painting in an unheated barn! We've had frost the last two nights and daytime highs in the mid-40s.
But all was not lost:
This coming week looks promising: warmer, with less wind, but losing three days of painting time (Friday was lost to a doctor's appointment and errands in Grand Rapids) means Gardens may not be ready to turn over by the end of the month.
Yes, absolutely gorgeous - and too cold for painting in an unheated barn! We've had frost the last two nights and daytime highs in the mid-40s.
But all was not lost:
- Some clean up in the boat bay and in the shop.
- Experimenting with different colors for the cockpit.
- Planning and estimating materials for winterizing the boat bay.
- Preparing blocks to support Gardens when we turn her over.
- Lining up helpers for turning Gardens over.
This coming week looks promising: warmer, with less wind, but losing three days of painting time (Friday was lost to a doctor's appointment and errands in Grand Rapids) means Gardens may not be ready to turn over by the end of the month.
Thursday, October 15, 2015
Story Board
Jan is an interior designer and artist - and she always uses a story board when planning a project (painting rooms or the house) but not a watercolor, oil or acrylic painting (those just seem to flow naturally). The story board helps her visualize different combinations of colors. While I spent a good bit of time thinking about a color scheme for Gardens, I never made a story board to help me decide anything. Until this week…
I had picked out a nice, soft, buttery, creamy yellow ("Fired Clay") for the hull and hunter green for the sheer strake to be off-set with varnished Douglas Fir trim. I really had no idea for deck or interior colors. My story board - a small mock-up cobbled together this week - is helping me sort things out.

That "nice, soft, buttery, creamy yellow" contrasts nicely with the white primer - until there is no white primer next to it. It also looks very white in direct sunlight - just not as harsh as a "real" white would be.
The hunter green is very dark and, in certain light (like our kitchen lighting), looks black.
The color of the deck sample ("Camouflage") is not the same as the "nice, soft, buttery, creamy yellow" but in certain light they look identical. In certain light the deck color has a green tint to it; in other light it looks white. It is amazing to me how much light and shadow affects color.
The deck piece comes off the mock-up easily so I can try different colors without any trouble (beyond picking and choosing colors).
Gardens received her first full color coat of paint this afternoon. I'll let that coat sit at least two full days before applying the next coat.
Sunday, October 11, 2015
Color
Well, sort of… Today the last coat of primer went on the hull. The next step is a 50/50 mix of primer (white) and color ("Fired Clay" which is a creamy, buttery, soft yellow that looks nearly white in sunlight). After that, full color…
Here is a preview - just a touch of Fired Clay along the laps for a look-see…
Photo
(Yes, the stem still needs some work.)
We are enjoying great fall weather: crisp, clear, blue sky; lots of sunshine; some wind and low 70 temperatures. Nights are cool so the maple trees are going red and yellow. These are wonderful days for boat work.
Here is a preview - just a touch of Fired Clay along the laps for a look-see…
Photo

(Yes, the stem still needs some work.)
We are enjoying great fall weather: crisp, clear, blue sky; lots of sunshine; some wind and low 70 temperatures. Nights are cool so the maple trees are going red and yellow. These are wonderful days for boat work.
Friday, October 9, 2015
Turning a Blind Eye
Two weeks past my estimated "paint by" date and I'm still futzing with dings and dimples in a couple of planks. I thought things looked very good under yesterday's coat of primer - of course, that was in fading light, I was tired and I was optimistic. In the clearer light of day this morning, I realized there are a couple of spots needing attention.
Now that those spots have been sanded and filled, I'll see how they sand out tomorrow.
Really, though, I'll soon turn a blind eye to these blemishes (as any number of people have suggested) as I am probably the only one to see them (although there is one spot in particular…). But, as Jan asked the other day, "Who are you building this boat for? Us or the Smithsonian?" Time to get on with the painting.
An update to the spar formerly known as the mizzen mast. I figured it would work as the yard for Gardens' balance lug main. However, having decided to go with the smaller sailplan, the spar is now the boom for the smaller main.
My experiment/trial/test of the biaxial FG sleeving was a success! The process went smoothly enough, didn't take as much epoxy as I expected and the results turned out better than I expected. I plan to use sleeving on the main mast, mizzen mast and the yard (I'll leave the boom alone).
Tuesday, October 6, 2015
Presents!
Yesterday was like a birthday! The UPS truck followed the mail carrier up the drive, both delivering packages - for me! Of course, I was expecting these deliveries but still it was fun to get them.
One box from Duckworks included two sizes of Biaxial FG Sleeving - one for Gardens' mast, the other for sampling/testing purposes.

Also in the box was a copy of Dave Nichol's book, The Working Guide to Traditional Small Boat Sails.

One box from Amazon had two quarts of Rustoleum Spar Varnish. Not terribly exotic but I've been using this varnish for a few years and I like it.

The other Amazon box contained a roll of stretch wrap plastic - to wrap the Biaxial FG Sleeving as per the Duckworks' Demo Video (scroll to bottom of the linked page).

And now, on to the fun stuff: I built a short, small diameter (43mm) section of birdsmouth spar for sampling/testing the sleeving.

I built a small stand to hold the test piece.

The test operation was moved to the house so Jan (recovering from hip surgery) could assist. The sleeving went on the spar; epoxy slathered on; everything wrapped in plastic stretch wrap which was then perforated to allow the excess epoxy to ooze out.
Estimating how much epoxy to mix was interesting. The 10 oz. sleeving looks like it will take quite a bit of epoxy to wet out, so I mixed up 60mg (which to me is quite a bit). I only used about half of that to wet out the 16" of sleeving.
Now we have to wait until this evening - or maybe this tomorrow morning - to see the results. Since this is the first time using this technique and a learning experience, I won't be disappointed if the results aren't great.
Subscribe to:
Posts (Atom)