Although plywood and epoxy are used extensively in building Gardens of Fenwick, there is much more to the project than those two materials.
Gardens' sail-plan will be a gaff yawl rig with three sails: jib, mainsail and mizzen. Encouraged by my success sewing the lug sail for my Goat Island Skiff last year, I've decided to sew the sails for Gardens. A kit for the mizzen sail has been ordered from SailRite and should be here early next week. Since I can only sew one thing at a time, it didn't make sense to me to order all three sails at one time. I'll order the jib next and finish up with the main sail later in the spring.
Also ordered this week: inspection hatches to be installed in Gardens' seat-fronts and decks and an assortment of cleats. And, while I haven't ordered it yet, I was pleasantly surprised to learn the recommended roller-furler (Ronstan RF76) is much more reasonably priced than I expected. I've also been studying detailed instructions for fabricating a suitable home-made roller-furler - so I may not be ordering the Ronstan furler after all.
Thinking ahead to the mast and spars, I've been reviewing the plans to determine what materials and hardware I'll need to order before too long. Thinking further ahead, there will be materials, parts, line, gear and equipment to decide upon and order.
There is a lot more to building a boat than plywood and epoxy.
Wednesday, March 28, 2012
Saturday, March 24, 2012
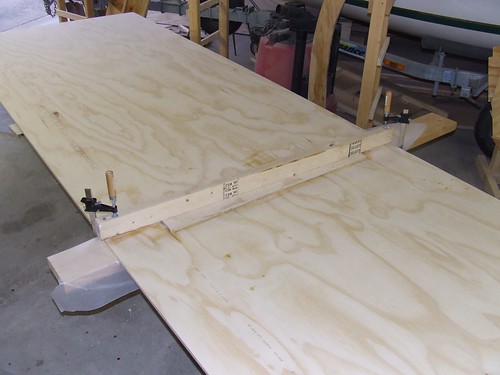
Some Assembly Required
Progress! The centerboard case fits... finally! Of course, cutting the slot was a fine lesson of measure twice (at least!), cut once. I would have sworn (actually, I did) I measured more than twice. Despite that effort I cut the slot too long (good thing the boat is wood and epoxy - I can fix the mistake and paint makes such things invisible) and too narrow (that was planned - better too narrow than too wide). Tools used in fitting the case to the slot: block plane, rasp, pull saw and scraped knuckles.
Here is the case fitted to the bottom, the gap in the bottom at the aft end of the case clearly visible:
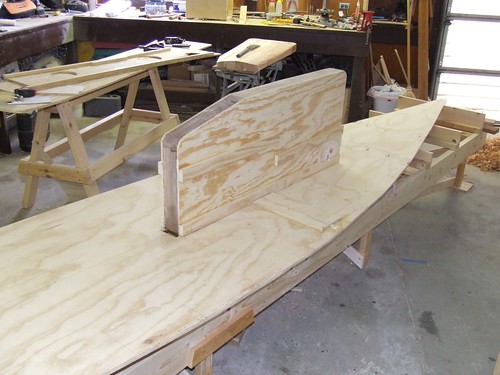
After getting the fit close, I removed the case, took the bottom off the platform and trimmed the risers to allow access for installing the chine (later in the process). Once the risers were trimmed I screwed the bottom to the platform using sheet-rock screws with 6mm plywood 'washers' (those darker spots on the bottom). Then I 'fine-fit' the case. And, for fun, propped Frame #5 at the aft end of the case.

If you look closely, you can see marks (put there when the frame was built a couple of months ago) on the frame lining up with the edges of the bottom. Isn't it great when parts line up the way they are supposed to?
Okay, so maybe you can't see it in this photo. Believe me, the marks line up with with the bottom edges. This is both very satisfying and very encouraging!
Now, the case has not been installed as there are one or two details to address before taking the Very Big Step of actually screwing and gluing it into place.
Here is the case fitted to the bottom, the gap in the bottom at the aft end of the case clearly visible:
After getting the fit close, I removed the case, took the bottom off the platform and trimmed the risers to allow access for installing the chine (later in the process). Once the risers were trimmed I screwed the bottom to the platform using sheet-rock screws with 6mm plywood 'washers' (those darker spots on the bottom). Then I 'fine-fit' the case. And, for fun, propped Frame #5 at the aft end of the case.
If you look closely, you can see marks (put there when the frame was built a couple of months ago) on the frame lining up with the edges of the bottom. Isn't it great when parts line up the way they are supposed to?
Okay, so maybe you can't see it in this photo. Believe me, the marks line up with with the bottom edges. This is both very satisfying and very encouraging!
Now, the case has not been installed as there are one or two details to address before taking the Very Big Step of actually screwing and gluing it into place.
Monday, March 19, 2012
Time Will Tell
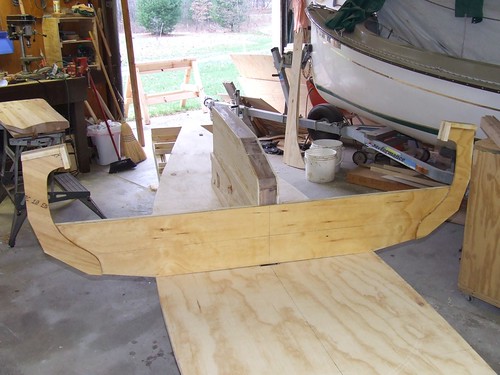
I've been saying this for some time now, but I'm almost ready to assemble the hull - at least the frames and stringers. Of course, I keep finding odds and ends that need to be done which has delayed the start of assembly.
Last week I decided to modify the centerboard lifting mechanism which lead to changing the case a bit. Oh, nothing dramatic; just time consuming. So, have I made any progress over the past few days? Yes. I think I have.
The building platform has been finished - complete with risers installed. The bottom has been cut out (including the slot for the centerboard!).
A couple of fiddly items have been epoxied to the centerboard case sides. While the epoxy sets up, I have begun shaping the centerboard. Using my #5 jack plane and the handy block plane, I've got a good start to being ankle deep in wood shavings:

The foil shape is beginning to emerge from the blank.

There is still a lot of wood to be removed before the centerboard is shaped and ready for fiberglass, epoxy and paint.
I am hopeful of drilling the necessary holes in the CB and case and gluing the second side of the case tomorrow. Assembly of the hull will begin the day after the case is glued. No telling when that will be - but from where I sit assembly may begin on Wednesday. Time will tell.
Last week I decided to modify the centerboard lifting mechanism which lead to changing the case a bit. Oh, nothing dramatic; just time consuming. So, have I made any progress over the past few days? Yes. I think I have.
The building platform has been finished - complete with risers installed. The bottom has been cut out (including the slot for the centerboard!).
A couple of fiddly items have been epoxied to the centerboard case sides. While the epoxy sets up, I have begun shaping the centerboard. Using my #5 jack plane and the handy block plane, I've got a good start to being ankle deep in wood shavings:
The foil shape is beginning to emerge from the blank.
There is still a lot of wood to be removed before the centerboard is shaped and ready for fiberglass, epoxy and paint.
I am hopeful of drilling the necessary holes in the CB and case and gluing the second side of the case tomorrow. Assembly of the hull will begin the day after the case is glued. No telling when that will be - but from where I sit assembly may begin on Wednesday. Time will tell.
Thursday, March 15, 2012
Works in Progress: The Centerboard and Case
Last week I thought I was nearly ready to begin assembling the hull. I was wrong.
I knew the centerboard case had to be built before work could begin on the hull (the case and the bottom are the first two components to be joined together to begin the assembly) but I managed to ignore the urge to build the case. Late last week I began the case and it has been one thing after another... including a design modification.
Studying the centerboard lifting arrangement on the plans, I wondered about using a simpler method - a straight-forward pennant attached to the trailing edge of the board and lead up through the top of the case. I posed the question on the Yahoo group forum and John Welsford responded, telling me a pennant is fine (and cautioning about the possibility of water coming up through the tube in top of the case). So today I recut and fit new spacers; clamped up the case; test-fit the centerboard (it fits!); and glued the spacers to one side of the case.
The case is upside down in this photo:
Here is the centerboard blank rough cut to shape:

Obviously, I have some serious shaping of the centerboard ahead of me!
Tomorrow, the spacers and the inside of the case will receive another coat of epoxy before the other side of the case is glued into place. Once the case is assembled I'll be able to cut the slot in the bottom to the dimensions of the case. And then, it'll be "off to the races!"
In the meantime, the centerboard and case continue as works in progress.
I knew the centerboard case had to be built before work could begin on the hull (the case and the bottom are the first two components to be joined together to begin the assembly) but I managed to ignore the urge to build the case. Late last week I began the case and it has been one thing after another... including a design modification.
Studying the centerboard lifting arrangement on the plans, I wondered about using a simpler method - a straight-forward pennant attached to the trailing edge of the board and lead up through the top of the case. I posed the question on the Yahoo group forum and John Welsford responded, telling me a pennant is fine (and cautioning about the possibility of water coming up through the tube in top of the case). So today I recut and fit new spacers; clamped up the case; test-fit the centerboard (it fits!); and glued the spacers to one side of the case.
The case is upside down in this photo:
Here is the centerboard blank rough cut to shape:
Obviously, I have some serious shaping of the centerboard ahead of me!
Tomorrow, the spacers and the inside of the case will receive another coat of epoxy before the other side of the case is glued into place. Once the case is assembled I'll be able to cut the slot in the bottom to the dimensions of the case. And then, it'll be "off to the races!"
In the meantime, the centerboard and case continue as works in progress.
Wednesday, March 7, 2012
Building Platform
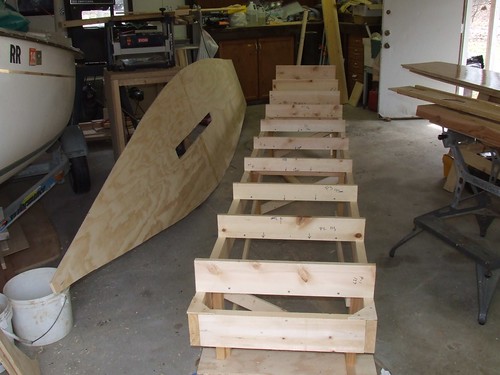
Gardens of Fenwick is nearing the Some Assembly Required stage.
The building platform took shape yesterday and today.

Assembling this platform was not a difficult task but handling the 16' 2x6s was something I was leery of doing alone. Fortunately a friend came over to help and we got the platform assembled yesterday. I spent much of today adding cross-braces and diagonals to beef up and stabilize the platform. Shims were needed under the end legs to level everything.
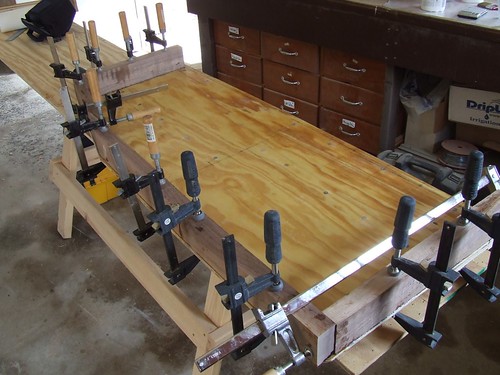
Late this afternoon I glued two sheets of ½" plywood together, end to end, to make a 16' sheet of plywood for the bottom of the boat. I used a butt join with a 6" butt strap. A 2x6 (covered with wax paper), a length of 2x3 and two bar clamps holds everything in place while the epoxy cures.

Tomorrow we'll loft the bottom on the plywood, cut it out and install the building stations on the platform.
Friday, we'll begin assembling the hull!
The building platform took shape yesterday and today.
Assembling this platform was not a difficult task but handling the 16' 2x6s was something I was leery of doing alone. Fortunately a friend came over to help and we got the platform assembled yesterday. I spent much of today adding cross-braces and diagonals to beef up and stabilize the platform. Shims were needed under the end legs to level everything.
Late this afternoon I glued two sheets of ½" plywood together, end to end, to make a 16' sheet of plywood for the bottom of the boat. I used a butt join with a 6" butt strap. A 2x6 (covered with wax paper), a length of 2x3 and two bar clamps holds everything in place while the epoxy cures.
Tomorrow we'll loft the bottom on the plywood, cut it out and install the building stations on the platform.
Friday, we'll begin assembling the hull!
Saturday, March 3, 2012
Phase I is Drawing to a Close
Phase I of building Gardens of Fenwick is coming to a close. Frame Fabricating is just about complete (see comments and photos on the Progress Notes page).
Frames are done; the stringers are done; and various bits and pieces (although I'm not sure 'bits and pieces' is an apt description of the centerboard case, seat fronts and transom) are nearly done. These components comprise the 'kit' components needed to construct the hull...
The next phase starts tomorrow when the building platform begins to take shape.
As this first phase comes to a close I find the prospect of phase II to be a mental hurdle for me. On the one hand I am anxious to proceed - I want to get this boat built and outfitted! On the other hand there lurks uncertainty and concern over venturing into new territory.
Fortunately, the experience of helping with the Sea Scout Sherpa project at the Havasu Pocket Cruiser Convention helps allay my concerns somewhat. I've seen how John Welsford boats go together and that is worth quite a bit to me. So, I look forward to Phase II - Hull Assembly!
Subscribe to:
Posts (Atom)