Fresh snow yesterday morning created a white topping for the dingy week-old snow already on the ground.
Christmas Day has been a quiet and relaxing day for Jan and I. For the first time in a long time there were no visiting family or friends (we saw family earlier in the week and visited friends last evening). Today we did see (via FaceTime) family in Oregon, Colorado and Belize.
Christmas is a time of reflection for me and, as I look back on the year, I am satisfied with the last twelve months. Did I finish Gardens and get her launched? No, completing and sailing Gardens will be a fine accomplishment, but it is not the entirety of my life. We were able to visit all of our children and grandchildren this year, which involved a good bit of traveling. Health issues took up a bit more time, but the results have all been positive. Fussing a bit about the political environment took up too much time before I remembered words of wisdom from Jan: I'd rather be at peace than be right. I've let go of the negative perceptions I experienced this year.
And so this is Christmas: I wish the same for everyone: be more mindful of being at peace than being right.
Sunday, December 25, 2016
Sunday, December 18, 2016
Things Are Looking Up
I can't explain the how or the why, but that grumpiness I whined about last week has resolved itself.
The cold and snow are still with us. Gardens sits waiting patiently for me. My workshop is still cold and in disarray. Christmas boxes have been, for the most part, mailed out. The lights and decorations have, mostly, been hung. And, the trip to Guatemala is further in the past. I'm glad to be home. Maybe listening to my six year-old granddaughter's stream-of-consciousness phone conversation helped...
Plans are in the offing for reorganizing the workshop, moving the wood storage racks to a more convenient spot in the barn, and figuring out how to get rid of cut-offs and scraps (I have some scraps that are several years old - if I haven't used them by now, I don't think I will). I'm counting on more storage and less horizontal surface will help de-clutter the shop. One can hope.
Closing in the Boat Cave is a bit trickier this year. With the gantry in place, the ceiling insulation is more piecemeal than it was last year. Still, making progress.
So, for whatever reason, I am in a much better frame of mind than I was last week and things are looking up.
Happy Holidays to everyone!
Sunday, December 11, 2016
Getting Grumpy
Winter is still more than a week away. Right… So, the six inches of snow on the ground don't really count yet… I don't mind snow - really - but this first snow of the season is making me grumpy.
Along with the snow, we're having prolonged periods of low temperatures (highs in the 20s). The cold is slowing progress on the rebuilding of the Boat Cave. And that is making me grumpy.
Work on the foils (centerboard and rudder) has moved into the shop where it is a bit warmer (low 40s) but it is tough to work more than an hour at a time and, yes, that is making me grumpy. A better heater is under consideration.
Prepping for the holidays is getting me down a bit, too. I like the results but not the work involved with decorating the house and tree. True, Jan does the tree but the lights on the porch have their own way of making me grumpy.
What is really making me grumpy is this sense that I am not making as much progress on Gardens as I think I should be making. Yes, I am making progress; just not enough.
Oh, I'll get over this grumpiness but it might take a few weeks. I am already looking forward to our annual New Year's Day visit to Pentwater on Lake Michigan: we stand on the beach (the pier is usually coated with ice!), face into the wind, shout out the old year and welcome the New Year with shouts of joy and then go enjoy a great bar burger at the Brown Bear. Sounds goofy but it helps blow off steam and takes care of a lot of grumpiness.
Sunday, December 4, 2016
Winter Approaches…
Winter doesn't begin for another two and a half weeks, but today's two inches of snow and mid-30s temperatures gave us a taste of what's ahead.
And I have to catch up with the weather - the Boat Cave needs rebuilding - at least the north end - after making room for the gantry. That is the immediate task at hand.
We are done traveling for the time being (trips to Oregon, Colorado, Kentucky and Guatemala kept us busy the last five months) and I have no pending medical concerns (the last five months also included hernia and cancer surgeries). The to-do list is waiting for me but I can see the end of the build in sight.
Yes, winter is approaching but I am gearing up to complete Gardens for a spring launch.
Thursday, November 17, 2016
Onto Stands
After a couple days of test (getting the balance point and slings figured out) lifts and show-and-tell demo lifts, Gardens was placed on her boat stands today.

 Finding the balance point proved to be trickier than I expected. During the first test lift, the bow came up while the stern did not. I moved the gantry aft about six inches. On the second lift, the stern came up but the bow did not. Moving the gantry three inches foreward found the balance point as the boat rose evenly off the floor.
After reworking the boat stands (initially built them 21" high but reduced the height to 11") today, I raised Gardens high enough to slide the stands into place and carefully lowered her onto the stands. The foreward stand is fine but the aft stand needed a bit of reworking to account for the rocker of the bottom.
The hull is not as rock-solid-steady on the stands as I'd like, so tomorrow additional supports will be installed to minimize any tipping tendency.
Tuesday, November 15, 2016
Elmer Works
Tested the gantry system late yesterday:
On the floor:
 Off the floor:
 The gantry needs to be moved aft a bit - the test lift was not quite balanced fore-and-aft.
On the floor:


Sunday, November 13, 2016
Busy Times
We've been busy over the last six weeks: Denver for a week (family), Kentucky Bourbon Trail for a long weekend (good bourbon, family and friends), the World Series (I grew up in Cleveland), outpatient surgery to remove skin cancer (not much fun), the election (not much fun about that either), and helping my brother-in-law complete a large woodworking project (fun but tiring).
The Boat Bay is being straightened up and cleaned out to make room for the gantry (to lift Gardens). Everything is ready (chain hoist installed, straps prepared, boat stands built, etc.) so the lift could take place any day now…
In the meantime, I built a portable-knock-down stand for my chop saw and I'm shopping for a new miter saw.

Saturday, October 15, 2016
Built Myself Into a Box
Or, more accurately, I built myself outside the box…
Way back when, early in the build, I decided I didn't want the centerboard raising/lowering mechanism shown in the plans. I wanted the centerboard to pivot as drawn but I wanted a simple pennant attached to the trailing edge of the CB passing through the top of the CB case and secured to a cleat. So, I built the CB case accordingly - the top completely closed in.
At some point I saw the problem with what I had done: how to install the CB and be able to line everything up. Might have been able to do it when the hull was still upside down… but now the boat is upright. I thought I could install it from below once the boat is on the trailer, but there isn't enough clear space in the trailer frame.
One possibility is to cut away the top of the CB case, install the CB and rebuild the top of the case. This option would let me lower the CB into the case with a sling.
Another solution is to build boat stands to support the hull high enough off the floor to fit the CB in from the bottom (using a jack of some sort to raise the CB into position).
Using boat stands and cutting away the top of the CB case would also work - keep the hull low but well supported and facilitate fitting the CB into the case.
Truth be known, I should have built stands last November when we turned the boat over.
Second truth… "Off plan" modifications need to be thoroughly thought though and planned before implementing.
Wednesday, October 12, 2016
Possibly Overbuilt...
Slow progress of late, due primarily to a lingering 3-week cold. The meds are working and I am feeling much better, thanks.
Yesterday's project was to build a gantry to raise Gardens onto (and probably off of) her trailer.

8' wide, 10'tall, 1-ton chain hoist (not pictured) (and that temporary bottom cross-bar will be removed).
Possibly overbuilt.
The Boat Cave clutter will be cleaned up before the gantry is positioned and Gardens comes off the floor.
Sunday, September 4, 2016
Returning to Work
As expected, I've been medically cleared to resume normal activities…
Began re-purposing the Boat Cave: removing the overhead so I can set up a chain hoist to raise/lower Gardens on & off her trailer. (I'll rebuild the Boat Cave in November so I can work through the winter.)
 I've got most of the components I need for setting up the hoist and I'm waiting on UPS to deliver (possibly Tuesday, probably Wednesday) the webbing I'll use for the sling.
About two years ago I purchased an air-cooled 2 HP Johnson outboard to use as a kicker (in and out of a marina if need be). This summer I finally figured out it doesn't fit Gardens well enough to be useable… so I now plan to use an electric trolling motor for the same purpose. This week I finished up (milled, drilled, sanded) a white oak blank for the motor mount. It still needs epoxy and/or varnish.

 Bilge clean-up and painting resumes this coming week; soon to be followed by installation of the cockpit seats and platform decking.
Having lost two full months of prime boat-building time, I am excited to be getting back to work on Gardens. And, finally, I am (pretty) confident enough to plan a Spring 2017 launch!
Began re-purposing the Boat Cave: removing the overhead so I can set up a chain hoist to raise/lower Gardens on & off her trailer. (I'll rebuild the Boat Cave in November so I can work through the winter.)

About two years ago I purchased an air-cooled 2 HP Johnson outboard to use as a kicker (in and out of a marina if need be). This summer I finally figured out it doesn't fit Gardens well enough to be useable… so I now plan to use an electric trolling motor for the same purpose. This week I finished up (milled, drilled, sanded) a white oak blank for the motor mount. It still needs epoxy and/or varnish.


Having lost two full months of prime boat-building time, I am excited to be getting back to work on Gardens. And, finally, I am (pretty) confident enough to plan a Spring 2017 launch!
Monday, August 29, 2016
New Trailer
Got a call from the dealer on Friday telling me my new trailer arrived and was available for pick up. Great!
Couldn't get there on Friday and the guy I worked with to order the trailer wasn't available until Monday. So, I picked up my new Genesis trailer this morning.
 All the lights worked. I expected the (empty) trailer to bounce a little bit on the way home but it didn't. The hubs were cool to the touch when I got home (about a 45 mile trip).

I am pleased.
Now, I just need to get the bunks adjusted and Gardens on the trailer.
PS: I expect to be cleared for all normal activities on Wednesday and back to work on Gardens by Thursday.
Couldn't get there on Friday and the guy I worked with to order the trailer wasn't available until Monday. So, I picked up my new Genesis trailer this morning.


I am pleased.
Now, I just need to get the bunks adjusted and Gardens on the trailer.
PS: I expect to be cleared for all normal activities on Wednesday and back to work on Gardens by Thursday.
Tuesday, August 16, 2016
Everyone's a Critic
We've got children and grandchildren visiting this week. The grandchildren are cute, bright, active and imaginative.
One of today's activities was to show Gardens to the four-year old grandson. He walked into the Boat Bay, walked around Gardens, thought for a moment and declared, "It's not stable!" and walked out of the barn.
Now, I'm not sure if he was being critical of the design, my workmanship or a combination of the two. I'm going to guess a four-year doesn't know too much about boat design (impressive enough that he knows - and used - the word stable) so I don't think he was really criticizing John Welsford's design.
And, while I wish my workmanship was better, I really don't believe he was commenting on my work either, so I'm not sure what prompted the remark.
On the other hand, he asked when the boat would be ready for sailing (always a good question)…
Thursday, August 11, 2016
Two Good Things
First, my surgeon cleared me for "normal" activities with a few restrictions:
Second, the trailer shopping trip was successful! Oh, not that I purchased a trailer yesterday but the dealer understood what I'm looking for. I had some questions the sales guy couldn't answer - but he called the manufacturer (Genesis Trailers) to get answers.
I ordered a new single-axle, galvanized, bunk trailer for Gardens today!
- No lifting of more than 20# for the next three weeks,
- No bike riding for the next two weeks,
- No yard-work for the next three weeks
Second, the trailer shopping trip was successful! Oh, not that I purchased a trailer yesterday but the dealer understood what I'm looking for. I had some questions the sales guy couldn't answer - but he called the manufacturer (Genesis Trailers) to get answers.
I ordered a new single-axle, galvanized, bunk trailer for Gardens today!
Saturday, August 6, 2016
Resting Soft Tissue
"Resting soft tissue" was Jan's mantra following her hip replacement surgery last fall. While my surgery on Thursday was no where near as major as a hip replacement, I am resting soft tissue. All is well - as long as I take it easy for a few days (and follow the surgeon's directions).
Of course, I've already changed my mind about refitting Karen Ann's trailer. I took a good look at it on Wednesday and decided a refit wouldn't be worth doing. I'd still have two boats and one trailer - and fitting the trailer to both boats isn't feasible.
On Friday - with nothing to do but rest, read and peruse the internet - I found a nearby dealer for both Genesis and Karavan trailers. As soon as I can resume "normal" activity, I'll pay the dealer a visit and see about a new trailer for Gardens.
In the meantime, I'll continue resting soft tissue and catching up on my reading.
Sunday, July 31, 2016
What To Do When You Can't Do Anything
Back from a great trip to Klamath Falls. (That little grandson is growing like a weed! And our five (almost six) year old granddaughter is a gem!)
Pre-op tests, ultra-sound and lab work have been completed, so I'm just waiting for Thursday's surgery.
But while I'm waiting to actually resume work, I've been able to ponder two issues that needed pondering…
Auxiliary Power: Since the Pathfinder design is just too wide to row, I picked up an old Johnson air-cooled 2HP kicker a couple of years ago for next to nothing, thinking it would be a good fit for Gardens. Well, I've discovered that old Johnson doesn't fit. I decided early on in the build that I wanted to hang the motor on the transom rather than in a motor well. The issue with the old Johnson is the shaft is too short and the motor head is too large to go on the transom. So, I am contemplating an electric trolling motor - probably a Minn-Kota 30 (but maybe a 40). Size-wise, a trolling motor makes more sense and since I don't plan on motoring more than getting in and out of a boat ramp (and/or a dock/marina), a trolling motor should be fine. Of course, that begs the question of where and how to install the battery.
Trailer: My search for a trailer for Gardens has not been productive. But, why not refit Karen Ann's (my GIS) trailer to accommodate Gardens? The trailer is sound although the winch post needs to be moved forward a bit. Yes, I'll need to rearrange the bunks to handle Gardens (honestly, I haven't figured out how to set it up to accommodate both boats) but that isn't major work. To deal with the overhang, I'll build a removable light-board. And, I can continue shopping for another trailer so each boat has a place to reside (once Gardens is completed).
This sitting around doing nothing - pondering doesn't really count - is leading to a mild case of mid-summer cabin fever. I'll get over it…
Sunday, July 24, 2016
Vacation!
We are on vacation in Klamath Falls, Oregon! Why Klamath Falls? Because my oldest son, his wife, daughter and newborn son live there! Nina and Grandpap needed to see the grandchildren!
So, one of the things we've done is visit Crater Lake.


Photos do not do the scenery justice!
Spent today doing projects around the house with my son. Good times.
A few more days here before we return to Michigan. This break has been good for me - clearing out the mental cobwebs - and I'm ready to get back to work on Gardens. Yes, what I can do will be limited for the next few weeks (due to surgery on the 4th) but I look forward to getting some work done.
Sunday, July 17, 2016
Stalled…
No progress, nothing, nada… for the last three weeks. This cessation of work was self-induced for reasons that are not totally clear to me.
And now… I am mentally ready to resume work but the restart will have to wait a few more weeks. Surgery (for a non-life-threatening condition) scheduled for August 4th means I shouldn't be bending, lifting, mutilating or spindling anything between now and then (and for a reasonable time following surgery).
So, Gardens won't launch this summer… Perhaps before the gales of November come slashing…
Sunday, June 26, 2016
A Better Week...
Thanks to some advice from another Pathfinder builder, I got my head wrapped around the issue of the seat/deck supports. Making progress there.
Looked at some trailers - none of which was ideal: some might have worked (with some modifications and/or repairs), some wouldn't work at all for Gardens and some weren't worth the time to look at. I did realize that I don't much care if the lights/wiring on a trailer are working - I plan to make a removable light bar.
I'm easing back into bicycling. I rode three days this week - nothing epic - and it felt good to be riding again (despite the road rash resulting from a near-perfect low-speed two point [shin and shoulder] landing).
Saturday, we spent a very relaxing - and yet invigorating - afternoon sailing on Lake Michigan with friends on their Express 35. It was good to sail again!
I'm feeling inspired and motivated… so Gardens will see more progress this week!
Sunday, June 19, 2016
The Week That Wasn't
I'm glad last week is over. Even with the encouraging words early in the week...
Monday: Overwelmed by the the tasks before me. Oh sure, the big pieces are done but the detail and prep work needed to assemble those big pieces got to me. For instance, I am grappling with the seat and platform deck supports along the hull. I just don't "see" how these pieces fit the boat. I've got an idea to check out tomorrow…
Tuesday: Decided to install only a single reef line for now - and put it on the wrong side of the boom. I'll go ahead and install the hardware for the second reef line, just for convenience, even though I thought I'd save a bit of time only installing one reef line. I was wrong.
Wednesday: Having to deal with the Michigan Secretary of State's office regarding a non-boat related item. I experienced a fit of low confidence (hey, I used to be a lawyer so confidence should not be an issue) and I just could't do what I needed to do. I got a pep talk from a lawyer friend…
Thursday: Cloudy, gloomy, pouring rain did nothing for my mood.
Friday: Dealt with the Michigan Secretary of State's office and accomplished what needed to be done. Too hot and humid for me to actually accomplish anything…
Saturday: Up early; bikes on the back of the bike; headed out for a ride… A mile and a half out, I had a flat tire. Tools with me were the wrong ones. Walked the bike back to the car. Waited for Jan to finish her ride and went home. Way to hot and humid for me to work on the boat - or anything else.
Today: Normal Sunday - easy morning, Sunday brunch, a nap and watching the sunset (on the next to the longest day of the year). But… nothing done on Gardens.
I've got ideas re the seat/decking supports, outfitting the boom (and yard), and moving forward. Anxious to getting back to work on the boat!
Friday, June 10, 2016
Spars
Most of the spars are (nearly) done. I haven't built the mizzen mast, the boom needs hardware, the mast needs hardware and the yard needs a bit of paint and a bit of hardware.
I am (mostly) happy with the spars as they are:
I am (mostly) happy with the spars as they are:
- The mast weighs 26 pounds (11.8kg), has eight coats of varnish and will look good from ten feet away.
- The boom weighs nine pounds (4kg) and is very stiff.
- The yard weighs six pounds (2,7kg), has a slight bow to it and a few white flecks where I sanded too far into the F/G sleeve (hence the "mostly happy" reference above) but should work well. I have not checked it for stiffness.
- The boomkin has been done for a long time and is waiting for me to finish the boat and go sailing. Same for the mizzen boom.
- Hounds with single block, fairlead (no block) or padeye with block on the mast for the halyard?
- Dixon Kemp style halyard arrangement or parrel beads at the yard?
- Padeye, rope loop (soft shackle), or single block on the yard for the halyard attachment?
- Straight (5:1) downhaul or the GIS bleater/vang arrangement?
- Parrel beads or OZ style line/loop attachment for the boom?
Tuesday, June 7, 2016
Getting There
While I was rough fitting the starboard foredeck panel this morning, Gardens reached a milestone (of sorts): All seat panels, platform deck panels and deck panels are cut and fitted. In other words, the boat kit is complete. All that's left is "just" some assembly required… Can't be long now, right?


Saturday, June 4, 2016
Like a Puzzle
Trim installed.
Fitting foredeck:

Decking will be cut close to size, finish cut with router and flush trim bit and then removed to allow installation to the rub-rails. If the decks are installed ahead of the rub-rails, there is precious little foreword of BH-2 to clamp the rub-rails to. My BIL got it right when he said building a boat is like assembling a puzzle - and the sequence is as important as the pieces.
Wednesday, June 1, 2016
Installing Trim
Finished painting the sheer planks last weekend, pulled the blue tape yesterday, re-taped this morning and set up the jig-sticks to install the trim along the bottom edge of the sheer planks.
 Applied neat epoxy to the trim pieces and the bare bottom of the sheer planks, slathered thickened epoxy to the trim pieces and, with Jan and Andy assisting, clamped the trim to the planks. After some fiddling with the clamps we were done.

 I followed the epoxy & clamp process with counter-sunk screws. And, there will be a bit of fine-tuning the fit right at the stem when the trim pieces between the rub-rails and today's trim pieces are installed.


Monday, May 30, 2016
Rigging the Boom
I've begun rigging the boom.
The boom is round…
The hardware for the reefing lines (cheek blocks and cleats) are flat…
Solution: Craft mounting pads/blocks contoured (a spindle sander is a nice tool to have) to fit the boom. These are for the cheek blocks.

The mahogany pads/blocks will be epoxied to the boom (which will be sanded to bare wood where the pads/blocks go), sanded and varnished. The hardware will be screwed to the pad and boom.
Sunday, May 29, 2016
Yard Work
While Jan worked on the gardens yesterday, I worked on Gardens' yard.
Cutting the tenon for the crank:

 When the rains arrived earlier than predicted, I moved the operation inside. Here it is, set-up and ready for epoxy.
 After I glopped on the epoxy, Jan turned the yard while I wrapped it with plastic-wrap and perforated the wrap to allow excess epoxy to ooze out.
 The whole, wrapped up yard sat overnight to give the epoxy a chance to cure. I pulled the wrap off this afternoon and things look good. It'll take a small bit of sanding to be ready for varnishing.
Meanwhile, the main mast has received three coats of the 1:1 wiping varnish and is looking better.
Cutting the tenon for the crank:


Meanwhile, the main mast has received three coats of the 1:1 wiping varnish and is looking better.

Friday, May 27, 2016
Varnish, Sleeving & Hardware
Varnishing the main mast began today with the first coat of wiping varnish (a 1:1 mix of spar varnish and mineral spirits). Three coats of 1:1 will be followed with a similar number of 2:1, which in turn will be followed by 3:1 and finished up with straight spar varnish.
The sleeving for the main yard arrived today and was slipped onto the yard. I ran out of time today so tomorrow we'll epoxy the sleeve, wrap it tightly with plastic wrap and perforate the plastic as per Duckworks' instructions. I've used the sleeving before and am looking forward to tomorrow's project.
 I sorted through my stash of hardware today looking for bits for the mast, boom and yard. I found a good bit of what I need and placed an order for a few items not in the stash. In the interests of time, I ordered cheek blocks - even though I began making my own during the winter. Those still need some work so I bit the bullet, ordered "store-bought" and figured I can finish my own next winter.
The sleeving for the main yard arrived today and was slipped onto the yard. I ran out of time today so tomorrow we'll epoxy the sleeve, wrap it tightly with plastic wrap and perforate the plastic as per Duckworks' instructions. I've used the sleeving before and am looking forward to tomorrow's project.

Wednesday, May 25, 2016
Scamp Camp
Today was a Scamp Camp day for me. Up and out early for the 90-minute drive to Eaton Rapids, MI.
Four Scamps, including Howard's Southern Cross, in various stages of completion:


Four Campers (Howard, Dave, Mike and me) caught up with each other, told stories and worked on Mike's Scamp.
As always, I learned a few things:
It was a good day… The paint of Gardens' sheer planks sat undisturbed for another day. The yard blank cured another day. And since I wasn't home, there was no temptation for me to do anything I might have to re-do tomorrow.
Four Scamps, including Howard's Southern Cross, in various stages of completion:


Four Campers (Howard, Dave, Mike and me) caught up with each other, told stories and worked on Mike's Scamp.
As always, I learned a few things:
- Eaton Rapids is known as the Island City because it is an island in the Grand River.
- Epoxy mixed with Fast Hardener goes off quickly and smokes in 80°F temperatures.
- Sometimes, you just need a bigger hammer.
It was a good day… The paint of Gardens' sheer planks sat undisturbed for another day. The yard blank cured another day. And since I wasn't home, there was no temptation for me to do anything I might have to re-do tomorrow.
Monday, May 23, 2016
Back to Work Following a Weekend Road Trip
Following a quick week-end trip to Springfield, MO, work resumed on Gardens today:
- Plugs for the yard were cut and fit, slathered with thickened epoxy and installed as part of the final assembly of the yard.
- Main mast was epoxied; a few minor gaps in the glue lines were filled with thickened epoxy. The rollers the mast is sitting on made rotating the mast a very simple matter. Varnishing will begin as soon as I can sand and finish fairing the mast. Probably Thursday.
- Gardens was vacuumed out - to make room for (a bit) more sawdust.
Friday, May 20, 2016
Sheer Plank Paint and Other Stuff
It's green, really, no matter what it looks like in the photo.
 The lighting in the boat cave is not good - very dim - and there is no way to step back and get a good look at new paint on the boat. But the second coat (pictured) looks better than the first one and, I suspect a couple more coats will look even better. So far, I am pleased with the outcome.
In other news, the starboard half of the foredeck has been rough cut. I found it encouraging that the port side half worked as a pattern for the starboard side half - no reason why it shouldn't have, but I'm glad it did. The foredeck will be installed once the lower trim piece is installed on the sheer planks (better for clamping than just the lower edge of the plank).
We also partially glued up the birdsmouth blank for the yard. I'll take it apart (glued in halves), fit the plugs and finish gluing it up early next week. After that, I'll plane and sand it round and add FG sleeving.
I'm still figuring out how to best install the supports along the hull for the seating and platform decking panels.
Wednesday, May 18, 2016
Painting the Sheer Plank... and Thoughts on Green
The sheer planks are epoxied and ready for paint.
 I decided sometime last year I wanted the sheer plank to be a dark green and my choice was "Hunter Green." Last October, when I did a story board with the Hunter Green for the sheer plank, "Fired Clay" (brings to mind a dark terra cotta, doesn't it? It is more of a soft cream color) for the hull and strips of DF representing the rub-rails and trim (the real ones are mahogany), I thought the Hunter Green might be too dark. But I wanted to see what it looks like in bright, full sunlight… It still looks dark - nearly black. So we began sampling other greens. We discovered two things:
The near-term sequence should go something like this:
But we're getting there!

- There are way too many shades of green; and
- There is a wide gap between the Hunter Green we began with and the next darkest shade we could find.
The near-term sequence should go something like this:
- Paint the sheer planks
- Install the trim pieces
- Install the decking
- Install the rub-rails
But we're getting there!
Sunday, May 15, 2016
Rub Rails
The trim pieces came off the jigs to make room to steam bend the rub rails. Both rub rail went into place without incident. The poly-tubing has been removed from both rub rails, which are clamped in place to dry.
 Next step for the sheer plank is to tape off the edges and begin painting.
Next step for the rest of the boat is to get the bilges painted and the seating & decking panels installed.

Next step for the rest of the boat is to get the bilges painted and the seating & decking panels installed.
Thursday, May 12, 2016
Rub Rail
We worked on the first of two rub rails today. The port side trim came off the jig to make room to steam bend the rub rail, which went into place without incident.
 The starboard side trim piece is still drying in place so we'll have to wait another day or so (it has been very humid lately) before steaming the second rub rail into place.

Tuesday, May 10, 2016
Steam Bending the Trim Pieces
We set up bending jigs on the hull for the two lower trim pieces using jig-sticks and a simple L-shaped height guide.
 The height guide was used to place the bottoms of the jig sticks 1" above the bottom of the sheer plank.
 We put the pre-soaked trim piece (19mm x 32mm x 6m; 3/4" x 1-1/4" x 20' mahogany) into poly-tubing, hooked up the steam generator and waited about an hour. When the trim piece was ready, we placed it under the jig-sticks and clamped it tight against the sheer plank with stick-clamps.

 One wrinkle in the process was the end furthest (20') from the steam generator cooled a bit too much (we were concerned it would crack) before we could clamp it in place. So, we moved the steam generator, hooked it up to the other end of the poly-tube, turned the generator on and steamed that end. It bent right into place. We did the port-side yesterday and the starboard side today using the "steam from each end" process for both trim pieces.
These two pieces will stay clamped in place to dry until Thursday, when we'll steam bend the rub-rails, which will pre-soak until then.
Port-side trim piece out of the tubing and clamped in place to dry.
 Using the poly-tubing, instead of a steam-box, is very convenient and effective. Being able to clamp a piece into place while still in the tubing makes it easier to re-heat the piece if necessary.


These two pieces will stay clamped in place to dry until Thursday, when we'll steam bend the rub-rails, which will pre-soak until then.
Port-side trim piece out of the tubing and clamped in place to dry.

Sunday, May 8, 2016
Rub-Rails, Trim and Foredeck
Thursday we ripped the rub-rails and trim pieces out of a 20' piece of mahogany.

 The trim pieces have been pre-soaking since Saturday. We'll steam bend them Tuesday or Wednesday. The rub-rails will follow later in the week.
Friday I marked off, cut out and test-fitted the port side of the foredeck. Everything went well and it looks good.
 I clamped it down the center-line of the king plank and then began clamping the edge to the gun'l. Surprisingly, to me, clamping it using bottom of the sheer plank worked! When I install the decking I will use more clamps than I used on Friday. Part of me wonders what I did wrong with the sheer plank as almost everyone says there is no convenient way to clamp the deck in place… Maybe I'm missing something? At any rate, using the bottom of the sheer plank seems to work for me.


Friday I marked off, cut out and test-fitted the port side of the foredeck. Everything went well and it looks good.
Thursday, May 5, 2016
Edge Trim Experiment
I decided to trim the curved edge of the aft deck (yeah, I know, getting ahead of myself again) so I experimented yesterday.
I milled a piece of cherry to 3/4" x 3/4" x 36" and centered a 1/4" wide and 5/8" deep slot on one side. This fit perfectly on a flat length of 6mm ply. I popped the piece into a length of poly-tubing, hooked up the steamer and let it run for 30 minutes. It didn't work…
 First thing I noticed was the piece was dry, which was unlike the carlins when I took them out of the poly-tubing. Second thing was the piece cracked - right at the top of the bend in the deck. Third thing was the slot was pinched at the top of the bend.
So, what happened? Three things:
I'll try again…
I milled a piece of cherry to 3/4" x 3/4" x 36" and centered a 1/4" wide and 5/8" deep slot on one side. This fit perfectly on a flat length of 6mm ply. I popped the piece into a length of poly-tubing, hooked up the steamer and let it run for 30 minutes. It didn't work…

So, what happened? Three things:
- The slot wasn't wide enough to take the bend,
- I did not pre-soak the piece, and
- I did not steam the piece long enough.
I'll try again…
Tuesday, May 3, 2016
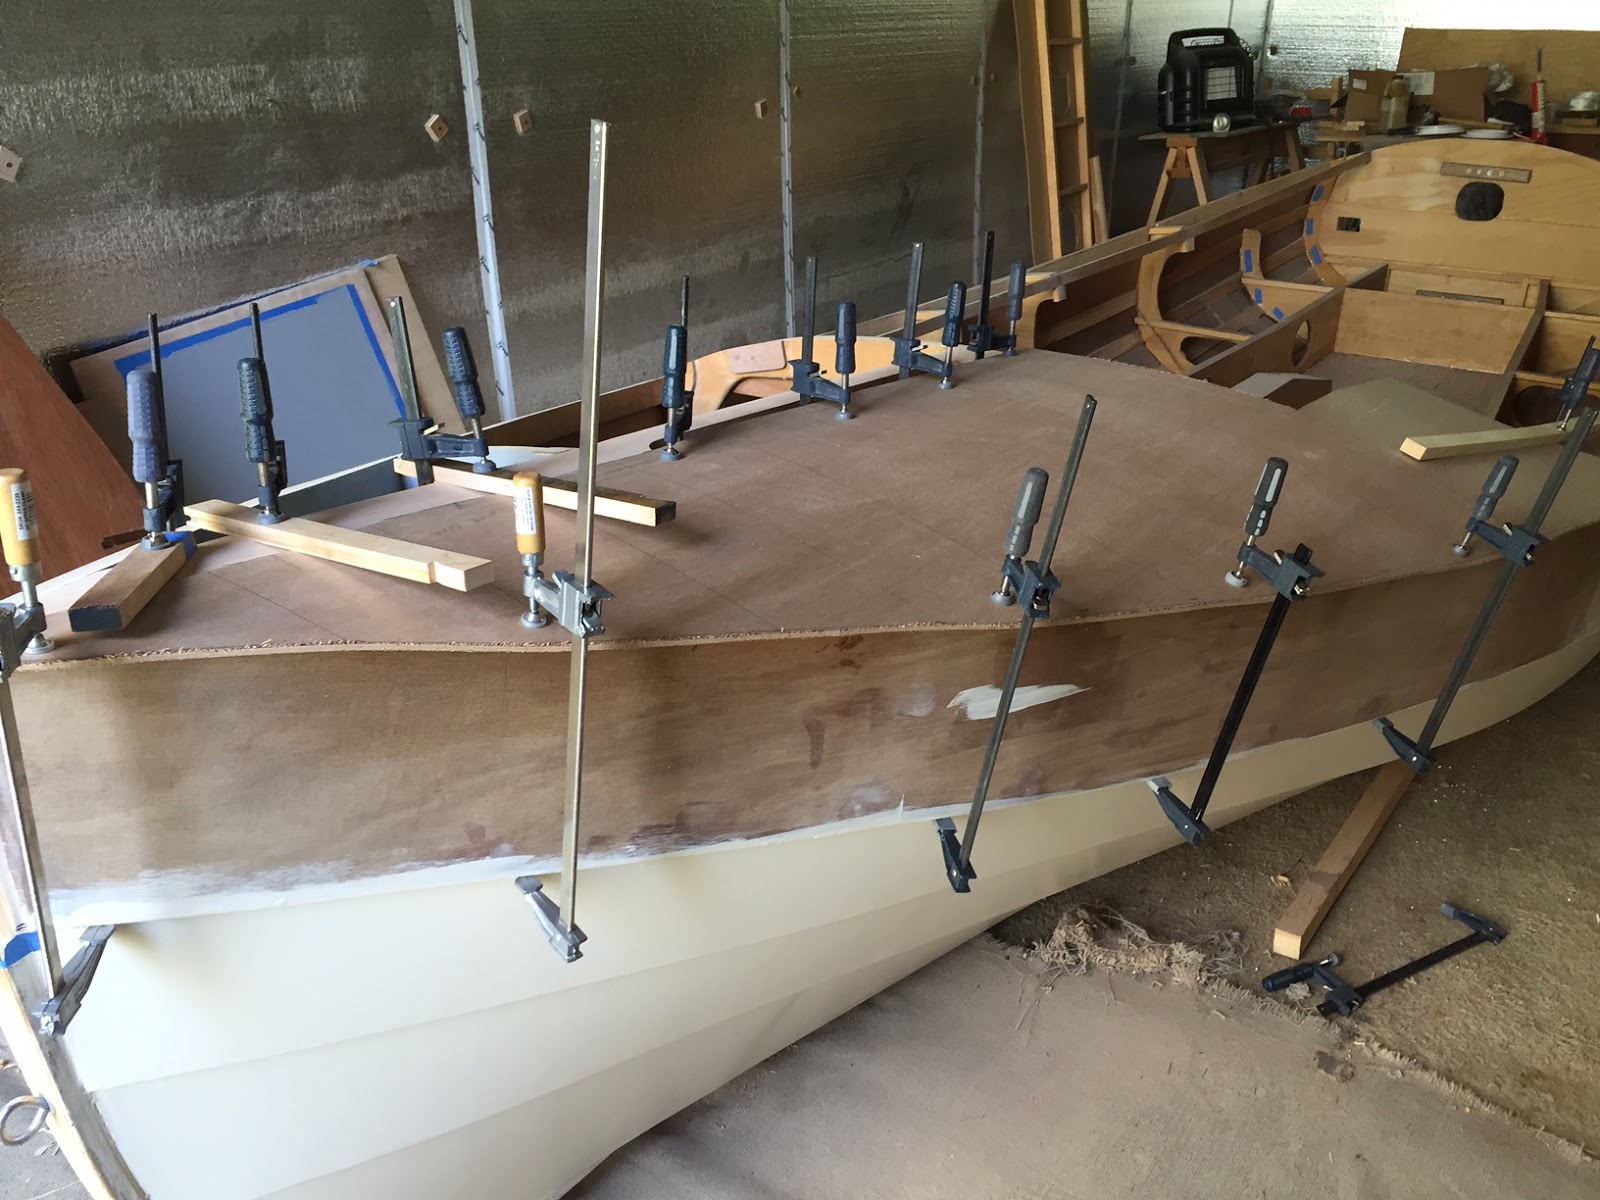
Decking
Working on the aft and side decking is really just a form of procrastination: Doing something new, fun and interesting is so much better than prepping the bilges for paint.
The stern decking - a single piece of 6mm ply - took its shape rather handily after I flattened the transom and enough clamps. I'll add doublers where the mizzen mast goes through the deck and trim along the front edge.

Side decks are progressing, too. A flush trim bit in the router, the side of the hull and the carlins make quick work of cutting the decking to size.

I'm still contemplating the foredeck: How to bend the ply to the contour when there really isn't much to clamp it to. Since it has been done before by others, I just need to figure out what will work for me.
Sunday, May 1, 2016
Bow Remediation
A bit of remediation work on the bow today. Here's what the front end looked like:
 The discrepancy between the king plank and the sheer line resulted from my long ago error in reading a dimension for BH-2.
I first thought I could fill in that discrepancy with a piece of wood and "fair" it into the king plank (creating sort of a wedge). That wasn't ever going to work as shown by straight edge along the king plank from the bow to BH-2. I needed another solution.
 Yes, I removed the discrepancy (slowly, very slowly) which means I've changed the sheer ever so slightly. I will continue to fair the sheer to get it close and, what decking, trim and rub rails it should be fine.
The carlins got a bit of attention, too. Cutting (as needed) and sanding the frame faces flush with the carlins provides a nice supporting structure for the coamings.
Gardens as she sits this afternoon without the clutter of clamps.


I first thought I could fill in that discrepancy with a piece of wood and "fair" it into the king plank (creating sort of a wedge). That wasn't ever going to work as shown by straight edge along the king plank from the bow to BH-2. I needed another solution.

The carlins got a bit of attention, too. Cutting (as needed) and sanding the frame faces flush with the carlins provides a nice supporting structure for the coamings.
Gardens as she sits this afternoon without the clutter of clamps.

Friday, April 29, 2016
Shopping Trip
We drove down to LL Johnson Lumber in Charlotte this morning. I picked out one 4/4 x 7" x 20' piece of mahogany for the rub rails. I also picked out 30bf of cherry for various non-boat projects. The cherry purchase was to help defray the delivery charges… The lumber will be delivered on Tuesday. Always fun to shop for lumber!
So, sometime later next week (when I can gather the help) I'll rip the mahogany for the rub rails. A day or two later we can steam bend the rub rails and have them ready to install.
Today I pulled the clamps on the carlins and the king plank. Everything looks fine. After some sanding and fairing I can begin fitting the fore and side decks.
Despite my recent whining about not making much progress, things seem to be surging forward now. This feels good!
Wednesday, April 27, 2016
Installed the King Plank
I refined the slot in the mock-up plank (sized the slot to fit the stub-mast with leather wrap) to use as a template for cutting the slot in the real king plank.

Measured, checked, rechecked, measured again… I wanted to make sure the slot was in the right position on the king plank. When I was sure I had it where I wanted it, I clamped the template to the king plank, traced the outline of the slot, cut it with the saber saw, clamped the template back on and cleaned up the edges with a router and flush trim bit.

King plank in place with the stub-mast (complete with leather wrap for sizing).

I cut a plug to fit/fill the slot and hold the mast in place. Trimmed the plug to a snug fit, which is fine for now but it will be trimmed again to allow for swelling when the plug is wet. The piece in the photo will be used as a template as there is a rather large knot in it. Even with epoxy and fiberglass, I'd rather not have that knot in the plug.

A top piece, a bit wider than the plug, will be added to the plug to prevent the plug falling through. Turn-buttons underneath will prevent the plug from popping out while sailing.
Subscribe to:
Posts (Atom)