Happy New Year to one and all. I hope you enjoy a happy and prosperous 2018. I am looking forward to a fun, exciting, successful, and rewarding new year.
I’ll get back to Gardens - the plan is to launch her this spring! - once the weather warms just a bit. Single-digit temperatures and an unheated barn make boat work difficult.
Happy New Year!
Sunday, December 31, 2017
Monday, December 25, 2017
Merry Christmas!
Wishing everyone a merry and peaceful Christmas!
The month of December was busy for us with Holiday preparations: shopping, cooking, baking, making gifts, wrapping and shipping - all mixed in with medical appointments. It all came together yesterday for a grand visit with grandchildren in south east Michigan. A late afternoon storm dumped 6” of snow for a beautiful white Christmas.
The medical issues are not life threatening but may push Gardens’ launch by a few months. I’ll do what I can within the limitations of damaged knees and shoulder. We’ll see how it goes…
Merry Christmas!
Wednesday, December 13, 2017
That's How It Works
In the end everyone builds the boat their psychology prepares them for.
That’s how it works…
Any serious undertaking is subject to psychological necessity.
We really can’t do anything else but follow our compulsion. It isn’t about capability because we can always get that if our psychology allows it. - Mik Storer
These words (from comments to the Duckworks’ article, Why I "HATE" Boatbuilding) give me insight to a thought (some might say rationalization) I’ve voiced for quite some time now: What I see in my mind’s eye doesn’t come out of my hands.
That's how it works...
These words (from comments to the Duckworks’ article, Why I "HATE" Boatbuilding) give me insight to a thought (some might say rationalization) I’ve voiced for quite some time now: What I see in my mind’s eye doesn’t come out of my hands.
That's how it works...
Thursday, December 7, 2017
Shaping With an Angle Grinder
Cold weather has set in - not unexpected in Michigan... in December…
The shop is still functional - after the heaters run for an hour or so before I begin working.
Yesterday I shaped the main mast cap, giving it a “domish” shape. My tool of choice: a 4-1/2” angle grinder.
 Concentric circles on the top of the cap helped guide the shaping, which was followed up with sanding using an ROS and an 80/120/80/220-grit progression. I plan to soften the bottom edge of the caps with a round-over.
When the other cap is done, I’ll glue them to the masts (cold temperatures not withstanding).
Update: Thursday’s post generated some discussion (sort of, but more like a lecture) about hand tools vs. power tools… the idea being that a spokeshave was a better tool of choice for shaping the mast caps than the angle grinder I used.
Admittedly, a spokeshave never crossed my mind for shaping the caps. Admittedly, as well, I am not very experienced in using a spokeshave which is not to say I am unfamiliar with hand tools, particularly planes.
 (I keep my spokeshave with my chisels - mounted on another wall of the shop - rather than with my planes, for no good reason other than my convenience.)
Intrigued by the idea, I decided to shape the second mast cap using hand tools, specifically the spokeshave. It worked. I was able to shape the cap using the spokeshave and hand-sanding.
 The spokeshave is definitely quieter and less dusty than the angle grinder. But, it took me three times as long to get to the nearly finished shape (yep, pretty much the same shape as the first cap). I’m happy I got the same results using the spokeshave but there was no deeper sense of satisfaction from using the hand tool compared to using the power tool. And the extra repetitive motion aggravated the arthritis in my hands and shoulder so, on one level, there was a bit more discomfort associated with using the hand tool… for me… for this task…
The angle grinder - and any other power tool - is just a tool, as are hand tools (saws, chisels, planes...). I like to use the tool that works for me for the task at hand.
The shop is still functional - after the heaters run for an hour or so before I begin working.
Yesterday I shaped the main mast cap, giving it a “domish” shape. My tool of choice: a 4-1/2” angle grinder.

When the other cap is done, I’ll glue them to the masts (cold temperatures not withstanding).
Update: Thursday’s post generated some discussion (sort of, but more like a lecture) about hand tools vs. power tools… the idea being that a spokeshave was a better tool of choice for shaping the mast caps than the angle grinder I used.
Admittedly, a spokeshave never crossed my mind for shaping the caps. Admittedly, as well, I am not very experienced in using a spokeshave which is not to say I am unfamiliar with hand tools, particularly planes.

Intrigued by the idea, I decided to shape the second mast cap using hand tools, specifically the spokeshave. It worked. I was able to shape the cap using the spokeshave and hand-sanding.

The angle grinder - and any other power tool - is just a tool, as are hand tools (saws, chisels, planes...). I like to use the tool that works for me for the task at hand.
Sunday, December 3, 2017
November Was a Busy Month
How quickly time flies! Our trip to Maine seems a recent memory but it has been seven weeks since that trip ended (yeah, seven weeks is recent but I meant recent like last week…).
November began with the caps for Gardens’ masts. Then, a visit to Oregon to see grandchildren and start a kayak build with my son. Thanksgiving followed on the heels of the Oregon trip. Meanwhile the kitchen remodeling project has continued at a snail’s pace. All appliances were installed and functional the day before Thanksgiving, so Jan cooked Thanksgiving dinner and I baked a pumpkin pie and we are both thankful to be cooking in our own kitchen again (the remodel is not complete - the cabinet vendor had quality control issues which meant about half of the cabinet doors had to be redone).
A follow-up appointment with the orthopedic surgeon last week confirmed the necessity of knee replacement surgery (both knees need replacing but I’ll do them one at a time). Scheduling has an eight-week lead time, so it will be early February before I’m out of commission for about six weeks.
November leads us into the Christmas Holidays and a growing list of gifts to make and projects to complete. I’ve had a small drill press that has been adequate and access to my BIL’s larger drill press - but the convenience of having my own larger one (and a good sale price) lead to the purchase of a new Jet drill press.
 Also, in the background of November’s events, my nine-year old MacBook began faltering and became progressively worse as the month worn on. Last week I purchased a new MacBook Pro. I’m doing my part to support the economy - and I haven’t done any Christmas shopping yet!
So, November was a busy month. I suspect the next two months to be very busy as well. I plan to get as much done on Gardens as I can before being laid up recovering from surgery.
November began with the caps for Gardens’ masts. Then, a visit to Oregon to see grandchildren and start a kayak build with my son. Thanksgiving followed on the heels of the Oregon trip. Meanwhile the kitchen remodeling project has continued at a snail’s pace. All appliances were installed and functional the day before Thanksgiving, so Jan cooked Thanksgiving dinner and I baked a pumpkin pie and we are both thankful to be cooking in our own kitchen again (the remodel is not complete - the cabinet vendor had quality control issues which meant about half of the cabinet doors had to be redone).
A follow-up appointment with the orthopedic surgeon last week confirmed the necessity of knee replacement surgery (both knees need replacing but I’ll do them one at a time). Scheduling has an eight-week lead time, so it will be early February before I’m out of commission for about six weeks.
November leads us into the Christmas Holidays and a growing list of gifts to make and projects to complete. I’ve had a small drill press that has been adequate and access to my BIL’s larger drill press - but the convenience of having my own larger one (and a good sale price) lead to the purchase of a new Jet drill press.

So, November was a busy month. I suspect the next two months to be very busy as well. I plan to get as much done on Gardens as I can before being laid up recovering from surgery.
Sunday, November 19, 2017
Return to Gardens
The Oregon trip went well. Spent good time with grandchildren, made a great start on the kayak project with my son, and got to visit with my other two children before returning to Michigan and Gardens.
Today was a 'travel recovery' day - unpacking, catching up with Jan, napping and generally taking it easy. Didn't even go out to the shop to see what's what.
Tomorrow soon enough.
Today was a 'travel recovery' day - unpacking, catching up with Jan, napping and generally taking it easy. Didn't even go out to the shop to see what's what.
Tomorrow soon enough.
Tuesday, November 14, 2017
Change of Venue, Different Boat, Next Generation, New Skills
Based on some discussions with my son in August, we decided to build a skin-on-frame kayak. We picked Dave Gentry's Chuckanut 12s - a 12' stretch version of the Chuckanut 10 design.
So, here I am in Klamath Falls, Oregon for a 10-day build session. I arrived last Tuesday and we cleared out a space in the garage, ran some errands, bought some materials and supplies before beginning the actual work on the kayak on Friday.
Scott cutting stock for the chines and gunnels. Photo
Scott planing stock for the scarf joints. Photo
Gluing two chines at a time Photo
About half of the chines Photo
Strong-back, Frames 1 and 5, keel, and gunnels loosely tied in place Photo
Bow stem Photo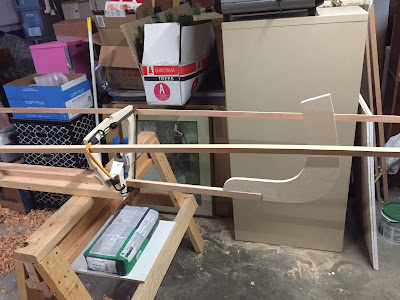
Improving shape with Frame 3 loosely in place Photo
Two more frames to cut out and fit, which will further improve the shape. Twist resulting from being "loosely tied" will be taken out when we lash the fuselage together.
This project is an opportunity for Scott and I to work on a project together (tough to do when we live so far apart). I am hoping to pass some woodworking skills on to him - and he is doing quite well with the block and smoothing planes.
Work on Gardens will resume when I return to Michigan this coming weekend.
So, here I am in Klamath Falls, Oregon for a 10-day build session. I arrived last Tuesday and we cleared out a space in the garage, ran some errands, bought some materials and supplies before beginning the actual work on the kayak on Friday.
Scott cutting stock for the chines and gunnels. Photo

Scott planing stock for the scarf joints. Photo

Gluing two chines at a time Photo

About half of the chines Photo

Strong-back, Frames 1 and 5, keel, and gunnels loosely tied in place Photo

Bow stem Photo

Improving shape with Frame 3 loosely in place Photo

Two more frames to cut out and fit, which will further improve the shape. Twist resulting from being "loosely tied" will be taken out when we lash the fuselage together.
This project is an opportunity for Scott and I to work on a project together (tough to do when we live so far apart). I am hoping to pass some woodworking skills on to him - and he is doing quite well with the block and smoothing planes.
Work on Gardens will resume when I return to Michigan this coming weekend.
Sunday, November 5, 2017
Mast Caps and and a Collar
Gardens' masts will sport caps, primarily as a decorative touch but also to better protect the wood end-grain at the top of each mast. The mizzenmast gets a collar, too. The caps are CVG DF and the collar for the mizzenmast is mahogany. A (rough) photo-essay of the process I used in creating the caps and the collar follows:
Eight segments with each end cut (on the table saw with a miter gauge) at 22.5°.
(Different) Segments assembled, glued (with thickened epoxy), and clamped.
Octagon blank ready for drilling (inside diameter begun), cutting (outside diameter), and sanding (all surfaces).
Top and bottom pieces of cap glued together with top piece cut/sanded to match outside diameter of bottom piece (could have used another photo or two here).

Top of cap will be sanded to "domish"/round-over shape. This is a practice piece.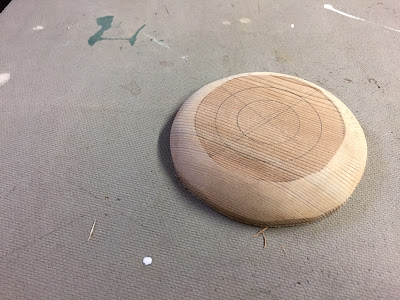
Collar for the mizzenmast.
Collar and its base. The underside of the base is contoured to fit the aft deck.
Eight segments with each end cut (on the table saw with a miter gauge) at 22.5°.

(Different) Segments assembled, glued (with thickened epoxy), and clamped.

Octagon blank ready for drilling (inside diameter begun), cutting (outside diameter), and sanding (all surfaces).

Top and bottom pieces of cap glued together with top piece cut/sanded to match outside diameter of bottom piece (could have used another photo or two here).


Top of cap will be sanded to "domish"/round-over shape. This is a practice piece.

Collar for the mizzenmast.

Collar and its base. The underside of the base is contoured to fit the aft deck.

Tuesday, October 31, 2017
Slot and Plug/Cap
The concept for the Slot, to facilitate mast raising, came to me a year-and-a-half ago. The idea of the Plug, to fill the slot and hold the mast upright, was part of the original concept. How to hold the Plug in place took a while to figure out. Here's what I came up with:
Slot: Slot with Demo Mast:
 View of underside of Plug/Cap with turn-buttons lined up fore-n-aft:
 View of underside of Plug/Cap with turn-buttons athwartship:
 Plug/Cap in place:
 Below deck view of Plug/Cap in place with turn-buttons fore-n-aft:
 Below deck view of Plug/Cap in place with turn-buttons athwartship (no worries about that knot):
 This configuration works well - sitting still in the Boat Bay: the Plug/Cap just does not move when tightened down. But I expect it will work just as well on the water.
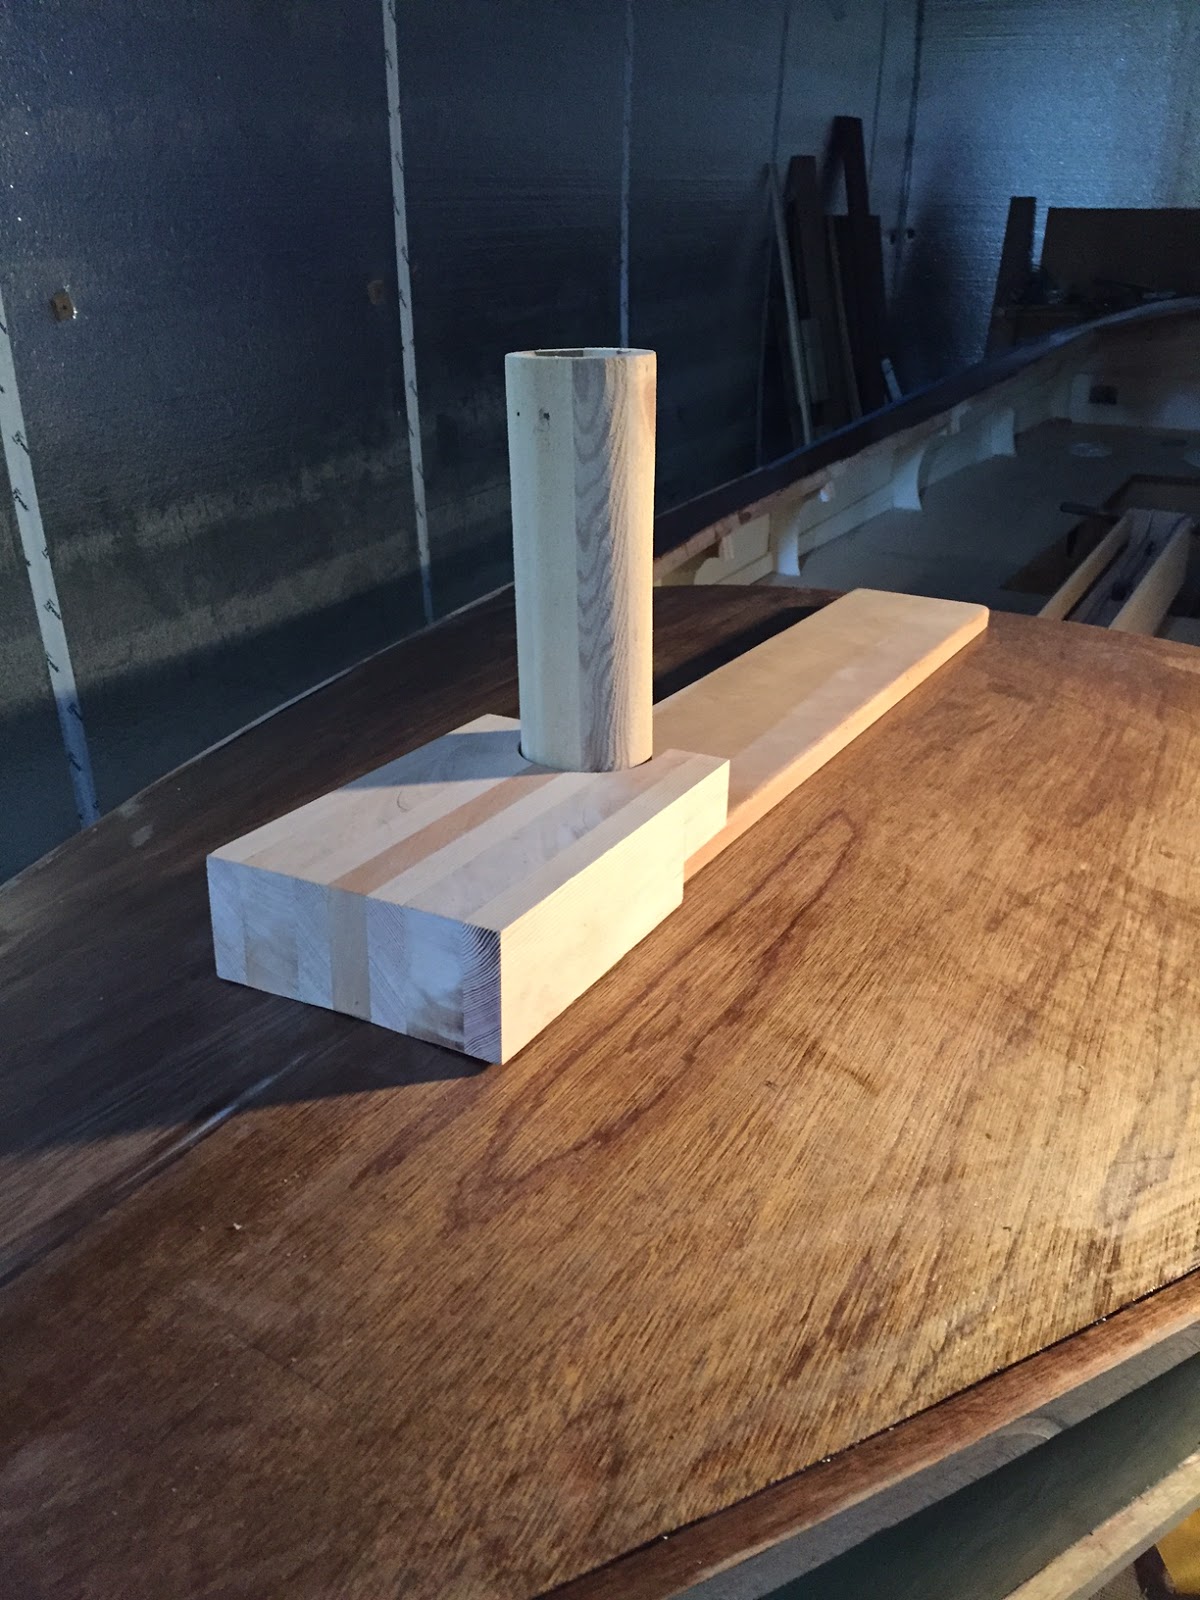
One more design element is, what i call, the Mast Block. My intent is for the block to help support the mast (although that may not be its primary purpose) and to provide an anchor point for the foreward ends of the cockpit coamings (probably its legitimate purpose) and the downhaul. It is a work in progress.
Slot:


One more design element is, what i call, the Mast Block. My intent is for the block to help support the mast (although that may not be its primary purpose) and to provide an anchor point for the foreward ends of the cockpit coamings (probably its legitimate purpose) and the downhaul. It is a work in progress.
Sunday, October 29, 2017
Deck Epoxy, Mizzenmast Varnish, and the Slot Cap
The top deck has received two coats of epoxy.
 Having shaped and sanded the mizzenmast, I've begun varnishing it. Using wiping varnish (50/50 varnish/mineral spirits) for starters, I will eventually progress to un-thinned varnish.
 The Slot Cap is a late development of the mast raising system (a slot in the fore deck and king plank to facilitate raising the mast) I've installed. The plug, which fits the slot, has been glued to the cap (which prevents the assembly from falling through the slot). Turn buttons on the bottom of the plug prevent the plug from popping out of the slot. I'll take photos of the assembly and how the turn buttons work.
 (Photos to follow...)


Sunday, October 22, 2017
Mizzenmast, Trailer and Seams
Planing the square mizzenmast blank to an octagon took nearly a full day last Tuesday. Planing it to 16 sides took about 40 minutes; and to 32 sides took about 25 minutes on Thursday. Sanding to round, using 50, 60, 80 and 120 grit, took about an hour on Friday. Cutting the tenon to fit the mast step took most of Friday afternoon.


I re-installed the bunks on the trailer so that is ready for Gardens.
The deck seams have been filled and faired.
With the port side foredeck panel installed (and clamps removed!), Gardens looks more like a complete boat!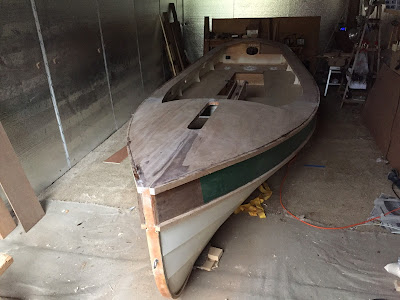


I re-installed the bunks on the trailer so that is ready for Gardens.
The deck seams have been filled and faired.
With the port side foredeck panel installed (and clamps removed!), Gardens looks more like a complete boat!

Wednesday, October 18, 2017
On a roll…
The installation of the starboard foredeck panel "took," (wasn't highly confident that would be the case Sunday evening).

(Monday) Spent an hour at the Michigan Secretary of State office to title and register Gardens. The first 20 minutes were spent waiting for my turn. Ten minutes with the clerk while she helped me get the correct information in the correct form, another 15 minutes while she copied the receipts I brought with me, five minutes waiting for the computer and, at the last ten minutes to finalize the forms and write the check. Gardens is 'official'! It was an hour well spent!

(Tuesday) Marked off the mizzenmast for shaping and planed the corners off the square blank taking it to an octagon. Using hand planes to shape wood is one of life's simple pleasures. Lots of shavings. I should do it more often…


(Wednesday) Installed the port foredeck panel without incident (had some help: an extra pair of hands made the task much easier than Sunday's solo installation).

I'm wondering if there is a tradition - similar to the whiskey plank tradition - for this point in building a boat… If not, perhaps our cold bear toast to Gardens this afternoon could be the start of a new tradition… hmmm, perhaps not (I'm guessing I'm not the first to enjoy a beer after the "last major piece" is installed.) At any rate, we enjoyed the cold beer!
Sunday, October 15, 2017
One Day At A Time
So it turns out that I am better at reporting than predicting…
In my previous post I predicted both foredeck panels would be installed by today (Sunday). Only one panel has been installed and that happened today.
 Four or five dry-fits of the starboard panel over the last two days went pretty well. The actual installation was much more troublesome. Funny how thickened epoxy acts as a lubricant… The photo is from a dry-fit on Friday. The Boat Bay was too dark and gloomy this afternoon for photos.
Obviously the port panel is still waiting to be installed.
Best I can do is take it one day at a time.
In my previous post I predicted both foredeck panels would be installed by today (Sunday). Only one panel has been installed and that happened today.

Obviously the port panel is still waiting to be installed.
Best I can do is take it one day at a time.
Friday, October 13, 2017
Back From Maine...
We had a great time in Maine!
Our trip began with a short stop in Fairport, NY (Jan's old stomping grounds) and continued in Maine with a stop in Saco, ME for a visit with Clint Chase at Chase Small Craft and a shop tour. If you are not familiar with Clint Chase's work, check out his website at Chase Small Craft
Then on to Bar Harbor, enjoying seafood, Acadia National Park, seafood, local beers, seafood, shopping, seafood, and a most enjoyable sail on the four-masted schooner Margaret Todd.
After Bar Harbor, we went to Boothbay Harbor for a cousins' reunion. One highlight for me was the Andrew Wyeth exhibit at the Farnsworth Museum in Rockland, ME. Another highlight was a day-sail on a Marshall 22 Catboat; light air for most of the day but the wind piped up for an hour's worth of excitement - a fun day.
 One last highlight was the Pumpkin Regatta in Damariscotta, ME. This annual event features boats carved out of large (very large - upwards of 1,600 lbs!) pumpkins and powered by small outboard motors!
 On our return trip we spent a day scouting New York state's Finger Lakes region for future sailing adventures.
And, now, back to work on Gardens!
The foredeck panels are prepped and ready for installation. I spent the afternoon trying to figure out how to install both panels at the same time - and concluded it makes more sense to deal with them one at a time. So, the starboard panel will be installed on Saturday and the port panel on Sunday (if all goes according to plan…).
Our trip began with a short stop in Fairport, NY (Jan's old stomping grounds) and continued in Maine with a stop in Saco, ME for a visit with Clint Chase at Chase Small Craft and a shop tour. If you are not familiar with Clint Chase's work, check out his website at Chase Small Craft
Then on to Bar Harbor, enjoying seafood, Acadia National Park, seafood, local beers, seafood, shopping, seafood, and a most enjoyable sail on the four-masted schooner Margaret Todd.
After Bar Harbor, we went to Boothbay Harbor for a cousins' reunion. One highlight for me was the Andrew Wyeth exhibit at the Farnsworth Museum in Rockland, ME. Another highlight was a day-sail on a Marshall 22 Catboat; light air for most of the day but the wind piped up for an hour's worth of excitement - a fun day.


And, now, back to work on Gardens!
The foredeck panels are prepped and ready for installation. I spent the afternoon trying to figure out how to install both panels at the same time - and concluded it makes more sense to deal with them one at a time. So, the starboard panel will be installed on Saturday and the port panel on Sunday (if all goes according to plan…).
Friday, October 6, 2017
The List
In Sunday's post I mentioned some of the tasks yet to be done for/on/to Gardens - but it was a very minimal list. This week's trip to Maine for a family reunion gave me a lot of driving time to add to the list. So, in no particular order, here is my newly updated list of tasks/work to be done:
- Install Foredeck Panels
- Fill/sand/fair interior and top deck seams
- Prep interior for paint
- Paint interior (need to pick a color…)
- Coamings (pattern, cut coamings, install)
- Install CB case cap
- Shape mizzen mast; varnish
- Mast slot modifications (stiffeners along underneath edges of slot)
- Mast block (a block just foreward of mast as an anchor point for the coamings)
- Mast step prep for installation; install
- Install hardware (cleats, motor mount, etc.)
- Title and register Gardens with the Michigan Secretary of State's office
- Test launch (before the weather turns cold!)
- Decide on and purchase trolling motor
Sunday, October 1, 2017
A Very Good September
September was a busy month for Gardens! Installing the starboard gunwale brought the month to a close.
 At the risk of overlooking something obvious, I think there are only four 'major' components left to install: the two foredeck panels and the two coamings. And of course, the second 75% of the build to finish (sanding, fairing, painting out the interior, installing hardware and rigging…)!
We made a good progress in September and feel very good about that progress.

We made a good progress in September and feel very good about that progress.
Thursday, September 28, 2017
Foredeck, Gunwales, and CB Box-Top
The foredeck panels have been fitted (and re-fitted) and should be about ready to go once the gunwales are both installed.
 After a week of 90° weather (yes, in Michigan, in September!), temperatures have returned to more fall-like (and epoxy friendly) levels.
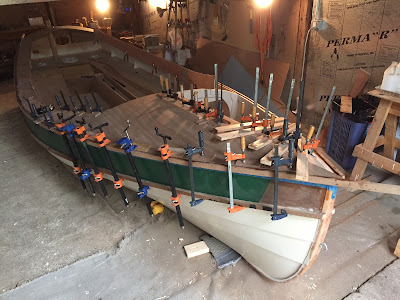
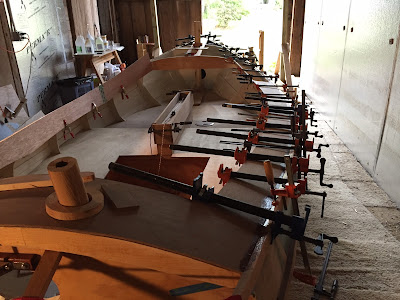
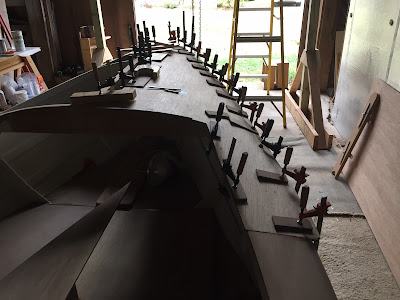
The port side gunwale was installed yesterday. Wasn't sure I'd have enough clamps as I recently loaned out about 20. Things went well and, after using 30 clamps, there were a few to spare. The starboard gunwale goes on tomorrow.
 A Spanish windlass pulled the aft end of the gunwale into place.
 A wedge at the starboard bow was useful to pull the bow end of the gunwale into place.
 Use of a wedge for installing the starboard gunwale (tomorrow) means I have to wait to install the port foredeck panel, otherwise there isn't a way to clamp the wedge in place.
The "box-top" for the center-board case fits (needs a bit of tweaking and, obviously, gluing up). Photo shows the box-top (without the top piece) with the rigging demo.


The port side gunwale was installed yesterday. Wasn't sure I'd have enough clamps as I recently loaned out about 20. Things went well and, after using 30 clamps, there were a few to spare. The starboard gunwale goes on tomorrow.


The "box-top" for the center-board case fits (needs a bit of tweaking and, obviously, gluing up). Photo shows the box-top (without the top piece) with the rigging demo.

Monday, September 25, 2017
Fiddly Work, Progress and Elmer
Recent progress on Gardens has been wonderfully visible and very satisfying. Less visible (and not as exciting) is the fiddly work over the last two days of installing cockpit seat doublers, filling/fairing deck seams, getting the coaming pattern almost finalized, prepping to install the gunnels (many dry-fits to get it 'right') and considering new colors for the interior (no decision made). Still making progress.
Elmer (the) Gantry has straddled Gardens, and has been sort of in the way, since I built it last fall. This weekend, as part of tidying up the Boat Bay and to make it easier to work on the gunnels, I moved Elmer forward of Gardens (not sure why I didn't think of that sooner!).


Elmer (the) Gantry has straddled Gardens, and has been sort of in the way, since I built it last fall. This weekend, as part of tidying up the Boat Bay and to make it easier to work on the gunnels, I moved Elmer forward of Gardens (not sure why I didn't think of that sooner!).


Thursday, September 21, 2017
Deck Seams, Coamings and Getting Close
Most of the upper decking is installed. The foredeck panels will be installed after the gunnels, so I have that to look forward to…
So the four seams between upper deck panels were 'pretty tight' but not quite what I wanted in terms of filling and fairing them. I used my trim router with a CNC bit to widen those seams to make it easier to fill them with thickened epoxy. The CNC bit worked like a charm.
 While I am really not quite ready for the coamings, yesterday I was inspired to tackle the (dreaded) task of making a pattern for the coamings. I say "dreaded" because the coamings have been on my "How in the heck do I do that?" list for a long time. I cut up some luan door-skin, clamped it in place, stood back and pondered, asked Jan for her thoughts, looked at many (many) photos on-line and began marking off the shape for the coaming.

 There is a bit of tweaking to do - and the "hard" part (fitting to the rise over BH-2) is not quite done - but after much hemming and hawing I realized that how one shapes the coaming is a personal decision. There is no right or wrong way to the shape.
On Tuesday, I went to the Secretary of State's local office to find out what documentation I need to title and register Gardens (Michigan doesn't call it DMV but that is one of the functions of the Secretary of State's office). I need materials receipts to show I've paid sales tax on the materials and a statement that I built the boat. No inspection required. As a lawyer friend of mine recently told me, "Michigan isn't concerned with the boat design, the quality of the build or whether the vessel is seaworthy… what the state wants is tax dollars so you'll have no trouble getting your title/registration - just write a check for the amount they tell you!"
I am pleased with the progress over the last two weeks or so, and I know I am getting close to completing Gardens. However, a FB post and comments this morning reminded me I still have a ways to go… "When the boat is 75% done you still have 75% to go." I'm probably a bit beyond the 75% mark, so maybe I have less than 75% to go.
So the four seams between upper deck panels were 'pretty tight' but not quite what I wanted in terms of filling and fairing them. I used my trim router with a CNC bit to widen those seams to make it easier to fill them with thickened epoxy. The CNC bit worked like a charm.


On Tuesday, I went to the Secretary of State's local office to find out what documentation I need to title and register Gardens (Michigan doesn't call it DMV but that is one of the functions of the Secretary of State's office). I need materials receipts to show I've paid sales tax on the materials and a statement that I built the boat. No inspection required. As a lawyer friend of mine recently told me, "Michigan isn't concerned with the boat design, the quality of the build or whether the vessel is seaworthy… what the state wants is tax dollars so you'll have no trouble getting your title/registration - just write a check for the amount they tell you!"
I am pleased with the progress over the last two weeks or so, and I know I am getting close to completing Gardens. However, a FB post and comments this morning reminded me I still have a ways to go… "When the boat is 75% done you still have 75% to go." I'm probably a bit beyond the 75% mark, so maybe I have less than 75% to go.
Subscribe to:
Posts (Atom)