Sunday, September 28, 2014

Laminating the Stem

Installing the exterior stem (laminating in place) began yesterday morning with the first ply (the plies for the lamination are pine ripped to between 4 and 5mm. No indication of stress, strain, cracking or splitting during the dry fit, so I painted the faying surfaces with neat epoxy, spread a generous amount of thickened epoxy on the hull and screwed the pieces into place. Then we left for a family get-together.

First thing this morning, I removed the screws, sanded the first ply and repeated the process to install the second ply - staggering the seams to avoid/minimize creating a weak spot.

Late this afternoon, I repeated the process again - and nearly got ahead of myself. I installed the skeg piece (which is almost flat and under no stress at all) without doing a dry fit. No problem. But I caught myself before getting too far along installing the stem piece without a dry fit. Good thing, too, because during that dry fit that ply (which measured 5mm) took the curve without any apparent problem but began cracking as I drove in the last screw (which was no where near the crack). Before I knew it, the piece split, held for a second or two and then broke in two.

I quickly removed the pieces, checked the next piece (closer to 4mm than 5mm) and proceeded with a dry fit. This time there was no cracking, splitting or breaking and the installation went well.

Three plies installed, three to go...

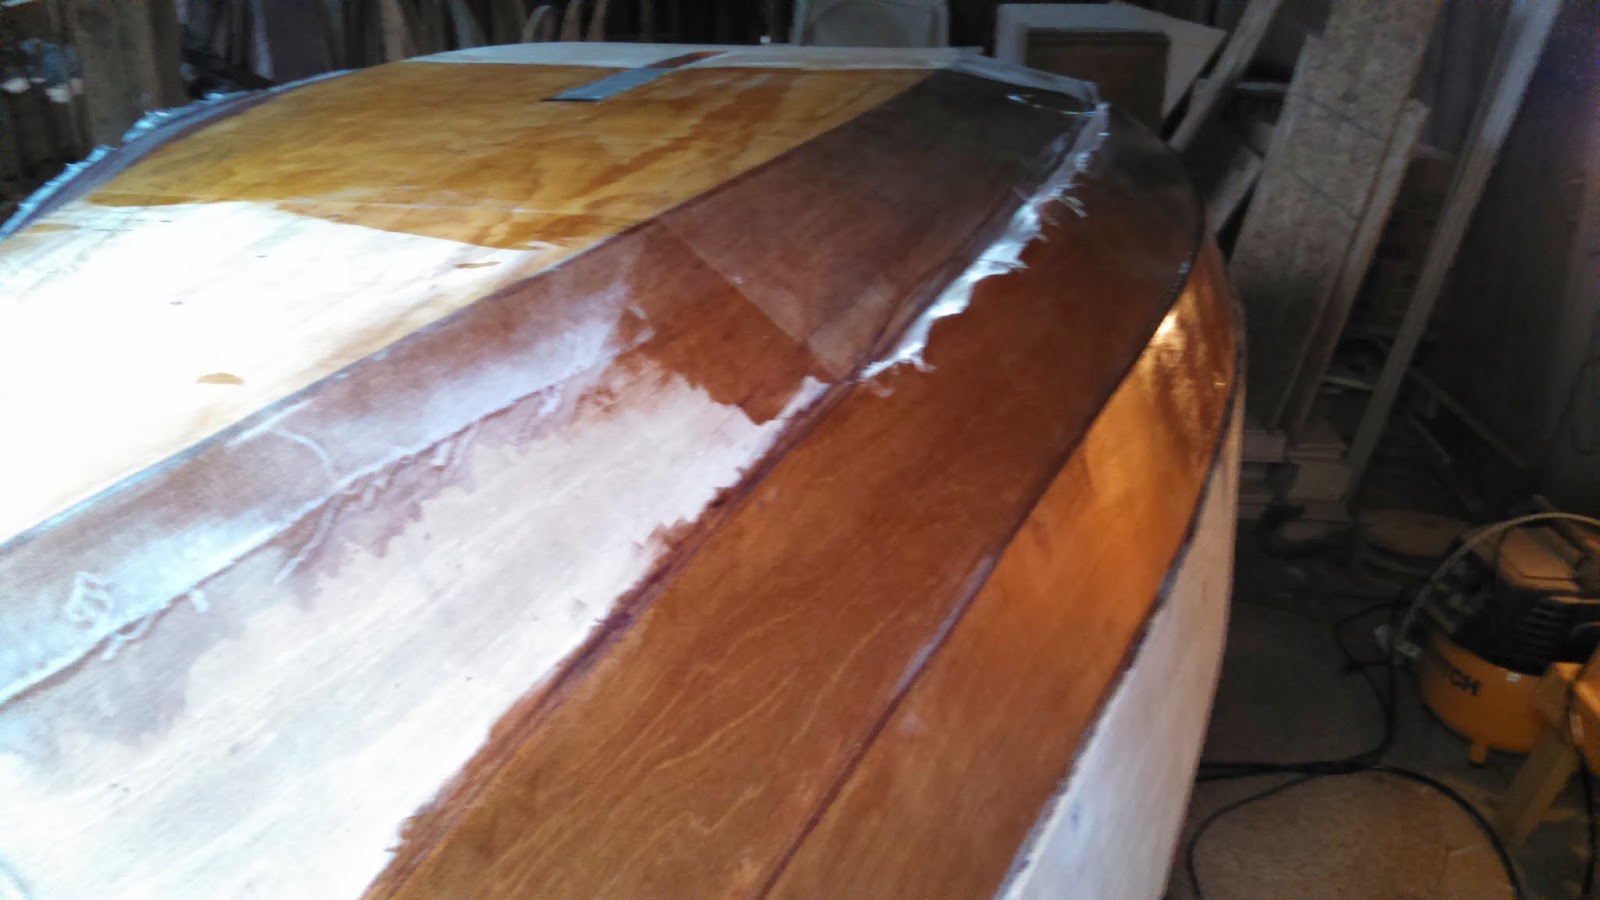
I am using 1¼" sheet-rock screws and plywood pads (souvenirs of my Goat Island Skiff build) which worked really well to hold the ply to the curve of the bow without marring the surface of the ply. Because of the total length needed (about 12ft) for the stem and (foreward) skeg, two pieces of unequal length are used for each ply so the seams can be staggered.

While this is a bit of a tedious process - I can add a maximum of two plies a day - the results will be good. And, there is no lack of work to be done before the hull is ready to paint...

Friday, September 26, 2014

Skeg, Stem and Fairing

Installed the skeg yesterday. Lots of thickened epoxy (too much, really, but I'd rather it be that way…), screws, patience and a huge assist from my wife.

Next up is the exterior stem and (for want of a better term) the foreword skeg (stem extension between the exterior stem and the centerboard slot?). Because my earlier lamination didn't fit well enough - and I dinged it up a bunch running it through the planer - I am going with Plan B. Plan B is laminating the exterior stem in place. The plies have been cut and the glue-up will begin in the morning. In the meantime, I glassed the front edge of the bow. The excess will be trimmed away before I begin laminating the stem.

Fairing continues - lots of sanding means lots of dust:

And, yes, I created more work for myself with that bit of fiber-glassing… But, it is all progress…

Wednesday, September 24, 2014

Things are Good

The bottom, including the first plank, has been glassed… and mostly sanded…
The first round of QuikFair has been applied…
The skeg has been epoxied and fiber-glassed and is ready for installation…
The temperatures reached the low 70s today… and, it didn't rain…
Things are that good!

Sunday, September 21, 2014

On Track

Fiber-glassing the bottom is going well. The plan to have it done by today went by the wayside when Saturday's commitments made their presence known: an afternoon memorial service for a WWII veteran and an evening house concert in Grand Rapids. Why - or how - is it that known, scheduled events are completely forgotten when working on the boat?

Here's a couple of photos of the most recent piece of fiber-glassing… A before and an after:


Fiber-glassing doesn't look like much in a couple a snapshots but these photos document progress. The last bit of glassing involves a triangular piece on the bottom and separate pieces for the front end of the first plank. I'll cut those three pieces tomorrow (when today's epoxy isn't tacky) and epoxy them in place after fitting.

Fairing the hull will take a few days, I am sure. QuikFair's cure time allows multiple applications per day so I should be able to work nicely around a couple of appointments over the next few days.

While I lost a day of boat work to social activities - which were completely worthwhile - my time-line for getting the hull prepped and painted before the end of October is still good. Wiggle room was built in to the time-line.

Friday, September 19, 2014

Out of Chaos...

Tuesday's chaos gave way to a certain measure of progress over the last three days.

Half the bottom has been covered with fiber glass and epoxy. The rest of the bottom should be fiber glassed tomorrow - Sunday at the latest.

The second and third planks on each side have been epoxy-coated. Fairing of those will begin tomorrow. I am using System 3's Quik-Fair. I liked the small test sample I mixed and used on Wednesday so I am looking forward to fairing the hull.

The sheer strakes/planks need the trim strips fitted and installed before being epoxied, faired and prepped for paint. I had thought of using mahogany for the trim, but I am reconsidering that idea. Given the lengths, twists, bends and curves involved, my thought now is to laminate thinner, shorter lengths of Douglas fir (which I happen to have on hand) in place. I have to give that plan a bit more thought…

In addition to the physical progress of the last few days, I've got a workable timeline for getting the hull painted and turned right side up before it gets too cold to paint.

So, things are looking up!

Tuesday, September 16, 2014

Strange Day

It was - I was - unfocused. And that is being kind and generous. Bouncing from one thing to another but getting nothing accomplished - that was my day.

Early to bed, early to rise… and all that hopefully means I will be more focused tomorrow. Maybe... I will get something DONE!

Sunday, September 14, 2014

Fitting the Skeg

Or… How to remove a bunch of material without making a lot of progress…

The skeg was rough cut to size and loosely fit to the hull a few weeks ago. There were a few high and low spots creating small (4 - 5mm) gaps in several places where the skeg didn't quite match the hull. Today, I decided to trim it to a nice tight fit…

I marked a line on each side of the skeg by sliding a carpenter's pencil along the bottom; there were some very minor differences. Using the grinder (with a flap-wheel sander) and the palm sander with 60 grit paper), I sanded to the lines and checked that the skeg was square. Put it back on the boat… There were a few - different - high and low spots putting the small gaps in different places.

Repeat the process - except to mark the low spots not the entire skeg. Similar results.

Repeat the process: same results although the gaps were getting smaller…

The whole process reminded me of efforts to even the legs of a chair to eliminate a wobble...

I stopped when there were only a few gaps and those gaps were no more than 2mm. I could have kept going to the point of sanding away much of the skeg but decided thickened epoxy, screws and glass-topped fillets will have to do.

Friday, September 12, 2014

Optical Illusion?

While tidying up the bottom edges of the planks, I spent some time trying to get a nice, sharp, crisp edge - because that's how I thought the edges should be… and struggled with the bumps and hollows. Then, while checking the Building Instructions for something else, I (re)read this:

Tidy up the underneath edges of the planking. This is critical to the boat's looks. Use a wooden batten around to indicate the bumps and hollows. Plane the edges fair with a rebate plane (or small block plane), fill the undersides and round them as shown on sheet 6. (emphasis added)

The wooden batten certainly helps but what surprised me most was that rounding over the edge made the the bumps and hollows visually disappear. This photo sequence illustrates this effect:

The raw edge:


Planed & Rough Sanded:


Rounded over:


Of course, there is more work to be done on the edges, but the modest statement, "This is critical to the boat's looks." is clearly an understatement. And rounding over the edge is a brilliant optical illusion - at least for me.

Wednesday, September 10, 2014

Boat Hook Project

While waiting for epoxy to cure I have time to dream up new projects…

A couple of weeks ago I sat in Atlanta browsing DuckWorks' site and came across a bronze boat hook head fitting. That lead me to pricing boat hooks at Shaw & Tenney. THAT sent me back to DuckWorks… I decided to make my own and ordered a boat hook head fitting.

Here's a peek at the project:


The practice piece was tapered using a grinder with a flap-wheel, a belt sander and a palm sander. It took a bit of time but the taper is a good fit. I am hoping to do as well with the real handle.

The varnished piece is a cut-off from the 8' 1¼" square blank I glued up using old maple flooring. I planned to take the handle round, but I like the octagonal shape - it looks and feels good - so I decided to leave it 8-sided. The two coats of varnish on the test piece tell me I'm going to like the looks of the finished product.

Work on the hull continues albeit not as quickly as I hoped for... sanding, epoxy, fiber glass, fairing, sanding... all with the intent of getting the hull faired, primed and painted by November.

Sunday, September 7, 2014

Plank Gauge

I may be a slow study…

Eyeballing the planks to get them symmetric from side to side wasn't working too well for me. I can step back from one side to get a decent look but the other side is close in to a wall, limiting the visual perspective. And, even though I did some trimming and sanding, I wasn't very happy with the 'other' side. And, even I could see the planks were not symmetric (never mind that I could have cut the planks in pairs… ).

A friend of mine is fond of saying, "If you can't put a number to it, it's just voodoo." And that's what I felt I was doing - somehow, the planks would magically match up. So, how to put a number on them?

This is where I may be slower than some… It took me a while to figure out I could measure points on the planks on one side of the boat and transfer those points (measurements) to the other side, connect the dots and cut to that line.

So, a nice long straight edge, a carpenter's square and a ruler resulted in an impromptu plank gauge.


I marked off 12 stations along the centerline of the boat, drew perpendicular lines to the chines, placed the straight edge across at each station and measured to the 'top' of the plank, recorded the measurements and transferred to the other side. Masking tape 'connected the dots' and the multi-tool trimmed away the excess material. An assortment of sanders and rasps faired and smoothed the edges of the planks. Gardens is looking much better to me than she did earlier in the week.

Wednesday, September 3, 2014

Slathering Epoxy

Work on Gardens has resumed with the goal of getting the hull faired, primed and painted before the weather turns too cold for that sort of thing. So, I've got two and a half months (actually less than that now) before things get too cold in mid-November.

I've been fairing planks, finishing the glassing of the chines, fitting the skeg (rough cut done, now to sneak up on a good fit), fitting the stem (grinding the hull a little at a time to fit the laminated stem) and prepping to glass the bottom. Trying to decide whether to glass just the bottom or include that first plank… Either way, that will be a lot of epoxy to slather around.

No photos so far this week as there really hasn't been anything worthy of a photo… hopefully that will change soon!