Friday, June 26, 2020

Gardens' Annual Yard Sail

Day 1, Thursday:
Some new rigging, a tidy-up of small bits of mis-matched line, a piece of new hardware, and an experiment with lazy jacks.
I was pleased with the overall set of the mail (left the mizzen in the barn for another day) but I was not thrilled with how the mast traveler worked. Oh, it hoisted the yard & sail just fine. But on lowering the sail, the yard was a bit unruly and when the yard was almost (but not quite) all the way down the mast traveler kept lowering, losing halyard tension on the yard and the loop on the yard popped off the hook of the mast traveler. (That is one messy sentence!) Lazy-jacks helped somewhat but the yard still popped off the hook. Perhaps a stopper of some sort on the mast to prevent the traveler from dropping lower than the yard?
The lazy-jacks presented a couple issues of their own. They really are quite a rat's nest of line and unless there is a convenient way to keep them rigged on the mast and boom for trailering, I am not convinced they would be worth the trouble of rigging for day-sailing. However, truth be told, this was my first effort at setting up and using lazy-jacks so, maybe, operator error is to blame.

Day 2, Friday:

Definitely a better day wrestling with the lazy jacks. Shortened the aft legs, lengthened the LJ halyard/downhaul, moved the legs toward the ends of the boom. Worked on stowing/securing for trailering (needs more work). The lazy-jacks helped control the sail and, I suspect, that will improve as I tweak the system. All in all pleased to make progress.

Pro-tip: Don't Yard-Sail until after the front passes through... things got dicey...

Next issue: minimizing catching LJ on boom mounted hardware and work on tidier bundling of the yard/sail/boom package for trailering.



Thursday, June 18, 2020

Concept... and Proof of Concept

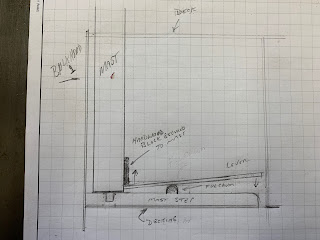
One issue I've had with unstepping Gardens' mast alone is in lifting the mast two, or so, inches for the stub tenon to clear the mortise in the mast step so the mast can be walked back to horizontal using the Slot in the deck.  Reaching across the three feet between BH-2 and the mast is not too difficult, but having enough leverage to lift the mast straight up is the problem. Someone standing on the foredeck can easily lift the mast vertically, but that same person cannot then lower the mast. So, I needed a solution for unstepping the mast by myself.

Concept: A Mast Lift consisting of a Lever, a Fulcrum, and a block of wood attached to the mast. Lifting the mast is helped by stepping on the lever... That's the Concept.


The lever is White Oak: 1.25"x1.25"x 36" 
The fulcrum is a T-section: White Oak: 1"x3"x6" base with a 1"x3"x6" upright (with a 1.25" notch)
The block is  White Oak: 1"x1.25"x4" screwed to the mast

Proof of Concept:


Not the best photo. The Proof of Concept utilized the mast support (used when trailering), not the full mast. The prototype fulcrum was modified from what is in the photo to the dimensions listed above.  The block on the mast support is pine - not white oak. (Ignore the yellow lifting strap in the foreground and the dust collection on the stringers in the background.)

I'll pull Gardens into the yard for rigging and testing the changes (mast traveller, lazy-jacks, etc.) made over the winter, including the "mast lift."
.


Wednesday, June 10, 2020

Paint Saga Continues...

The project to repaint the centerline is going well (although it may take me longer to paint than the paint takes to dry) - and, as mentioned previously, has expanded to include the transom, a bit of transom trim, and the sheer planks. The transom trim piece is at the top of the transom and, until recently, was finished bright (epoxy and varnish).

However, since the trim piece is a fairly uninteresting bit of white pine, I decided to paint it the same color as the sheer planks. So, it was sanded along with the centerline and transom. Some folks may be able to paint around fittings without smearing paint everywhere, but I'm not one of those folks. The motor-mount and rudder hardware came off. The mounting blocks/spacers for the rudder fittings are epoxied in place so they, along with the trim piece, were masked off.

Then, as I was getting the paint ready, I remembered I'm not one of those neat painter folks. I added painter's plastic-drop-cloth-film-edged- with-masking-tape (convenient product) to protect the transom and hull from paint drippings and splashes.

So, the long (and getting longer!) painting story is at the point that the trim piece has been painted and the sheer planks have been repainted. The masking tape and painter's film will come off (later today, maybe tomorrow) so the transom and centerline can be painted. Once those are done, Gardens will go back on the trailer for interior work and outfitting.

Wednesday, June 3, 2020

A Little Here and a Little There

Time is flying by and I feel as though I've been busy. But progress seems to have slowed a bit.

The centerline repainting project is progressing slowly and has expanded to include the transom (and possibly, the sheer planks). The weather has been reliably unpredictable, so progress has come in fits and starts. There are no photos of paint drying...

The plain mast traveler I ordered in late February arrived from Australia in late March. Vendor's photo:
It was tucked away awaiting installation. But in early May I had the inspiration to ask my leather-crafting BIL if he could wrap the traveller in leather for me. A couple weeks later I picked up the finished item. It cost me two 6-packs of beer (BIL refused cash payment) and may be my best money spent on beer in recent memory.

Always looking for additional projects (it's a form of procrastination), I built new trailer bunks (inch-and-an-eighth thick, and slightly narrower) to replace the older inch-and-a-half ones. The new bunks are "springier" than the old ones, which is what I wanted. We'll see how they work once Gardens goes back on her trailer.