Thursday, November 29, 2012

Diversions (Updated)

Interior sanding and epoxy work continues. Temperatures have been cooperating enough - aided by the plastic weather coverings tacked up on the windows - to allow epoxy work.

The band-saw is back in operation with a new capacitor. I'm sure it is just wishful thinking, but the motor seems to be working better than ever. Of course, cleaning the motor and blowing out a LOT of sawdust probably helped.

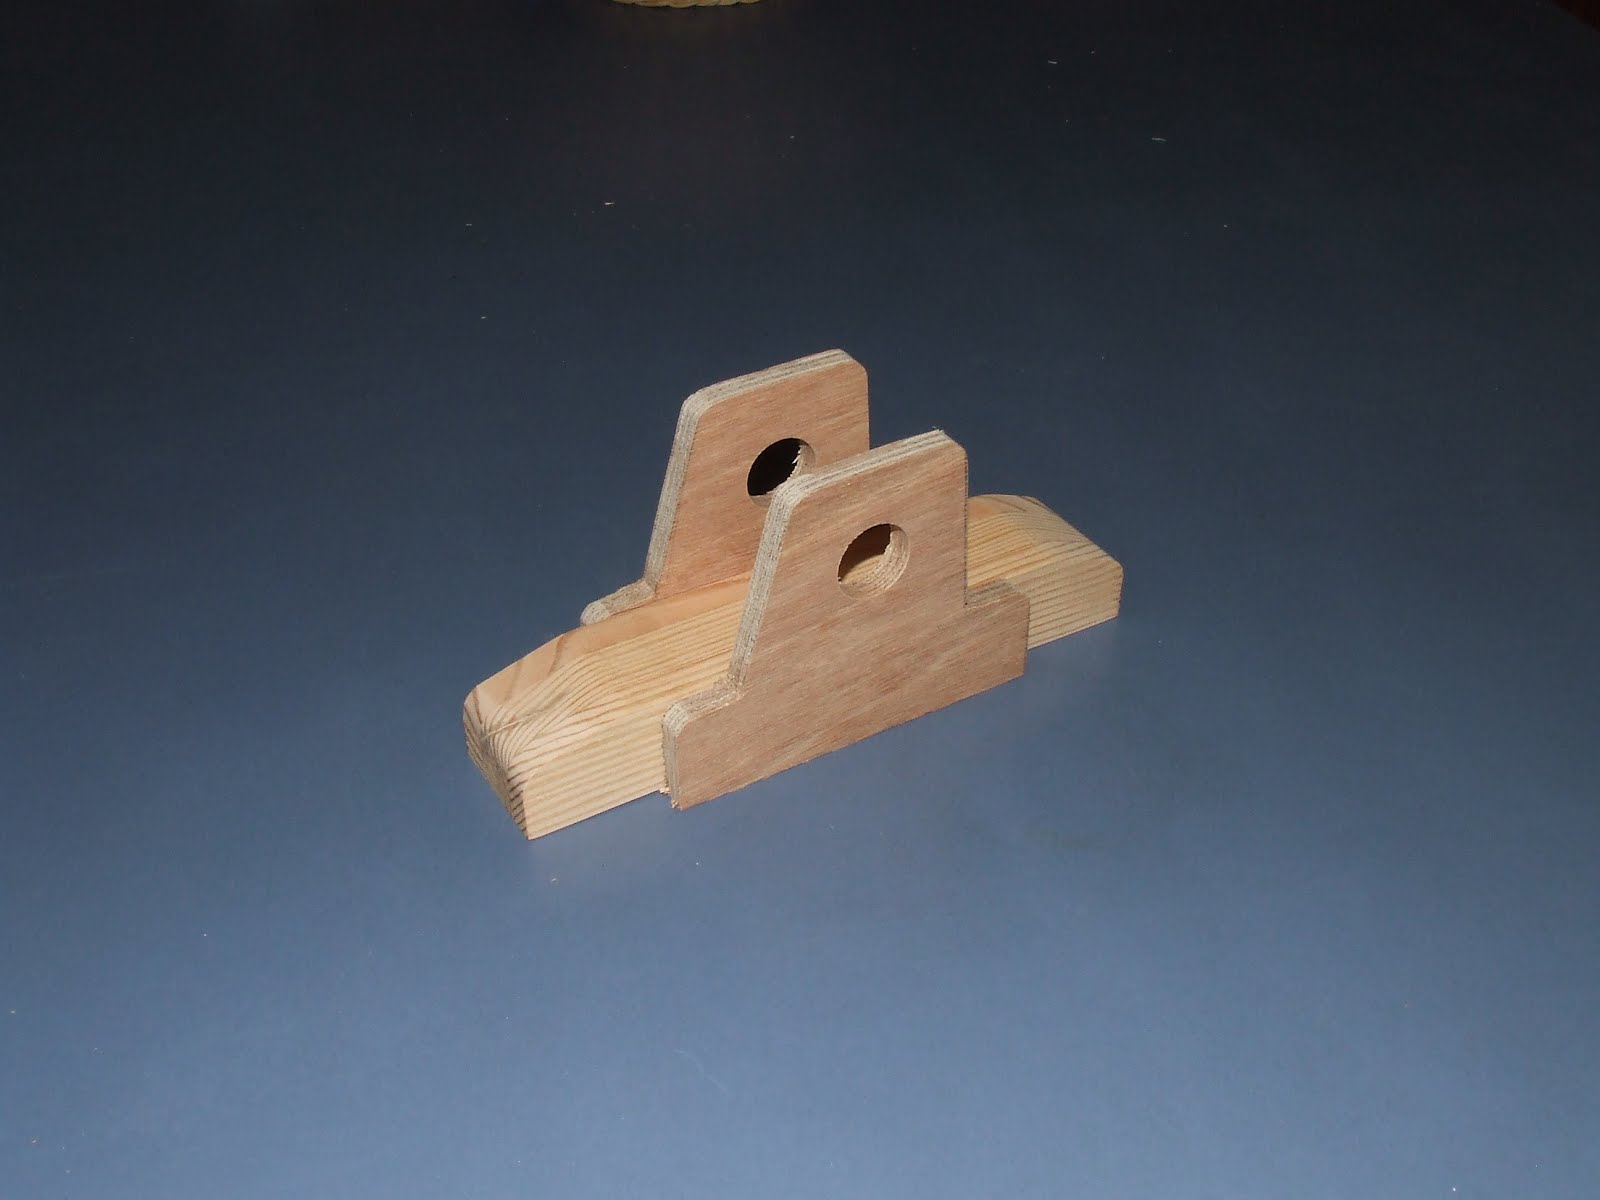
Getting the band-saw working meant I had to test it… but just cutting scraps of wood didn't make sense, might as well cut something for Gardens. Checking the plans, I decided to work on the mast steps (both main and mizzen) and the boomkin mount. So, after figuring out what I needed and checking my wood supply, I cut out the pieces for the boomkin mount. (Photo in the morning as the camera is not available tonight.)


The boomkin mount dry-fitted. The base was cut from a block of laminated Douglas fir using the band-saw and planer to mill it to size. A bench-top sander worked to bevel the top corners. A scroll saw was used to cut the 3/8" meranti ply side pieces. The pin holes are over-sized. They will be filled with epoxy and re-drilled for the pin attaching the boomkin in place. More sanding, epoxy and finish work to do on this component. Working on these small bits is a nice diversion from the monotony of sanding.

Sunday, November 25, 2012

A View From Astern

Plenty of sanding and epoxy work (and not much else) going on…

Actually, there is more going on - it just isn't visible. I am writing out lists of what needs to be done (or what I think needs to be done) this winter. Big-picture items include the bunk flats, the cockpit seats and the decking. Heck, that's it! That's all I have to do before turning the boat to fair and paint the bottom… Of course, there is a lot of detail and fiddly work to be done before those big-picture items are completed. Then, too, I have my list of tasks to do inside when winter really sets in. Pretty soon, though, I'll need to figure out how to support the hull while I bumble around working on the interior - I don't want to capsize Gardens in the shop!

The view from astern:


…which is an interesting perspective. I like it. I think I'll use this angle (among others) as the interior work progresses.

Friday, November 23, 2012

Tingles... and Sanding

Thanksgiving Day was absolutely beautiful with sunshiny skies and temperatures in the low 60s. It was a perfect day to work on Gardens and It was also a perfect day for visiting with family and friends. Family and friends won out over boat work.

Last night the weather changed - wind, rain, lightning and thunder in the evening followed by dropping temperatures and more wind in the early morning hours. Snow flurries have been blowing around off and on all day. Despite the dismal conditions outside, I was able to get some work done on Gardens.

The nine remaining 'tingles' (reinforcing/backing strips aka butt straps spanning the joins between pieces of planking) were cut and installed today. The tingles are not difficult to cut, fit and install so this really isn't much to report - just another of the small but necessary steps to take toward completion.

Sanding continues...

Wednesday, November 21, 2012

Thoughts and an Idea

It is the night before Thanksgiving, pies are baked, turkey is thawed, the house is clean and company won't arrive until tomorrow.

No new progress on Gardens to report - sanding is sanding and not very exciting at that - but I have been thinking about upcoming steps and stages in the building process. One of those steps is to install the bottom of the anchor well. Fine, I will do that because I suspect that piece of plywood adds to the strength of the bow. But I have begun to wonder just how functional that anchor well is for storing AND using ground tackle.

The anchor well is forward of the mast and well forward of the cockpit. It seems - and I haven't really tried that reach yet or even asked for comments based on experience - the anchor well is too far out of reach to be practical and, perhaps, a bit small to boot.

So, I am contemplating foregoing the anchor well - and its necessary deck cut-out - for a cockpit anchor storage/deployment//retrieval set-up. This will, for the time being, eliminate the deck cut-out and, as a result, simplify the building process. Installing the anchor well bottom now means I can always modify things if a future need arises.

Probably won't get much boat work done tomorrow, but Friday should be a good day in the shop.

Happy Thanksgiving!

Monday, November 19, 2012

Work Continues… and a Note re the New Shop Accessory

Sanding, in preparation for epoxy coating and painting, has begun. The stem/spine and all the frames were coated with epoxy when they were built but none of the planking (other than the glued portions) has been coated as yet.

Beginning at the forward end: sanding all surfaces, vacuuming; and covering with two coats of epoxy. Once that is done, I will measure, mark, cut and fit the bottom piece for the anchor well. The interior of the bow section will then be painted before the anchor well deck is installed. That all may happen this week - but with the Thanksgiving holiday upon us, well, let's just see how things progress.

A note regarding that new shop accessory I commented on earlier this month: It works well enough keeping large bits and pieces from getting to the main shop-vac but it does not keep the shop-vac filter from clogging with fine dust. This is so because there is no "cyclone" effect created by the Woodstock fitting. In fact, a close look of the item would have suggested this outcome: The pick-up hose feeding into the bucket and the vacuum hose from the shop-vac are nearly opposite one another. The fine dust and sawdust is sucked right into the shop-vac. Perhaps a baffle of some sort or, perhaps a screen over the end of the hose to the shop-vac, would improve the performance. Hmmm… perhaps a baffle made of screening would do the trick? At any rate, the Woodstock item does seem to improve the shop-vac's performance.

Good news: Upon further review, the band-saw does NOT need a new motor. A new start capacitor should have the saw back in operating condition.

Saturday, November 17, 2012

Preparing for the Next Stage

Yesterday and today have been quieter and less frantic than the last few days of the planking. I didn't do much actual boat work but I did things that will facilitate the next stages of this build:
  • Reviewed the plans and drawings to make sure I know what's next
  • Checked materials on hand to make sure I have what I need before I need it!
  • Cleaned up the shop - lots of dust (from grinding the bevels for the planking) everywhere
  • Began winterizing the shop - not so much to make it toasty warm throughout the winter, more to minimize the drafts and to help keep the shop at a working temperature for epoxy
  • Tool repair and maintenance:
    • New blades for the thickness planer
    • New wheel tires and, possibly, a new motor for the bandsaw
So, what are the next stages?
  1. Sanding, epoxy coating and painting the inside of the hull.
  2. Marking, cutting, fitting and installing the anchor well deck.
  3. Marking cutting, fitting ad installing the bunk decks.
  4. Marking, cutting, fitting and installing the cockpit seat tops.
This will keep me busy for a while. When the weather closes in and it is too cold to work in the shop, I'll have my list of 'indoor' projects to keep me busy.

Thursday, November 15, 2012

Isn't that the Truth?!

The planking is done. The last two pieces of planking were glued in place early this afternoon.

The last bit of planking installed on a hull is sometimes called the "shutter plank" (as in "Shutting or closing the hull") but more often it is referred to as the "whiskey plank." Tradition has it that completing the planking is a milestone deserving a celebration - a shot of whiskey being the traditional form of celebration. (Makes you wonder which came first: the celebration or the name.)

From wisegeek.com:
A whiskey plank is the last plank which needs to be put in place to finish a ship's hull. Although a ship is far from finished once the whiskey plank has been installed, mounting the whiskey plank marks a major milestone in the construction of a ship, and many shipbuilders treat it as a cause for celebration.


At any rate, yesterday I thought it a bit presumptuous to consider Gardens' last bit of planking as a "whiskey plank" worthy of celebration. Not so today. When that last piece was glued in place (for the record, it was the aft section of the starboard sheer strake), I felt a great sense of accomplishment and relief. We celebrated the milestone with a toast of Jack Daniels.

"...a ship is far from finished once the whiskey plank has been installed..."


Isn't that the truth?! Sealing, fairing and sanding the hull; fitting out the interior and outfitting - quite a lot left to do. But for tonight I will enjoy the moment.

Wednesday, November 14, 2012

Cold Shop

Today was too cold in the shop to work with epoxy so the last two pieces of the planking were not installed today. Everything is ready and tomorrow is supposed to be warmer - perhaps warm enough…

Dry fit of the last piece on the port side: the lower aft corner has been tightened -eliminating that apparent little flair.


Bow roughed in - needs some work. That top plank looks oddly wide and the sheer looks terribly flat - but it is the camera angle distorting the look.


I've given some thought to how to winterize the shop: plastic film on the three windows, block the edges of the overhead door to eliminate (minimize) drafts, and a heater. I'll also use the warming box I made last winter to keep the epoxy resin and hardener workable. I still have the warming tent that worked so well last winter to facilitate epoxy curing.

Tuesday, November 13, 2012

Planking Almost Done

Getting there with the planking… The last two planks are nearly complete. Just two more short pieces to install tomorrow and Gardens' hull will be planked! Photos tomorrow upon completion of this (to me) milestone.

Sunday, November 11, 2012

Plankng Progress (Really)

The last two days have been productive: Planks 2 and 3 have been installed!


Clearly there is much work to do to clean up the planking once it is all installed.

Today was a day of taking it easy and enjoying the unseasonably mild weather. I also took to heart comments made on the John Welsford Yahoo group concerning a neat and tidy shop making the boat work easier. I had let my workbench become so cluttered I couldn't find tools (that I had just used) yesterday. Today I cleaned and organized the workbench, including the addition of a 3-drawer tool chest. Now that the shop is neater and tidier, perhaps I'll remember to put tools away at the end of the day...

Planking will continue tomorrow. Bevels and lands for the fourth plank(s) to be cut in the morning. Cutting, fitting and gluing the planks will follow.

Friday, November 9, 2012

Planking Continues… and About Those Gains

Planking continues and the work is going well. Hey, I may even have the planking completed by my projected target date of next Wednesday…

As for the gains… I looked at photos of completed Pathfinders for inspiration and found that some (perhaps many?) carry the lapstrakes all the way to the stem (in other words, the builders didn't cut the gains). This discovery sent me back to the instructions and drawings for guidance and, there is NOTHING in the written instructions about cutting gains or smoothing the bow. The drawings show the lapstrakes carried forward to the stem. Could this be? Have I been making life more difficult than it needs to be? I think so. A DECISION: I am not cutting the gains to smooth the bow of Gardens. I will carry the lapstrakes to the stem and cap the ends with an outer stem.

There, I feel better.

Wednesday, November 7, 2012

New Shop Accessory

Dust collection is always a concern and consideration when working with wood. My shop is pretty rudimentary - band saw and thickness planer are on castors for flexibility - and the shop-vac rolls around as needed.

I have sort of coveted fancy dust collection systems even while realizing a fancy system is more than I need or can justify. Over the years I've seen the Dust Duputy cyclone separator (a plastic fitting to install on a 5-gal bucket which serves to make a shop-vac a two-stage vacuum) but never went ahead with getting one. Recently, on various small boat internet forums, I have seen posts for making your own cyclone separator patterned after the Dust Deputy. Frankly, this sort of DIY projects are fascinating but often impractical for me. So, early this week I searched Amazon for the Dust Deputy by Oneida. Dust Deputy by Oneida. Okay, $40 and a little finagling to fit it to the top of a 5-gal bucket. I almost ordered one…

But... I spotted this:
The Woodstock Mini 2-Stage Cyclone Separator. After reading the reviews I decided it was worth 'risking' $22 on it. I ordered one.

It arrived today and, like a kid on Christmas morning, I ripped open the box and hooked it up. This thing flat out WORKS! The dust and bits vacuumed up fell into the 5-gal bucket, not the shop-vac. This will help prolong the life of the filter, to say nothing of how much easier it is to empty a 5-gal bucket than the shop-vac. Of course, the Dust Deputy might be twice as effective - but I'll never know because I'm pleased with this product and recommend it if you are using just a shop-vac for dust collection in your shop. (The usual disclaimers apply - I have no financial interest in this product. I am a happy customer.) Oh, and by the way, I installed another piece of planking today and the planking of Gardens is now past the half-way point.

Monday, November 5, 2012

Planks, Gains and Winter Projects

Each plank (or piece of plank) installed on Gardens improves my techniques: the planks fit better and there is much less struggle involved with installing them. Now, the struggle may be easing because these recent planks have less twist in them but I'd like to believe I am getting better at this. As it is, I am planning to complete the planking by November 14. Since I have a history of perpetual optimism, we'll se…

The gains are still an issue. Joel's nifty Gain Machine may be the solution for the next four of the six sets of gains (the garboards are on the boat and, so, those need to be cut in place). In the meantime, I am still experimenting with a Japanese pull saw and a large rasp.

Temperatures around here are dropping - the season's first dusting of snow fell Saturday morning. I will soon need to shift projects from the shop to the house. I've begun a list of projects I can work on in the house such as the sails (SailRite kits), rudder cheeks, tiller and other bits and pieces. The mast, boom and yard will have to wait until next spring as access to the basement precludes moving materials in or the finished spars out. I do not anticipate a lack of boat bits to work on when it is too cold in the shop.

Saturday, November 3, 2012

Cutting the Gains

Cutting the gains - to fair the planks into a smooth surface at the stem - has been one of those "how the heck am I going to do that?" concerns of mine since before deciding to build the Pathfinder. I mean, I admire those great looking lapstrake boats with their planks blending into such a fair and elegant surface at the bow. I just didn't understand how to do that. Oh sure, I read about, saw step by step photo instructions and watched videos - and I finally understood the mechanics of the process. I still wasn't sure I could do it.

Today, after working on the first set of gains (there are six sets), I'm still not sure I can do it. My rabbet plane didn't do what I saw done in photos - might be operator error, though. A block plane was actually more effective but not much. A 14" horse-hoof rasp was not very effective either. I tried the grinder but that is hit or miss - practice pieces weren't too bad but I don't like the results I got on the hull.

Now, despite not being pleased with my efforts, I did make progress and will continue working out a methodology that will work for me. This first gain needs more workbut that last gain ought to look pretty good.


Between the various attempts to cut the gains, I began the third plank. So, the first third of the third plank on the port side of the hull is in place. This was a "feel-good" installation as everything went well: grinding the bevels; marking off and cutting the piece; fitting only required a couple of very minor tweaks and the gluing.

Thursday, November 1, 2012

Planking Continues...

After returning from my annual fall road trip (Baldwin and Munising, MI, Duluth, MN, Bayfield, WI and the Porcupine Mountain Wilderness State Park on Michigan's UP), I have resumed work on Gardens.

Planking continues and my lessons continue as well. Wrestling the garboards into place had me convinced the rest of the planking would be much easier. Well, the second plank is not any easier to fit than the garboard. In fact, while using a 6' length of 2x3 to leverage a portion of the port-side second plank into place, I managed to crack a stringer. The stringer did not split through and a bit of thickened epoxy squirted into the crack seems to be an effective fix.

Cutting the gains at the bow is the next task/skill to master.