Monday, May 30, 2016

Rigging the Boom

I've begun rigging the boom.

The boom is round…

The hardware for the reefing lines (cheek blocks and cleats) are flat…

Solution: Craft mounting pads/blocks contoured (a spindle sander is a nice tool to have) to fit the boom. These are for the cheek blocks.


The mahogany pads/blocks will be epoxied to the boom (which will be sanded to bare wood where the pads/blocks go), sanded and varnished. The hardware will be screwed to the pad and boom.

Sunday, May 29, 2016

Yard Work

While Jan worked on the gardens yesterday, I worked on Gardens' yard.

Cutting the tenon for the crank:
When the rains arrived earlier than predicted, I moved the operation inside. Here it is, set-up and ready for epoxy.

After I glopped on the epoxy, Jan turned the yard while I wrapped it with plastic-wrap and perforated the wrap to allow excess epoxy to ooze out.

The whole, wrapped up yard sat overnight to give the epoxy a chance to cure. I pulled the wrap off this afternoon and things look good. It'll take a small bit of sanding to be ready for varnishing.

Meanwhile, the main mast has received three coats of the 1:1 wiping varnish and is looking better.

Friday, May 27, 2016

Varnish, Sleeving & Hardware

Varnishing the main mast began today with the first coat of wiping varnish (a 1:1 mix of spar varnish and mineral spirits). Three coats of 1:1 will be followed with a similar number of 2:1, which in turn will be followed by 3:1 and finished up with straight spar varnish.

The sleeving for the main yard arrived today and was slipped onto the yard. I ran out of time today so tomorrow we'll epoxy the sleeve, wrap it tightly with plastic wrap and perforate the plastic as per Duckworks' instructions. I've used the sleeving before and am looking forward to tomorrow's project.

I sorted through my stash of hardware today looking for bits for the mast, boom and yard. I found a good bit of what I need and placed an order for a few items not in the stash. In the interests of time, I ordered cheek blocks - even though I began making my own during the winter. Those still need some work so I bit the bullet, ordered "store-bought" and figured I can finish my own next winter.

Wednesday, May 25, 2016

Scamp Camp

Today was a Scamp Camp day for me. Up and out early for the 90-minute drive to Eaton Rapids, MI.

Four Scamps, including Howard's Southern Cross, in various stages of completion:


Four Campers (Howard, Dave, Mike and me) caught up with each other, told stories and worked on Mike's Scamp.

As always, I learned a few things:
  • Eaton Rapids is known as the Island City because it is an island in the Grand River.
  • Epoxy mixed with Fast Hardener goes off quickly and smokes in 80°F temperatures.
  • Sometimes, you just need a bigger hammer.


It was a good day… The paint of Gardens' sheer planks sat undisturbed for another day. The yard blank cured another day. And since I wasn't home, there was no temptation for me to do anything I might have to re-do tomorrow.

Monday, May 23, 2016

Back to Work Following a Weekend Road Trip

Following a quick week-end trip to Springfield, MO, work resumed on Gardens today:
  • Plugs for the yard were cut and fit, slathered with thickened epoxy and installed as part of the final assembly of the yard.
  • Main mast was epoxied; a few minor gaps in the glue lines were filled with thickened epoxy. The rollers the mast is sitting on made rotating the mast a very simple matter. Varnishing will begin as soon as I can sand and finish fairing the mast. Probably Thursday.
  • Gardens was vacuumed out - to make room for (a bit) more sawdust.

Friday, May 20, 2016

Sheer Plank Paint and Other Stuff

It's green, really, no matter what it looks like in the photo.
The lighting in the boat cave is not good - very dim - and there is no way to step back and get a good look at new paint on the boat. But the second coat (pictured) looks better than the first one and, I suspect a couple more coats will look even better. So far, I am pleased with the outcome.

In other news, the starboard half of the foredeck has been rough cut. I found it encouraging that the port side half worked as a pattern for the starboard side half - no reason why it shouldn't have, but I'm glad it did. The foredeck will be installed once the lower trim piece is installed on the sheer planks (better for clamping than just the lower edge of the plank).

We also partially glued up the birdsmouth blank for the yard. I'll take it apart (glued in halves), fit the plugs and finish gluing it up early next week. After that, I'll plane and sand it round and add FG sleeving.

I'm still figuring out how to best install the supports along the hull for the seating and platform decking panels.

Wednesday, May 18, 2016

Painting the Sheer Plank... and Thoughts on Green

The sheer planks are epoxied and ready for paint.

I decided sometime last year I wanted the sheer plank to be a dark green and my choice was "Hunter Green." Last October, when I did a story board with the Hunter Green for the sheer plank, "Fired Clay" (brings to mind a dark terra cotta, doesn't it? It is more of a soft cream color) for the hull and strips of DF representing the rub-rails and trim (the real ones are mahogany), I thought the Hunter Green might be too dark. But I wanted to see what it looks like in bright, full sunlight… It still looks dark - nearly black. So we began sampling other greens. We discovered two things:
  • There are way too many shades of green; and
  • There is a wide gap between the Hunter Green we began with and the next darkest shade we could find.
We did pick out a green we like: Benjamin Moore's "Forest Foliage" (where they come up with these names is anyone's guess) and it contrasts nicely with the Fired Clay of the hull. The first coat of Forest Foliage went on late this afternoon.

The near-term sequence should go something like this:
  • Paint the sheer planks
  • Install the trim pieces
  • Install the decking
  • Install the rub-rails
Of course, there is a multitude of other work to be done - some of it before the decks are installed.

But we're getting there!

Sunday, May 15, 2016

Rub Rails

The trim pieces came off the jigs to make room to steam bend the rub rails. Both rub rail went into place without incident. The poly-tubing has been removed from both rub rails, which are clamped in place to dry.
Next step for the sheer plank is to tape off the edges and begin painting.

Next step for the rest of the boat is to get the bilges painted and the seating & decking panels installed.

Thursday, May 12, 2016

Rub Rail

We worked on the first of two rub rails today. The port side trim came off the jig to make room to steam bend the rub rail, which went into place without incident.
The starboard side trim piece is still drying in place so we'll have to wait another day or so (it has been very humid lately) before steaming the second rub rail into place.

Tuesday, May 10, 2016

Steam Bending the Trim Pieces

We set up bending jigs on the hull for the two lower trim pieces using jig-sticks and a simple L-shaped height guide.
The height guide was used to place the bottoms of the jig sticks 1" above the bottom of the sheer plank.
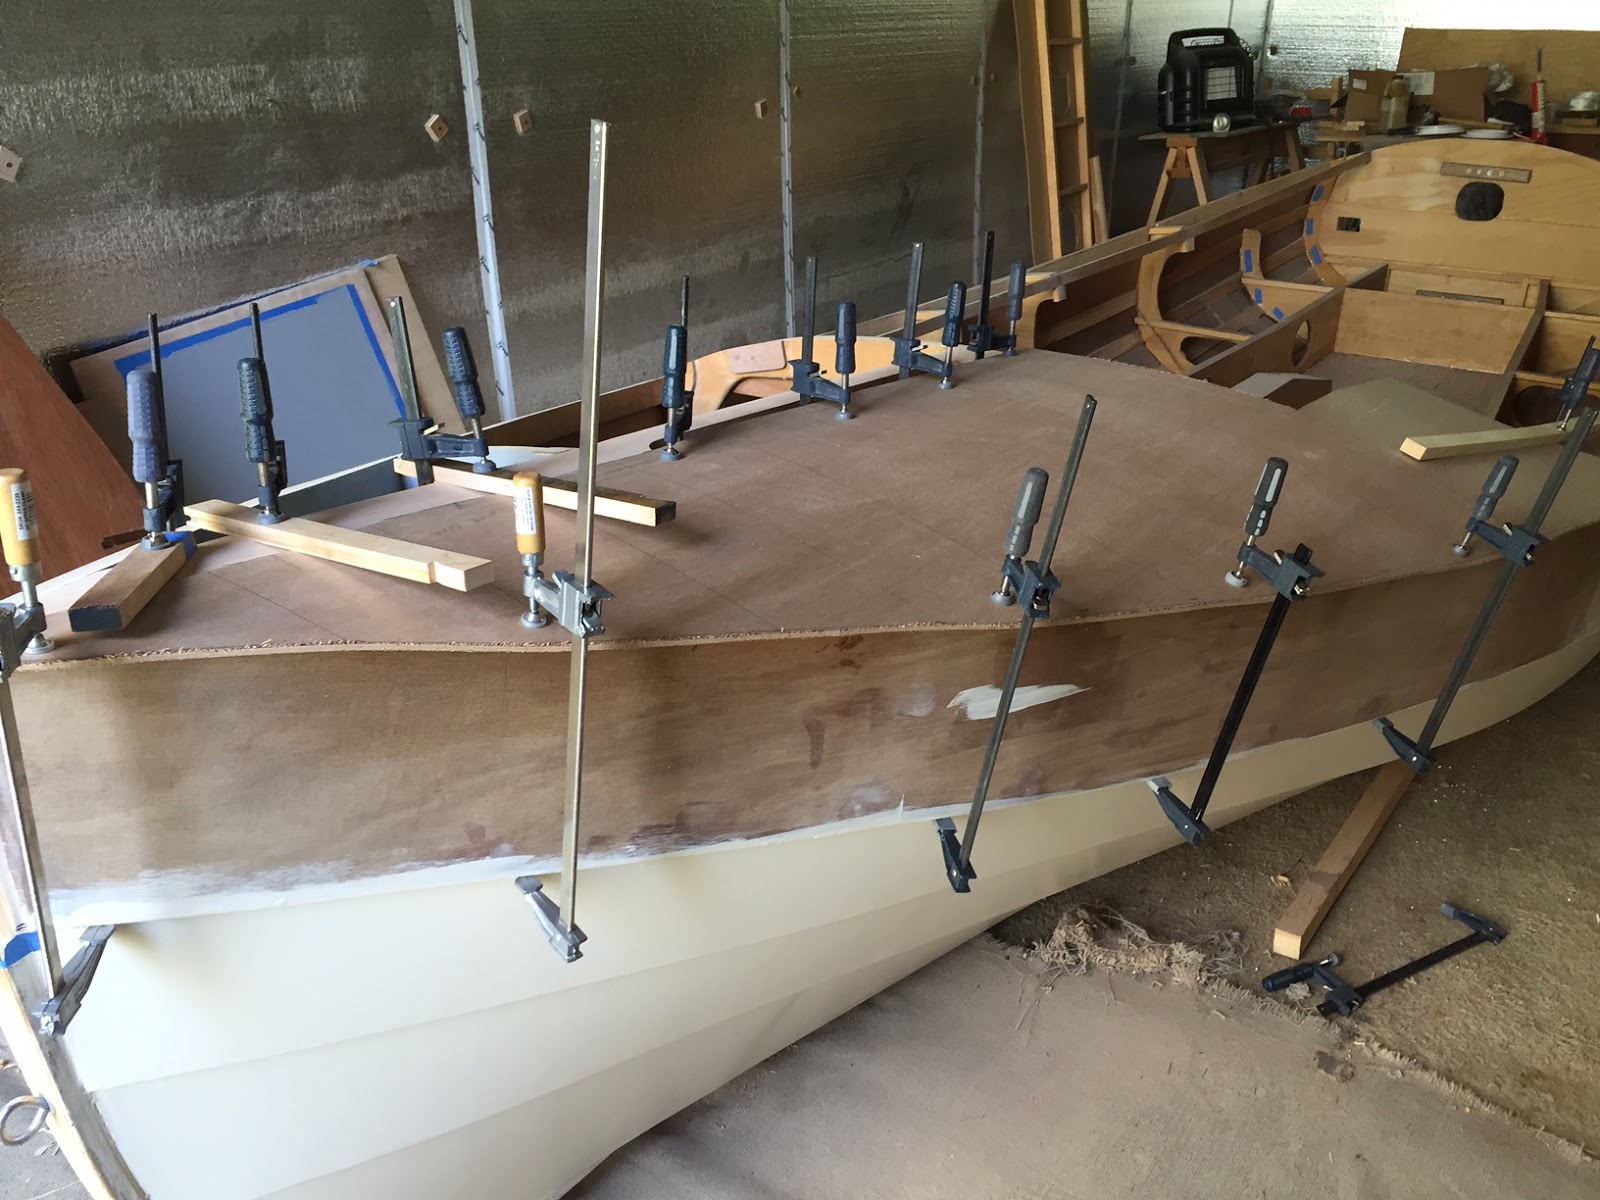
We put the pre-soaked trim piece (19mm x 32mm x 6m; 3/4" x 1-1/4" x 20' mahogany) into poly-tubing, hooked up the steam generator and waited about an hour. When the trim piece was ready, we placed it under the jig-sticks and clamped it tight against the sheer plank with stick-clamps.
One wrinkle in the process was the end furthest (20') from the steam generator cooled a bit too much (we were concerned it would crack) before we could clamp it in place. So, we moved the steam generator, hooked it up to the other end of the poly-tube, turned the generator on and steamed that end. It bent right into place. We did the port-side yesterday and the starboard side today using the "steam from each end" process for both trim pieces.

These two pieces will stay clamped in place to dry until Thursday, when we'll steam bend the rub-rails, which will pre-soak until then.

Port-side trim piece out of the tubing and clamped in place to dry.
Using the poly-tubing, instead of a steam-box, is very convenient and effective. Being able to clamp a piece into place while still in the tubing makes it easier to re-heat the piece if necessary.

Sunday, May 8, 2016

Rub-Rails, Trim and Foredeck

Thursday we ripped the rub-rails and trim pieces out of a 20' piece of mahogany.

The trim pieces have been pre-soaking since Saturday. We'll steam bend them Tuesday or Wednesday. The rub-rails will follow later in the week.

Friday I marked off, cut out and test-fitted the port side of the foredeck. Everything went well and it looks good.

I clamped it down the center-line of the king plank and then began clamping the edge to the gun'l. Surprisingly, to me, clamping it using bottom of the sheer plank worked! When I install the decking I will use more clamps than I used on Friday. Part of me wonders what I did wrong with the sheer plank as almost everyone says there is no convenient way to clamp the deck in place… Maybe I'm missing something? At any rate, using the bottom of the sheer plank seems to work for me.

Thursday, May 5, 2016

Edge Trim Experiment

I decided to trim the curved edge of the aft deck (yeah, I know, getting ahead of myself again) so I experimented yesterday.

I milled a piece of cherry to 3/4" x 3/4" x 36" and centered a 1/4" wide and 5/8" deep slot on one side. This fit perfectly on a flat length of 6mm ply. I popped the piece into a length of poly-tubing, hooked up the steamer and let it run for 30 minutes. It didn't work…

First thing I noticed was the piece was dry, which was unlike the carlins when I took them out of the poly-tubing. Second thing was the piece cracked - right at the top of the bend in the deck. Third thing was the slot was pinched at the top of the bend.

So, what happened? Three things:
  • The slot wasn't wide enough to take the bend,
  • I did not pre-soak the piece, and
  • I did not steam the piece long enough.


I'll try again…

Tuesday, May 3, 2016

Decking

Working on the aft and side decking is really just a form of procrastination: Doing something new, fun and interesting is so much better than prepping the bilges for paint.

The stern decking - a single piece of 6mm ply - took its shape rather handily after I flattened the transom and enough clamps. I'll add doublers where the mizzen mast goes through the deck and trim along the front edge.

Side decks are progressing, too. A flush trim bit in the router, the side of the hull and the carlins make quick work of cutting the decking to size.

I'm still contemplating the foredeck: How to bend the ply to the contour when there really isn't much to clamp it to. Since it has been done before by others, I just need to figure out what will work for me.

Sunday, May 1, 2016

Bow Remediation

A bit of remediation work on the bow today. Here's what the front end looked like:

The discrepancy between the king plank and the sheer line resulted from my long ago error in reading a dimension for BH-2.

I first thought I could fill in that discrepancy with a piece of wood and "fair" it into the king plank (creating sort of a wedge). That wasn't ever going to work as shown by straight edge along the king plank from the bow to BH-2. I needed another solution.

Yes, I removed the discrepancy (slowly, very slowly) which means I've changed the sheer ever so slightly. I will continue to fair the sheer to get it close and, what decking, trim and rub rails it should be fine.

The carlins got a bit of attention, too. Cutting (as needed) and sanding the frame faces flush with the carlins provides a nice supporting structure for the coamings.

Gardens as she sits this afternoon without the clutter of clamps.