The Boat Cave, inspired by the guys at the Eaton Rapids, MI, Scamp Camp, is a simple framed-in space around the boat with foil-faced insulation panels and a small propane heater (which has only been used once).
So, how is the Boat Cave working?
It is working quite nicely, thank you very much!
In previous years, cold weather brought an end to boat work by mid-November. This year it is the end of December and the boat work is going strong. When cold weather finally forces an end to boat work, my expectation is the Boat Cave will enable work to resume in early March (or sooner) instead of mid-April (as in previous years).
The Boat Cave works!
Wednesday, December 30, 2015
Sunday, December 27, 2015
A Ghost of Errors Past
Although I didn't know it at the time, I made an error in laying out BH-2 back in December, 2011.
Good Progress
That error wasn't discovered and "repaired" until September, 2012. (Jan helped me spot my error then, too.) Measure Twice Cut Once
However, the real consequence of that error and repair - bad geometry for the King Plank - was not realized until now.
Various views of the King Plank mock-up today:
I'll cut the notch in BH-2 deeper until the King Plank is supported at the stem, BH-1 and BH-2. Then, doublers on both faces of the frame and a filler in between should correct the previous errors and strengthen BH-2.
Of course, now I can only wonder what other ghosts of earlier errors/repairs will appear as work proceeds on Gardens.
That error wasn't discovered and "repaired" until September, 2012. (Jan helped me spot my error then, too.) Measure Twice Cut Once
However, the real consequence of that error and repair - bad geometry for the King Plank - was not realized until now.
Various views of the King Plank mock-up today:
- Overall view:

- At the bow - a pretty close fit to the stem and the top of the stringer/plank structure:

- In the existing notch in BH-2 (the real King Plank will terminate at BH-2):

- At BH-1:


I'll cut the notch in BH-2 deeper until the King Plank is supported at the stem, BH-1 and BH-2. Then, doublers on both faces of the frame and a filler in between should correct the previous errors and strengthen BH-2.
Of course, now I can only wonder what other ghosts of earlier errors/repairs will appear as work proceeds on Gardens.
Wednesday, December 23, 2015
A Bit of Remediation
Jan was in the Boat Cave a few days ago and commented that the starboard side of BH-2 looked higher than the port side. I've looked at that frame many times without making that observation - but today I compared the two sides.
I set a batten across on the backside of the frame, marked the batten every three inches and then measured the vertical distance to the top of the frame on each side.

The result? The starboard side was higher at each of the seven measuring points than the port side! Jan has good eyes!
I made a pattern of the port side, transferred the shape to the starboard side and will (carefully) use the angle grinder and ROS to correct the starboard side. (The black line on the port side of the frame is old and not germane to today's effort. The line on the starboard side is my target.)
Jan needs to visit the Boat Cave more often!
Sunday, December 20, 2015
Warmth (Relative but Workable)
The Boat Cave got its first real test yesterday. The outside temperature was 24F and the winds were 15-20 mph. It was cold walking out to the barn.
The temperature inside the Cave was 30F - which really was good to see: the insulation is keeping the winds/drafts out. I turned on the Halogen work light, fired up the Big Buddy propane heater and slid an insulation panel into the doorway (still haven't hung the door). Within 20 minutes the inside temperature was up to 40F, and after another 10 minutes the temperature was 50F where it stayed.
Now that's not exactly balmy but I did shed a layer and was able to work comfortably. I only ran the heater on the medium setting so there is more heating capacity. Once the door is properly hung and the gaps around the door are better sealed, I expect to have mid-50s to mid-60s to work in.
As for localized task heat, I can set up shop lights (1, 2 or 3) focused on a work area, shroud the area with black plastic to get 65-70F - plenty for curing epoxy. Here is the bow section with a single light generating 65F.


One issue with the propane heater is that on the medium setting, two 1-lb canisters are good for about 4 hours or so. I may decide to get a larger tank and connector hose. Other than that I am satisfied that the Boat Cave will let me work later into the winter and earlier next spring.
Friday, December 18, 2015
Not As Planned
So, things don't always work out the way they are planned…
The platform decking didn't get cut and fit this week. But all our Christmas shopping is done and packages are in the mail (to Cleveland, Chicago, Sacramento, Denver and Tanzania).
The bow section is still waiting for one last coat of epoxy and paint. But the Christmas tree is up and decorated and the outside lights have been installed (and work!).
The tiller mock-up hasn't been finished. But Christmas baking and cooking is well under way.
So, yeah, things don't always work out the way they are planned. But that is not always a bad thing.
Wednesday, December 16, 2015
X Marks A Spot
The sore throat is healing.
After supervising the electricians installing a dedicated circuit to the Boat Cave (I know next to nothing about electricity) and after getting almost the last Christmas package to the Post Office, I decided to figure out where the boomkin mount goes.
First, I had to make some adjustments to the 75mm x 45mm hole previously cut in the transom for the boomkin.

The opening needs some cleaning up and some epoxy/fiberglass treatment but I think the size is correct - at least it fits the boomkin I built.
The location on the starboard seat is marked with a blue-tape X.

If this exact location needs refinement, at least I know where to install the doubler.
So, here's the boomkin/mount held in place.

I need a shorter bolt. I also need to sand the boomkin just a bit to accommodate the two inside washers. But, those are pretty minor adjustments. Also, obviously, the cockpit seats have not been permanently installed.
Tomorrow: fitting the forward platform decking.
Sunday, December 13, 2015
Slow Days
Nice (enough) weather lately but I've been down with a sore throat (no other symptoms) since Thursday which means there has been no physical progress on Gardens.
I've been making lists of what needs doing, how to do those things and prioritizing the work. Seeing the progress on two other Pathfinders (in the Florida Keys and in Houston) is inspiring. Tomorrow should find me back in the Boat Cave and in the shop making sawdust and progress.
I've been making lists of what needs doing, how to do those things and prioritizing the work. Seeing the progress on two other Pathfinders (in the Florida Keys and in Houston) is inspiring. Tomorrow should find me back in the Boat Cave and in the shop making sawdust and progress.
Thursday, December 10, 2015
Tiller/Transom/Rudderhead
Working the mock-up for the heel of the tiller, I discovered the opening in the transom for the tiller isn't tall enough or wide enough.


Enlarging the opening in the transom is added to the "To Do" list.


Enlarging the opening in the transom is added to the "To Do" list.
Tuesday, December 8, 2015
Cool and Damp
Last week's mild and unseasonably warm weather has given way to cool and damp. Cool and damp enough to need a better heat source than just the halogen work lights.
My new Mr. Heater Big Buddy heater works well enough for me to work comfortably in the Boat Cave. Unfortunately, I don't have room in the Cave to lay out 4x8 sheets of plywood to cut out the platform decking. I set up 2x4s across sawhorses outside the barn last week.

Too damp yesterday and today for that, so I turned to other tasks needing work.
Necessary stuff but not as immediately gratifying as the cockpit seat.
My new Mr. Heater Big Buddy heater works well enough for me to work comfortably in the Boat Cave. Unfortunately, I don't have room in the Cave to lay out 4x8 sheets of plywood to cut out the platform decking. I set up 2x4s across sawhorses outside the barn last week.

Too damp yesterday and today for that, so I turned to other tasks needing work.
- Mocking up a tiller
- Adding a doubler for the access hatch in BH-1
- Getting a better fit for the king plank pattern
- Fitting and installing cleats to support the cockpit seats
- Cleaning up the debris from building the Cave
- Installing peg board and a shelf
Necessary stuff but not as immediately gratifying as the cockpit seat.
Sunday, December 6, 2015
Cockpit Seats - Part II
All three cockpit seat panels have been cut and fitted! The tick stick method works for me and I am now over my trepidation about cutting irregular shaped panels.

One lesson learned: Follow the build sequence (and tips) offered by the designer in the build instructions. John W describes fitting the seats and foreward platform decking before the planks are installed. At the time I was planking, this did not make sense to me. Now, it does. Before the planks are installed, one can cut the seats/decking oversize, run a batten along the frames, draw a line and cut out the shape. I'll do that for my next build.
Next up, the foreward platform panels.
Friday, December 4, 2015
Cockpit Seats
With much trepidation about fitting the cockpit seats and sleep platform decking, I've been looking for that 'perfect' method of transferring the curves of the hull to the plywood for the seats and deck. I decided on the tick stick method. I also decided to test it with a sheet of luan before risking a sheet of meranti plywood.
Using foam core for the spiling batten and a simple tick stick, I marked off the shape of the port-side cockpit seat.

Transferring the marks to the luan, the curve (matching the hull) looked WAY off…
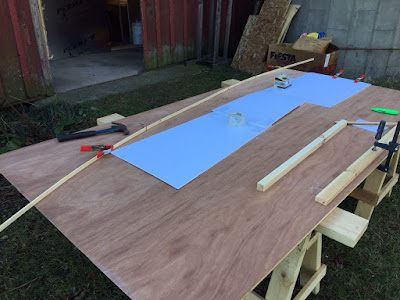
I measured, checked those measurements and remeasured. (Interestingly, to me, the while foam-core, reflecting the sky, looks blue in the photo.) Everything checked out so I cut the luan to shape. And… needing only minor tweaking, it fit! Cutting the meranti was, once I made the first cut, anti-climatic.

It fit, too.
This is a major hurdle for me. Yes, I only cut and fit one piece today - but now I know the method works. More importantly, I know I can do it! Tomorrow, the rest of the seats and decking!
Wednesday, December 2, 2015
King Plank Lamination
While I am using a piece of pine from a Big Box store as a template for the king plank, I have created a more suitable rather plank of CVG DF using board-widening technology - otherwise known as edge glued laminating. I didn't have a wide enough piece for what I needed but plenty of narrower stock.
Edge-glued lamination of three pieces of CVG DF to get the needed width:

Trimmed to width:

Sanded smooth:

Finished board:

The plank is now ready for fitting - but I am still working on the template. Installation of the king plank also has to wait for work on the bow section to be completed: That space is tight enough for painting, to say nothing of the impossibility of installing the anchor well floor if the king plank is installed first.
So now I'm working on the bow section: sanding first, gaps between BH-1 and the first plank filled, epoxy coating, paint, installation of the anchor well floor and whatever else needs doing.
Subscribe to:
Posts (Atom)